

I’ve been crocheting book covers for years, and I’m excited to show you how simple it really is.
This guide walks you through every step, from picking the right yarn to adding fun closures like buttons or bookmarks.
You’ll learn how to measure your books correctly, choose stitches that actually work, and avoid common mistakes that waste time. I’ve made plenty of errors myself, so I know what trips people up.
Whether making a cover for your journal or a gift for a friend, this article has you covered.
The best part? You don’t need fancy skills to start. Let’s make something you’ll actually use and love.
Let’s get started.
What Is a Crochet Book Cover & Why You’ll Love Using One
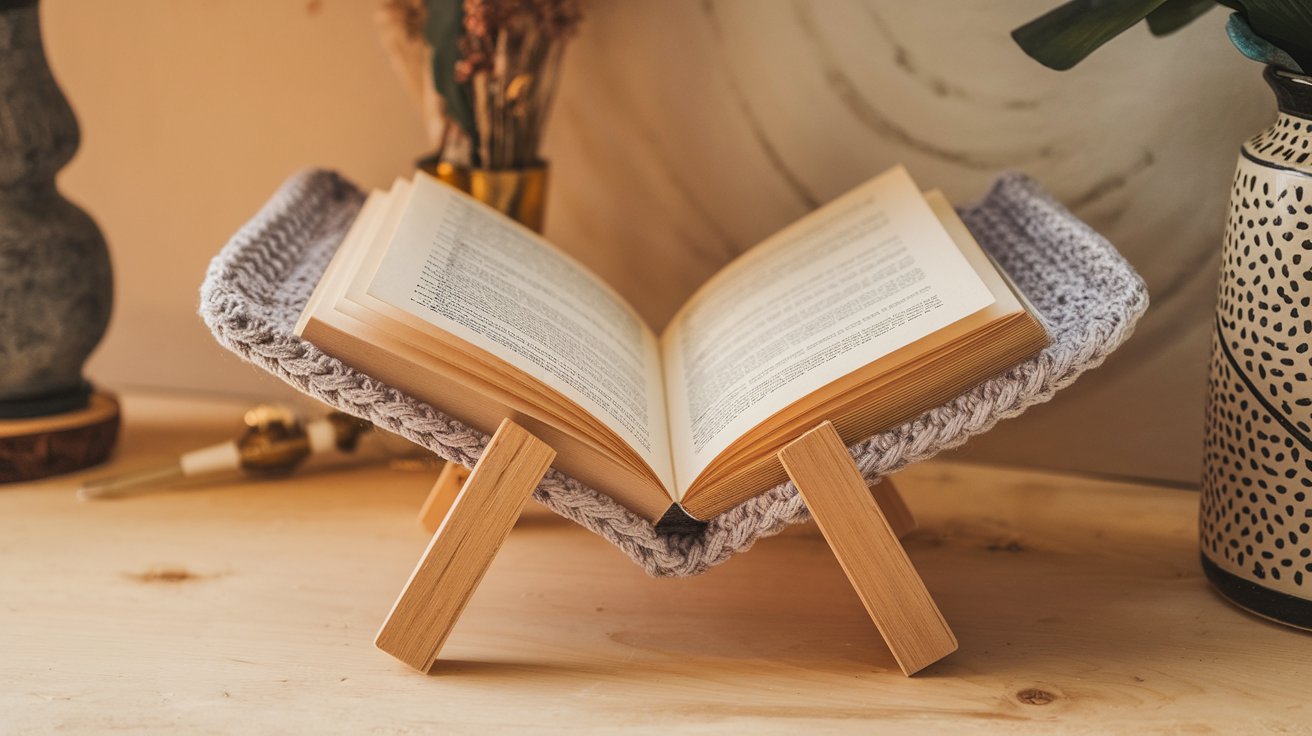
A crochet book cover is a fabric sleeve made with yarn that slides onto your book.
Think of it like a cozy sweater for your reading material.
These covers protect books from spills, scratches, and bent corners. I started making them after coffee destroyed a book I loved.
They add personality to plain books and make great gifts. You can customize colors, add pockets for bookmarks, and adjust them to fit different book sizes.
Best Yarn for Crochet Book Covers (What Works & What Doesn’t)
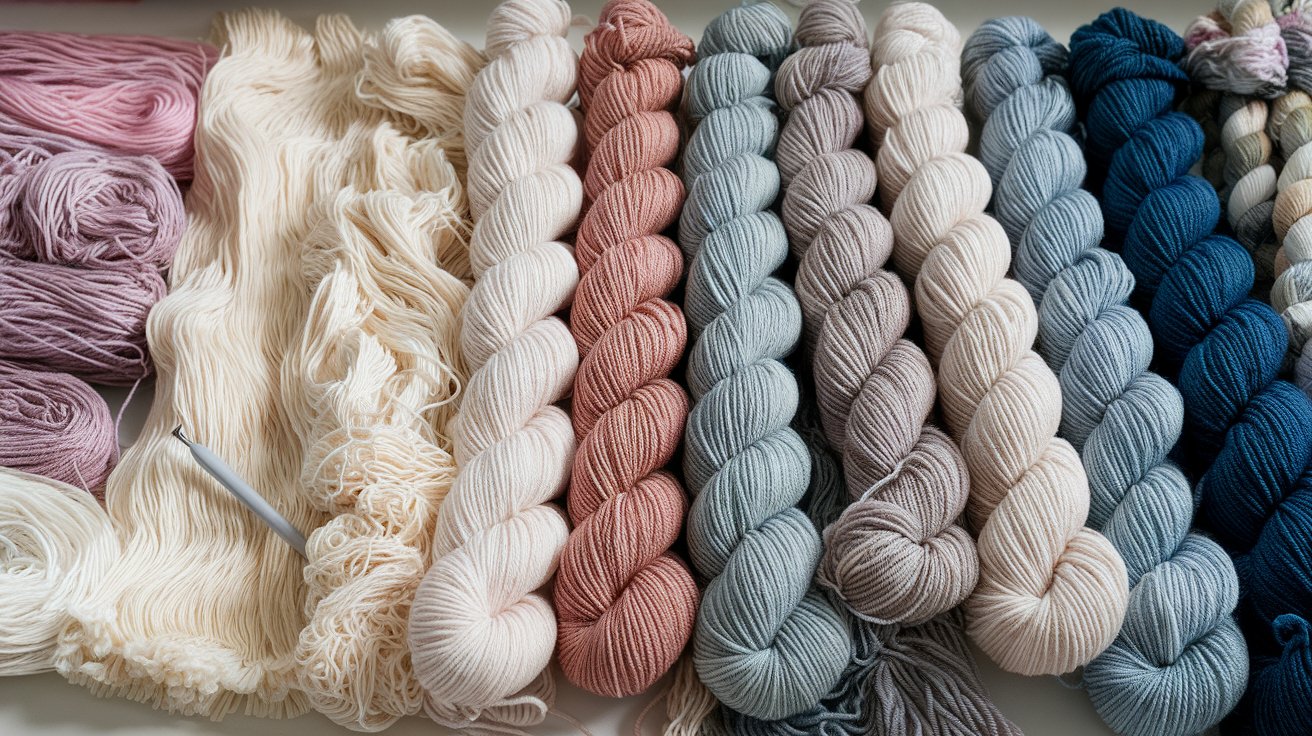
Choosing yarn matters more than you’d think. The wrong type makes your cover too stiff or too floppy. I learned this the hard way.
Soft vs Durable Yarn: Choosing the Right Balance
You want yarn that feels good but doesn’t fall apart.
Super soft yarn like some wool blends feels nice at first. But it pills quickly when you handle your book daily. On the flip side, rough yarn lasts forever but irritates your hands.
The sweet spot? Yarn that has some structure but isn’t scratchy. I test it by rubbing it against my wrist. If it feels comfortable there, it’ll work.
Durability matters because books get opened and closed constantly. Your cover needs to handle that friction.
Look for yarn labeled as machine washable. That usually means it can take some wear.
Cotton, Acrylic, or Blended Yarn – Which Is Best?
Cotton is my go-to choice. It’s breathable, strong, and gets softer with washing. It doesn’t stretch out of shape like some yarns do. Your cover stays the right size.
Cotton also looks clean and professional. The stitches show up nicely without being fuzzy.
Acrylic works well too, especially if you’re on a budget. It comes in tons of colors and holds up fine.
The downside? It can feel a bit plastic-y in your hands. Some people don’t mind this at all.
Blended yarns give you the best of both worlds. Cotton-acrylic blends are affordable and comfortable.
I avoid pure wool for book covers. It’s too warm and you can feel it if you wash it wrong.
Yarn Weight Guide for Neat, Non-Bulky Covers
Yarn weight changes everything about how your cover looks and fits.
Bulky yarn makes thick, chunky covers. They look cozy but add too much weight to your book. I stick with light worsted or DK weight yarn. These create covers that fit snugly without bulk.
Sport weight works too if you want something really sleek. It takes longer to crochet though.
The rule I follow: if the cover makes your book hard to hold comfortably, the yarn is too thick.
Think about where you’ll use the book. A journal you carry daily needs a thinner cover than a coffee table book.
Thinner yarn also shows stitch patterns better if you want to add texture.
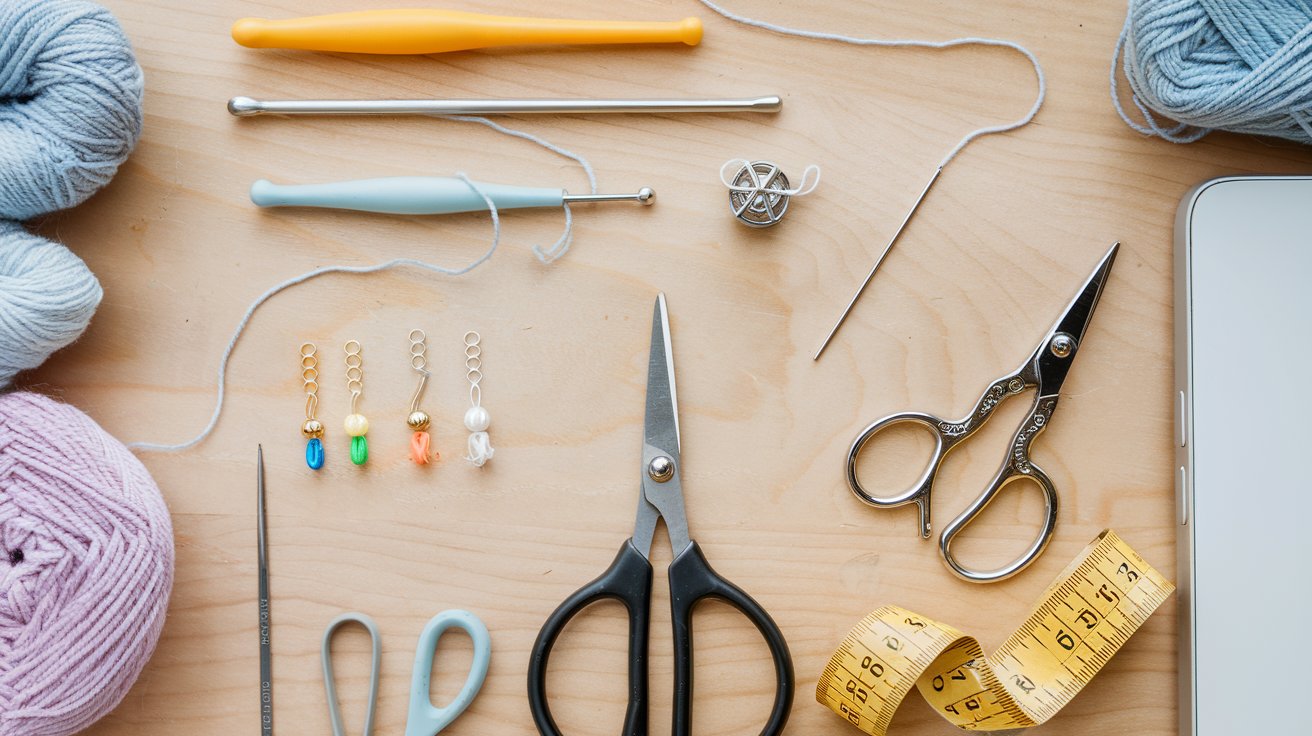
Crochet Hook Size & Tools You’ll Need
The right tools make this project so much easier.
Recommended Hook Sizes for Book Covers
- 5mm (H-8) hook for worsted weight yarn
- 4mm (G-6) hook for DK weight yarn
- 3.5mm (E-4) hook for sport weight yarn
Match your hook size to your yarn weight. Check the yarn label for guidance. Test your tension with a small swatch first.
Extra Tools That Make Your Cover Look Professional
Here’s what I keep in my crochet kit:
- Tape measure for accurate measurements
- Sharp scissors for clean cuts
- Yarn needle for weaving in ends
- Stitch markers or safety pins to track rows
- Buttons, snaps, or elastic for closures
These basic tools help you create professional-looking covers without much fuss.
How to Measure a Book for a Perfect-Fit Crochet Cover
Getting measurements right prevents do-overs. I measure twice before starting.
Measuring Width, Height & Spine Correctly
Open your book and lay it flat with the cover facing up.
Measure the full width from the left edge to the right edge. Write this number down. Now measure the height from top to bottom. Include any raised areas on the spine.
Measure the spine thickness separately. This number determines how much ease you need. Add half an inch to the width and height for comfort. Books need room to breathe.
If you skip this extra space, your cover will be too tight to get on and off.
Adjusting Patterns for Thick or Thin Books
Thick books need longer foundation chains. Thin books need fewer stitches.
The spine measurement tells you how much to adjust. For every inch of spine thickness, add about 10-12 stitches to your foundation chain. This isn’t exact science.
Make a gauge swatch first. Measure how many stitches equal one inch in your pattern. Use that number to calculate adjustments. Math makes this precise.
One Pattern, Multiple Book Sizes (Smart Sizing Tips)
I use the same basic pattern for all my books. I just changed the starting chain length. Work the pattern until the cover reaches your book’s height measurement.
Try it on your book as you go. This catches sizing problems early.
The flaps that fold inside the covers should be about 3-4 inches wide. Adjust your total width to account for this.
Best Stitches for Crochet Book Covers (Beginner-Friendly)
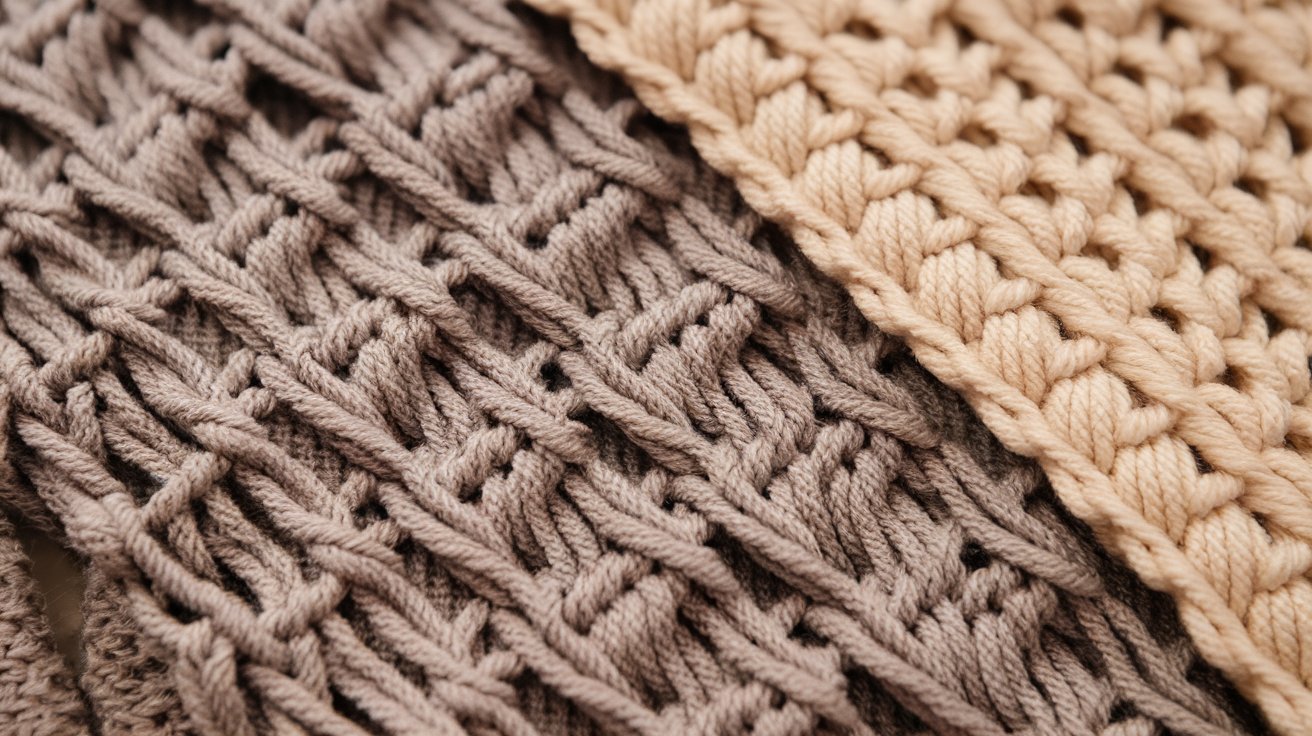
Stitch choice affects both looks and function.
Single Crochet – Clean & Protective
A single crochet is my favorite for book covers. It creates a tight, dense fabric. This stitch protects books really well. Nothing gets through those tight loops.
It’s also the easiest stitch for beginners. You can learn it in five minutes. The fabric doesn’t curl at the edges like some stitches do. Your cover stays flat.
A single crochet takes longer than other stitches because it’s short. But the result is worth it.
Half Double Crochet – Fast & Flexible
Half double crochet works up faster than single crochet. It creates a slightly looser fabric with more drape. This works well for covers that need flexibility.
I use this stitch when I’m in a hurry or want a softer feel. The trade-off is less protection. The fabric has tiny gaps between stitches.
Still perfectly fine for journals and notebooks that don’t face rough handling.
Textured Stitches for Decorative Covers
Once you’re comfortable with basics, try textured stitches.
The moss stitch creates a bumpy texture that feels nice. It’s just alternating single crochet and chain stitches.
The shell stitch makes a pretty scalloped pattern. Good for gifts. Ribbing adds stretch and looks professional. Work in back loops only for this effect.
I save fancy stitches for special books. Daily-use covers work better with simple stitches.
Easy Crochet Book Cover Pattern (Step-by-Step Overview)
Here’s my basic pattern that works for any book size.
Start with a foundation chain that equals your book’s width plus two flap widths. Add the spine measurement too.
Row 1: Single crochet in the second chain from the hook. Continue across the entire chain.
Row 2 and beyond: Chain 1, turn. Single crochet in each stitch across.
Keep working rows until the piece matches your book’s height. Don’t fasten off yet. Fold the sides in to create flaps that tuck inside the book covers.
Try the cover on your book. It should slide on snugly but not too tight. If it fits, fasten off and weave in the ends. If not, add or remove a few rows.
That’s it. Seriously. The pattern is that simple.
Crochet Book Cover Designs & Style Ideas
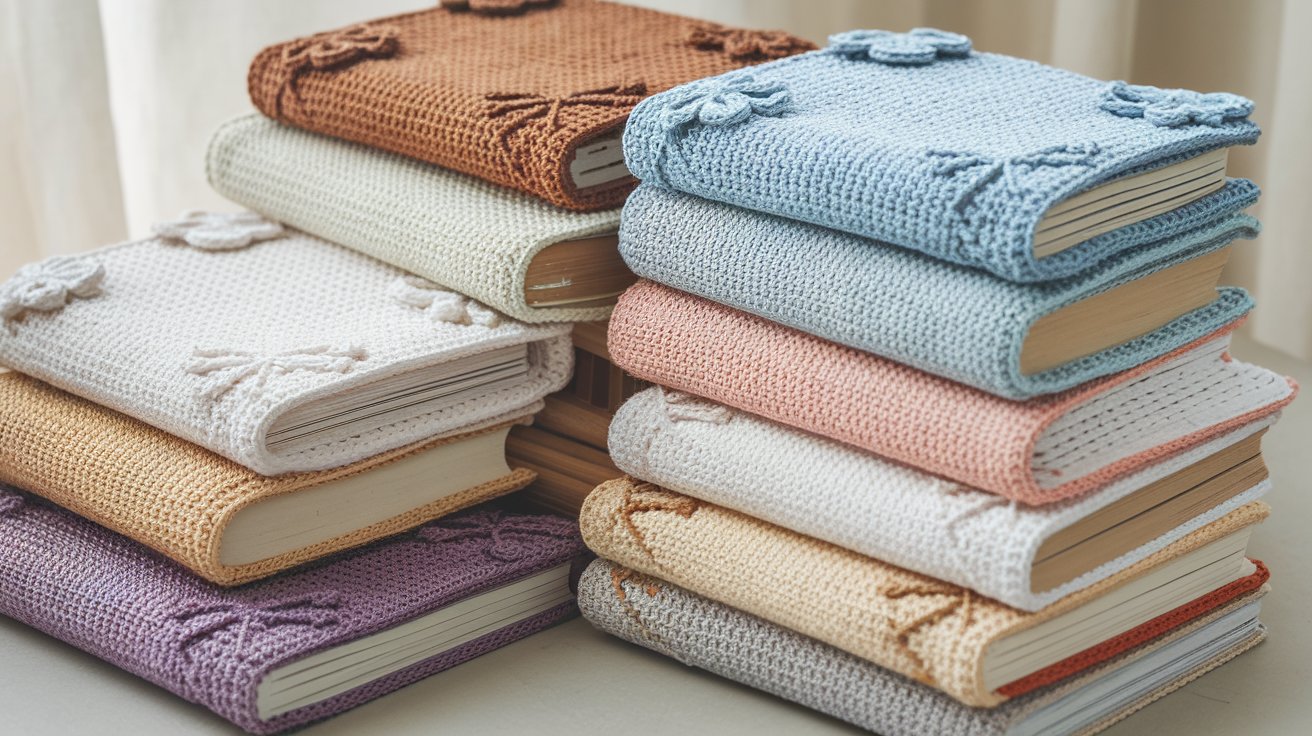
Plain covers work fine, but adding personality makes them special.
Minimalist Covers for Everyday Use
Solid colors in neutral tones look clean and professional. Gray, beige, black, or cream go with everything. They don’t distract from your reading.
I keep the design simple with just a single crochet throughout. No texture, no fuss. These covers age well. They don’t look dated or trendy.
Crochet Book Covers for Gifts
For gifts, I add color and detail.
Stripes are easy but look intentional. Change colors every few rows. Add a contrasting border around the edges. This frames the cover nicely.
Attach a crocheted flower or applique to one corner. Small details make big impressions. Match the colors to the recipient’s style. This shows you put thought into it.
Cozy Covers for Journals & Planners
Journals get used constantly, so make them comfortable to hold. Warmer colors feel inviting. Think rust, burgundy, forest green, or mustard.
Add a pen holder loop on the side. Just chain a few stitches and attach securely. Consider a bookmark ribbon sewn into the spine area. Super practical.
How to Add Closures, Buttons & Pockets
Closures keep your cover secure and add function.
Button & Loop Closures
- This is my favorite closure method.
- Make a small loop with chain stitches on one side of the cover. Attach it firmly.
- Sew a button on the opposite side. Test that the loop fits over the button.
- This keeps the cover closed in your bag without zippers or snaps.
- Pick buttons that match or contrast with your yarn color.
Elastic & Tie Closures
- Elastic bands work like those journal bands you see in stores.
- Sew elastic to the back of the cover so it wraps around the book.
- For ties, crochet two long chains. Attach one to each side of the cover.
- Wrap them around the book and tie in a bow. It looks handmade in the best way.
Adding a Bookmark or Pen Holder
- Bookmarks are incredibly easy to add.
- Cut a piece of ribbon longer than your book’s height. Sew it to the inside top of the spine area.
- For pen holders, crochet a small tube or rectangle. Attach it to the cover’s side or front.
- Make sure the holder is tight enough to keep the pen in place.
Common Crochet Book Cover Mistakes (And How to Avoid Them)
I’ve made all these mistakes. Learn from my failures.
- Making it too tight is the biggest problem. Your cover should slide on easily.
Solution: Add that extra half inch to your measurements. Really. - Using yarn that’s too thick makes bulky covers. They add too much weight to your book.
Solution: Stick with worsted weight or thinner. - Not checking gauge leads to sizing disasters. Different people crochet at different tensions.
Solution: Make a test swatch and measure it. Adjust your hook size if needed. - Forgetting to weave in the end looks sloppy. Loose yarn ends ruin an otherwise nice cover.
Solution: Use a yarn needle and take five extra minutes to finish properly. - Choosing yarn that stretches out destroys the fit over time.
Solution: Test your yarn by pulling it. If it bounces back slowly, pick something else.
Crochet Book Covers for Beginners vs Advanced Crocheters
Your skill level determines what you can tackle comfortably.
| Aspect | Beginner Level | Advanced Level |
|---|---|---|
| Stitch Type | Plain rectangle in single crochet | Surface crochet for added designs |
| Color Work | One solid color throughout | Tapestry crochet with complex patterns |
| Yarn Choice | Light-colored yarn to see stitches | Intarsia for blocks of color |
| Book Size | Medium-sized book for practice | Any size with custom adjustments |
| Closures | No closures or simple button loop | Crocheted appliques and 3D elements |
| Design | Basic measurements and fitting | Custom color gradients and ombre effects |
Start with simple projects that build your confidence. Once you’ve made a few basic covers, the advanced techniques become much easier to try.
Can You Sell Crochet Book Covers? (Legal & Pricing Tips)
Yes, you can sell them. I know several people who do.
Check if your pattern is copyright-free first. Some designers don’t allow selling finished items. If you create your own pattern, you’re free to sell whatever you make.
Price based on materials plus your time. Don’t undersell your work. Calculate yarn cost per cover. Add the cost of any buttons or closures.
Then decide what your time is worth. A simple cover takes 2-3 hours.
I charge $25-35 for basic covers and $40-50 for complex ones. Custom orders with specific colors or designs cost more.
Selling locally at craft fairs works well. People like seeing and touching them first. Online platforms like Etsy reach more customers. Good photos matter there.
Be clear about book sizes you can accommodate. Offer custom sizing for a higher price.
Crochet Book Cover Care & Washing Tips
Proper care keeps your covers looking new.
- Hand washing is safest for most covers. Use cool water and mild soap.
- Gently squeeze the water through. Don’t wring or twist the fabric.
- If your yarn is labeled machine washable, use a delicate cycle in a mesh bag.
- Air dry flat on a towel. Never put crochet in the dryer unless you want it shrunk.
- Reshape the cover while it’s damp if needed. It’ll dry in that position.
- Cotton covers can be steam blocked if they get misshapen. Hold a steamer above the fabric.
- Keep them away from direct sunlight to prevent color fading.
Conclusion
Making a crochet book cover is easier than most people think.
You’ve got all the information you need now, from measuring your book to picking the right yarn. I’ve shown you the stitches that work best and how to avoid mistakes that waste time.
Try different colors, add closures, or experiment with textured stitches. The best part about this project is how practical it is.
You’re not making something that sits on a shelf. You’re creating protection for books you actually use and love. Now grab your hook and yarn and start crocheting.
Frequently Asked Questions
How long does it take to crochet a book cover?
A basic cover takes about 2-3 hours for most people. If you’re new to crochet, plan for 4-5 hours. Complex patterns with texture or colorwork can take 6-8 hours.
Can I use the same pattern for hardcover and paperback books?
Yes, but you’ll need to adjust measurements. Hardcover books are usually thicker and taller than paperbacks. Measure each book separately and modify your foundation chain accordingly.
What’s the best way to keep a book cover from stretching out?
Choose yarn with minimal stretch like cotton or cotton blends. Crochet with tight tension and wash in cool water. Avoid hanging your cover when storing it.
Do I need to know advanced crochet skills to make a book cover?
No, basic single crochet is enough for a functional cover. If you can chain and single crochet, you can make this project. Fancy techniques are optional extras.
How do I price handmade book covers if I want to sell them?
Add your yarn cost plus closure materials, then calculate your hourly rate times hours worked. Most crafters charge $25-50 depending on complexity. Custom orders and larger sizes cost more.