

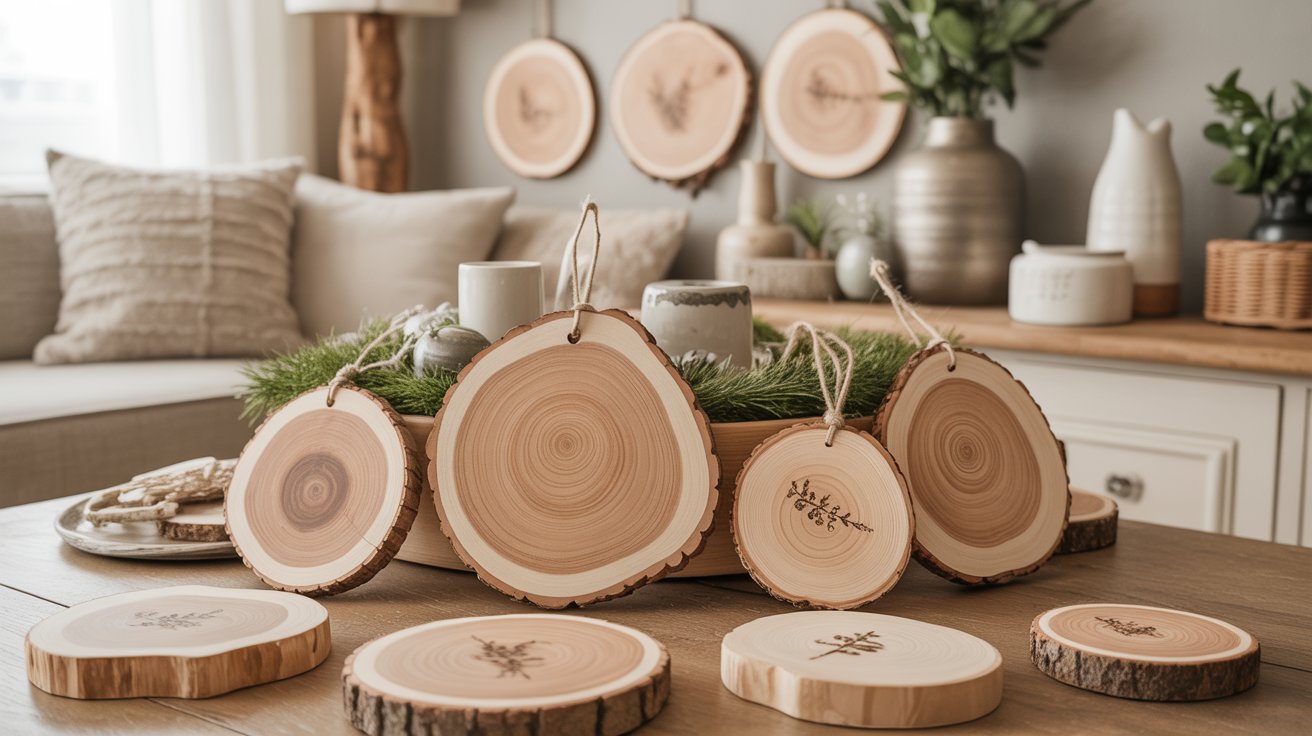
Wood slice ornaments bring natural warmth and rustic appeal to any home space.
These simple yet beautiful decorations have become increasingly popular in farmhouse and country-style interiors, offering an affordable way to add organic texture and visual interest to your rooms.
Their versatility makes them perfect for year-round display, from holiday decorations to everyday accents.
These charming pieces work wonderfully as wall art, table centerpieces, or hanging decorations.
They complement both modern and traditional design styles while bringing a touch of nature indoors.
In this post, you’ll find 13 creative ideas to transform ordinary wood slices into stunning decorative pieces that reflect your personal style and enhance your home’s vibing appeal.
Why Wood Slice Ornaments Are Perfect for Home Decor
Wood slice ornaments bring natural texture into any space. I love how they work with rustic, farmhouse, boho, and even modern styles.
Each slice has a different grain pattern. No two ornaments look the same, which makes every project feel personal and special.
They’re also budget-friendly. You can find wood slices at craft stores or cut your own from fallen branches.
Easy to customize for any season or holiday. Paint them, burn designs into them, or leave them natural. They work year-round or just for special occasions.
List of Creative Wood Slice Ornament Ideas
Explore 13 inspiring wood slice ornament projects. From painted designs to rustic accents – find the perfect DIY idea for your home.
1. Hand-Painted Holiday Ornaments

Convert plain wood slices into festive masterpieces with hand-painted holiday designs. Create charming snowflakes, Christmas trees, reindeer, and heartwarming holiday messages that capture the spirit of the season.
Materials You’ll Need:
- High-quality acrylic paints in festive colors
- Fine-tip brushes for detailed work
- Clear protective sealant for durability
Start with a base coat if desired, then add your chosen motifs using steady brush strokes. Allow each layer to dry completely before adding details or applying the final protective coating.
2. Photo Transfer Ornaments
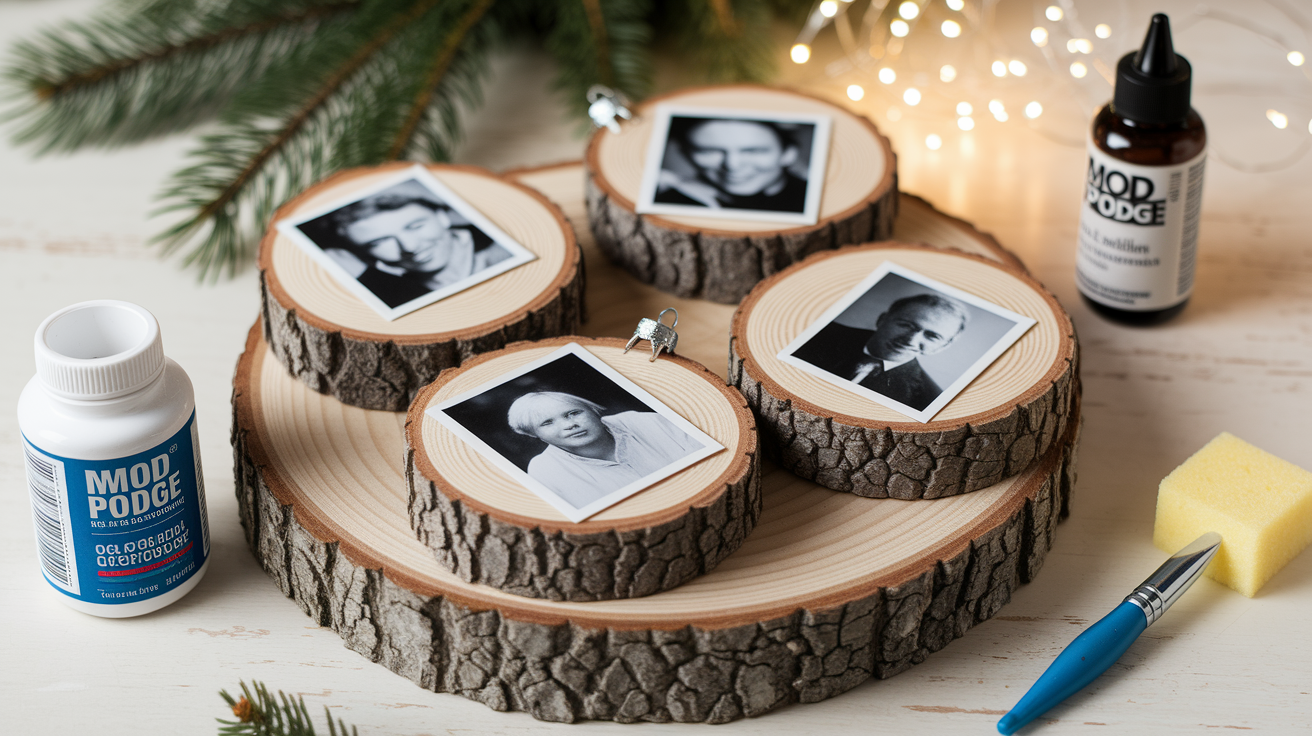
Create meaningful keepsakes by transferring cherished family photos onto wood slices. These personalized ornaments make wonderful Christmas decorations or thoughtful gifts for loved ones.
The Transfer Process: Apply Mod Podge or gel medium to both the photo and wood surface. Press firmly and smooth out air bubbles, then allow to cure according to product instructions. The result is a lasting memory preserved in natural wood.
3. Nature-Inspired Botanical Designs
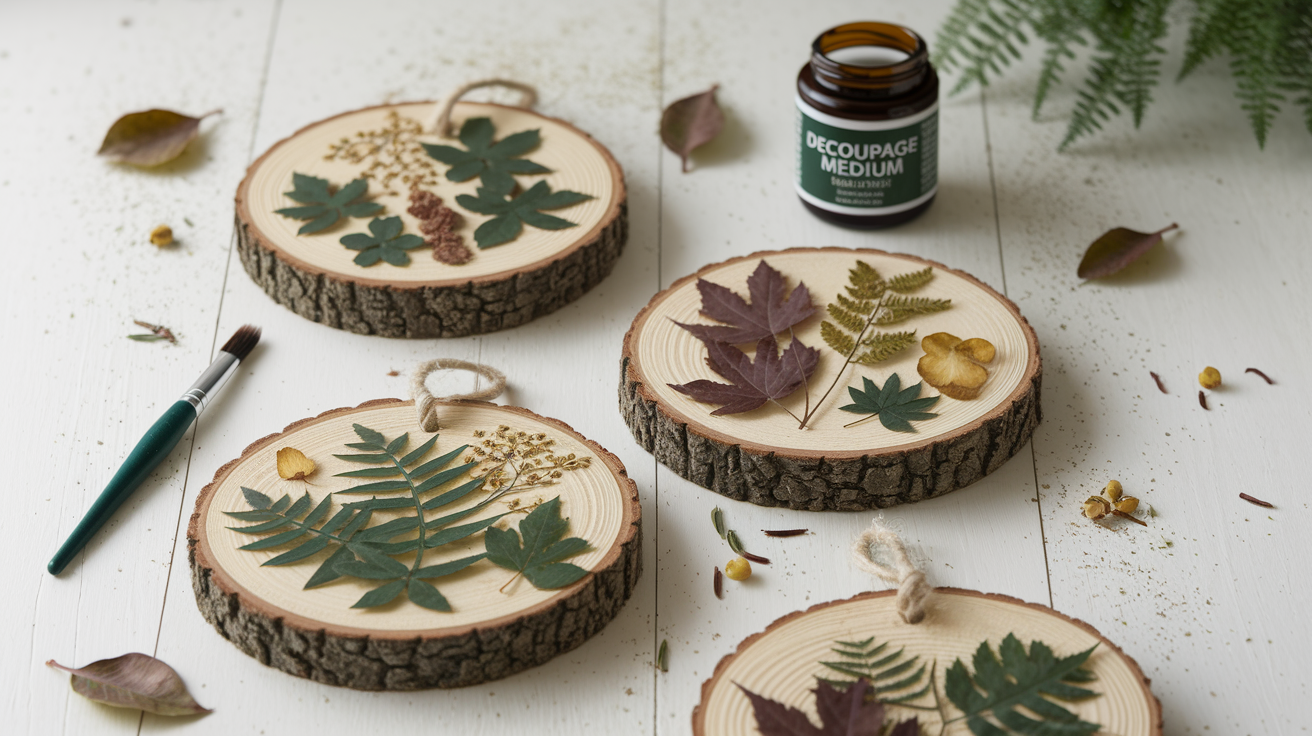
Bring the outdoors inside with pressed leaf and flower decorations. Collect ferns, small flowers, and interesting leaves, then press them flat before securing with decoupage medium.
Color Palette Tips: Choose earthy tones like forest greens, warm browns, and golden yellows to complement the natural wood grain and create a cohesive organic look.
4. Chalkboard Quote Ornaments

Apply chalkboard paint to wood slices for reusable message boards. Write inspirational quotes, family names, or seasonal greetings that can be changed throughout the year.
Making Them Functional: Use chalk markers for crisp, clean lines that won’t smudge. These work wonderfully as place cards for dinner parties or daily motivation reminders around your home.
5. Pyrography (Wood Burning) Ornaments
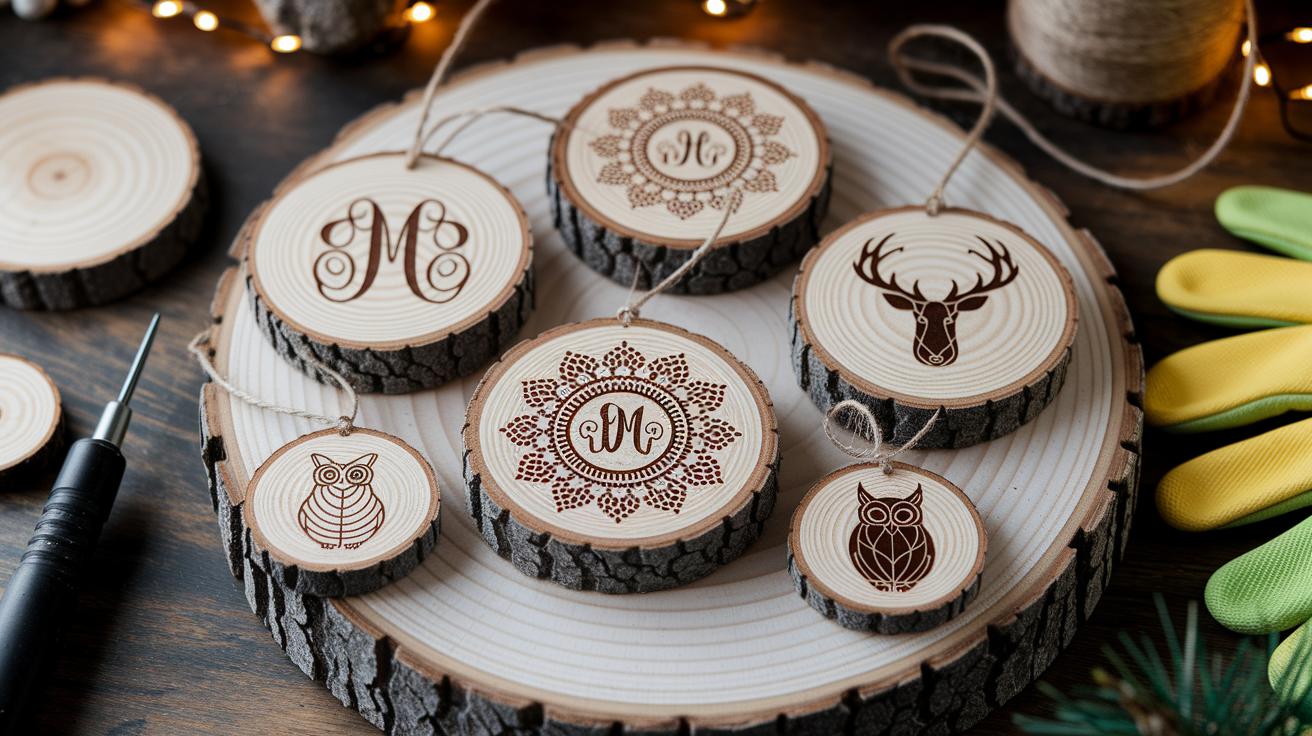
Wood burning creates stunning rustic designs with lasting appeal. Try monograms, intricate mandalas, or woodland animal silhouettes for a professional-looking finish.
Safety First: Always work in a well-ventilated area and start with simple designs. Practice on scrap wood before working on your final pieces, and keep a steady hand for clean, consistent lines.
6. Glitter & Glam Wood Slices
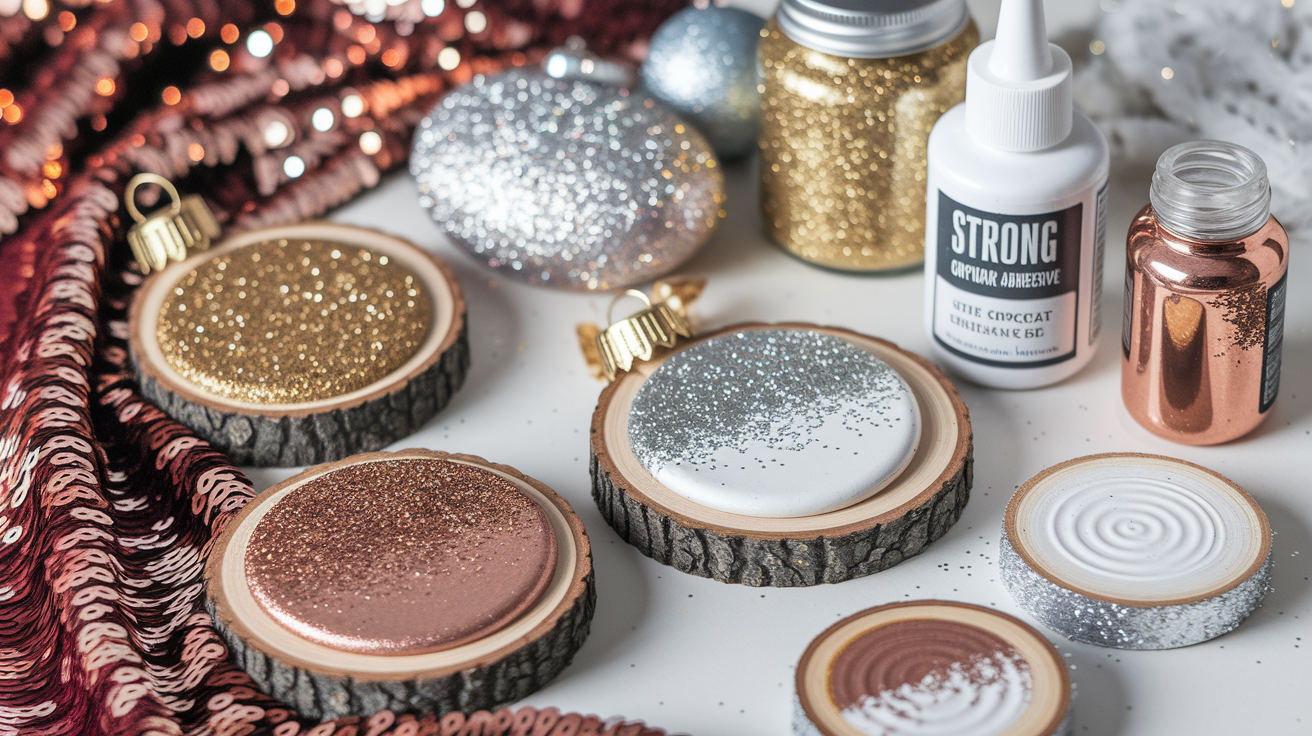
Add sparkle and shine with metallic accents and glitter applications. These eye-catching pieces work beautifully for festive occasions or glamorous home decor themes.
Application Tips: Use strong adhesive designed for crafts, and seal glitter with clear topcoat to prevent shedding. Apply in thin, even layers for the best coverage and longevity.
7. Mini Calendar Ornaments
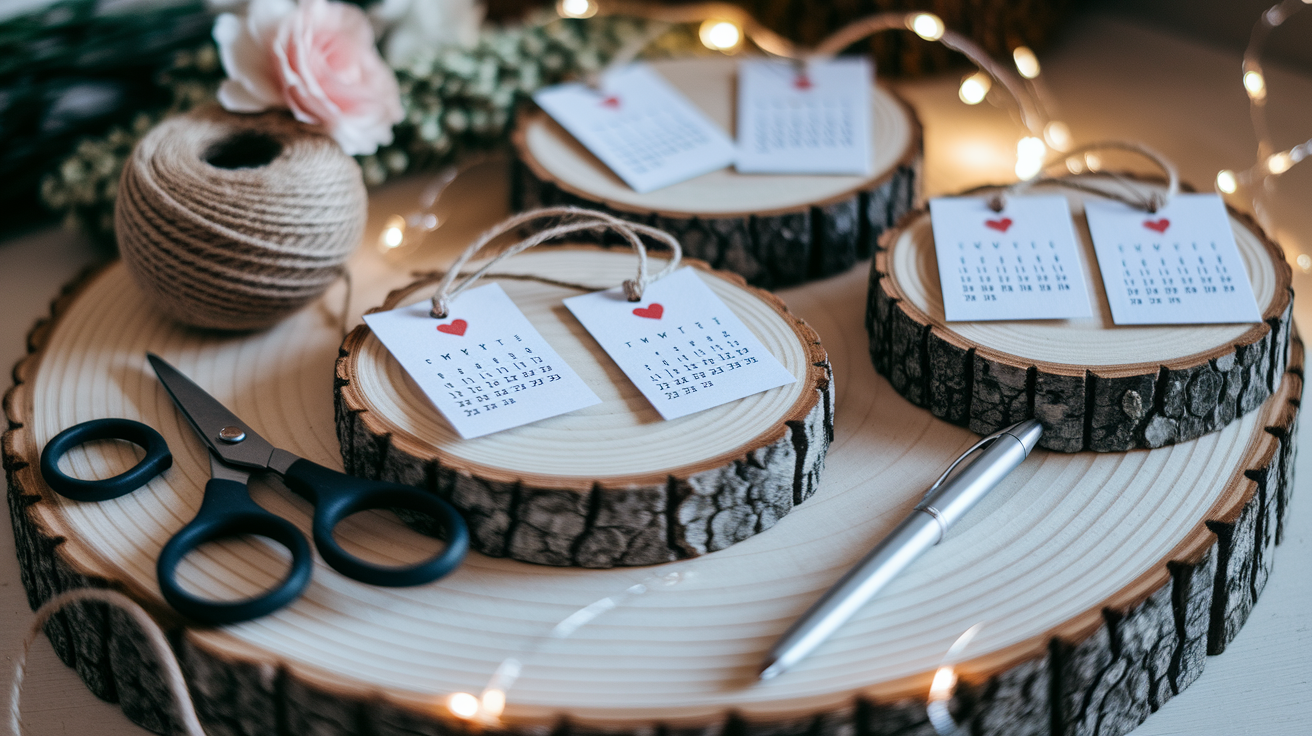
Mark important dates like anniversaries, birthdays, or special milestones with custom calendar ornaments. Print small calendar pages and attach them to wood slices with significant dates highlighted.
These make thoughtful wedding or anniversary gifts that commemorate special moments in a unique, displayable format.
8. Resin-Coated Wood Slices
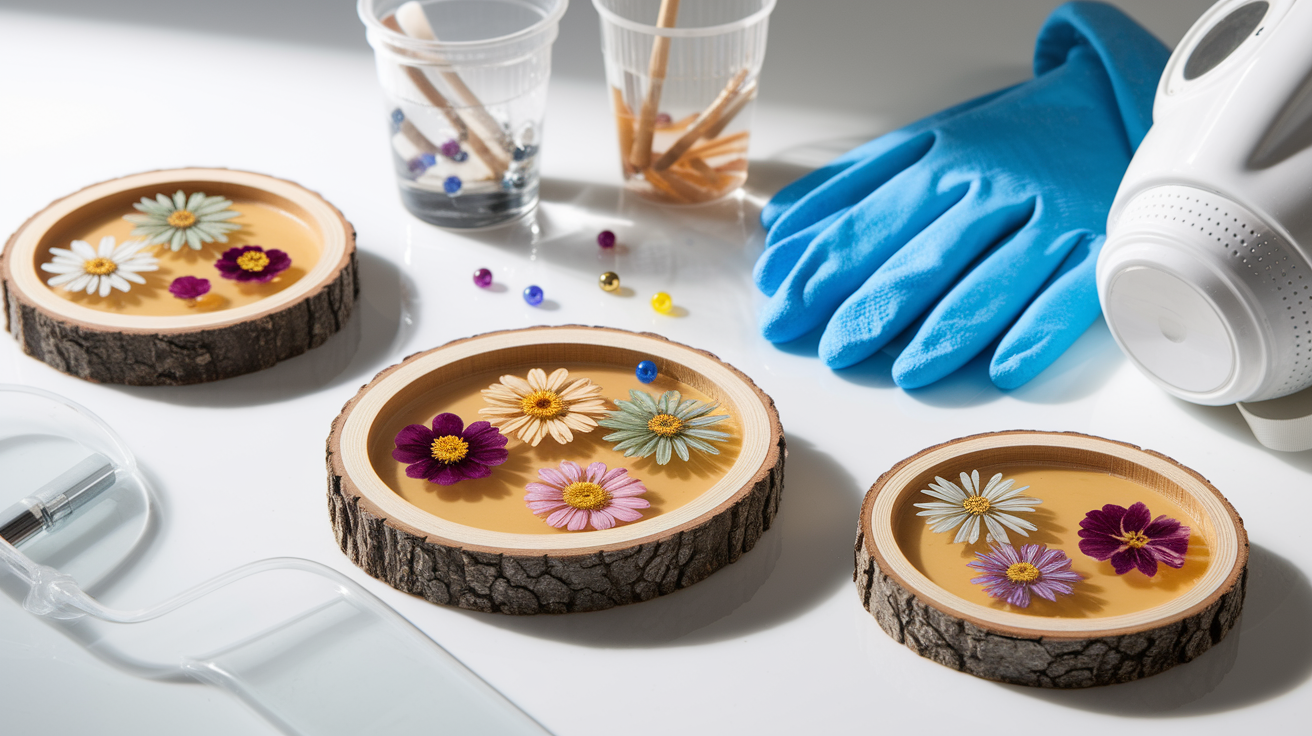
Create glossy, professional-looking ornaments by embedding objects in clear resin. Press flowers, colorful beads, or metallic elements become suspended in crystal-clear finish.
Safety Considerations: Work in a ventilated space and follow all manufacturer guidelines. Mix resin components carefully and allow full curing time for best results.
9. Fabric or Lace-Covered Ornaments
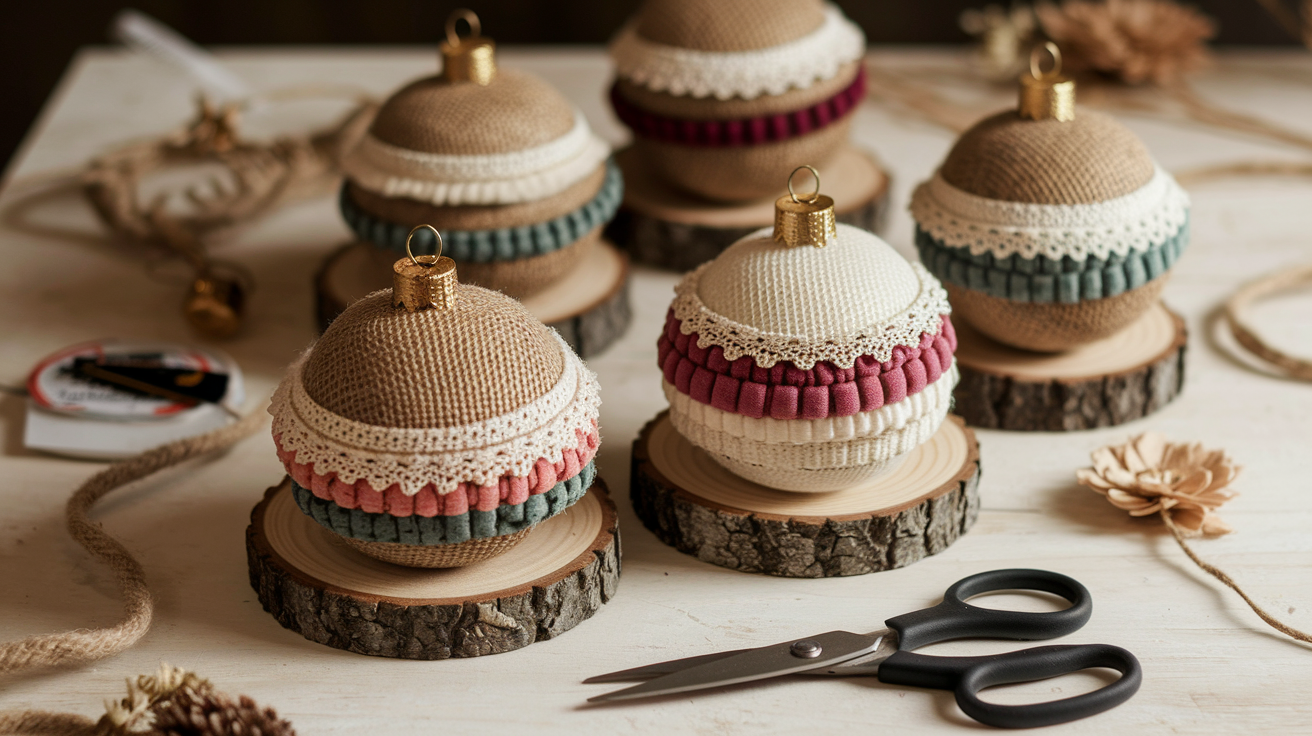
Soft textures like burlap, vintage lace, or patterned fabric add warmth and visual interest. These materials complement rustic decor while introducing color and pattern.
Securing Methods: Use fabric glue or Mod Podge to attach materials smoothly. Trim excess fabric carefully and seal edges to prevent fraying over time.
10. Decoupage Themed Art Ornaments
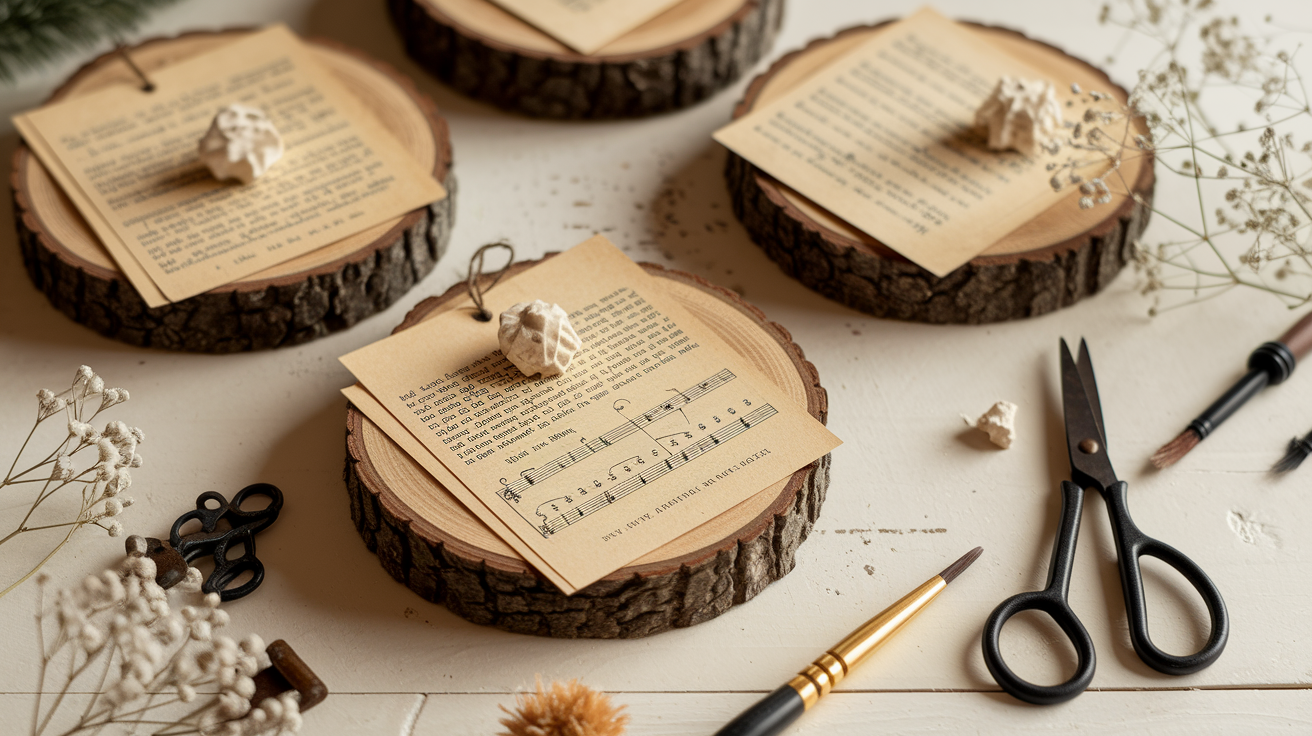
Repurpose old book pages, vintage sheet music, or decorative paper for literary or musical themed ornaments. This technique works especially well for themed room decor.
Simple Technique: Apply decoupage medium to the wood surface, position your paper carefully, then seal with additional medium. Work out air bubbles gently for a smooth finish.
11. Animal Silhouette Ornaments
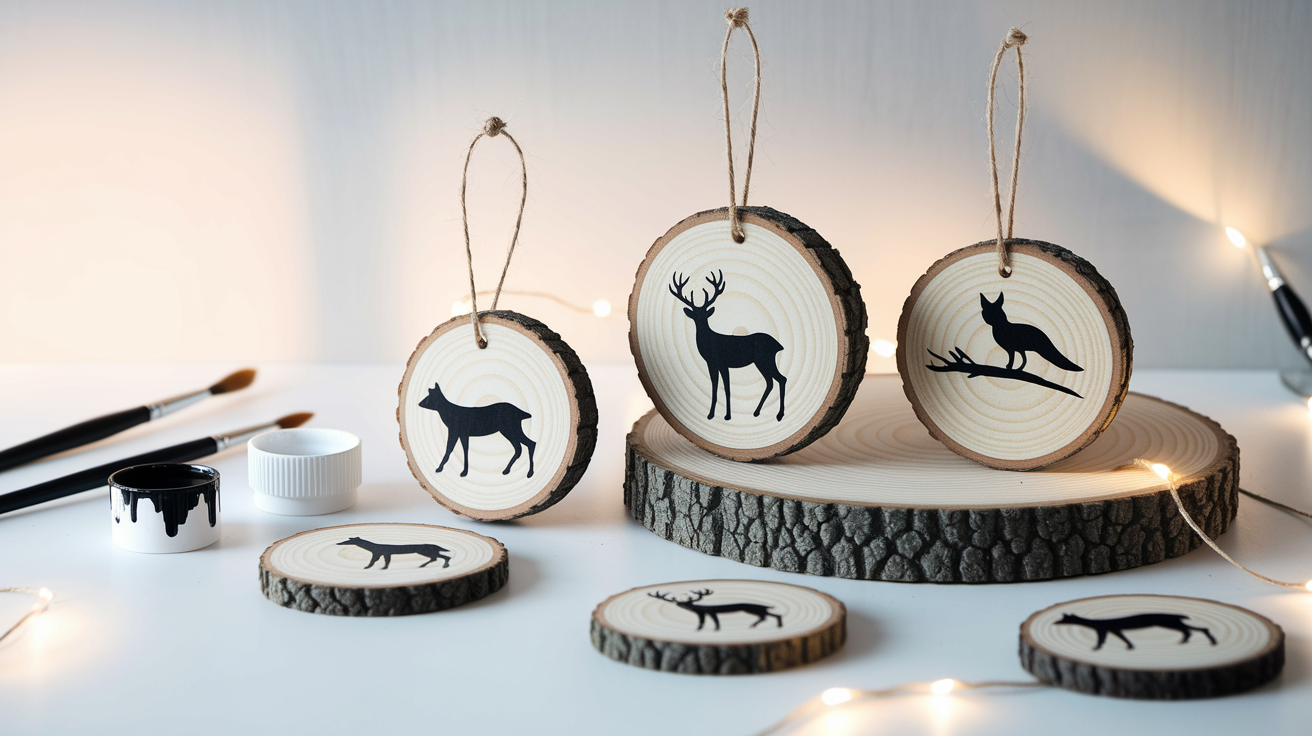
Create clean, modern designs with animal silhouettes. Deer, birds, foxes, and other woodland creatures work beautifully in minimalist or contemporary settings.
Use stencils for precision or try freehand painting for a more organic, artistic approach. Black paint on natural wood creates striking contrast.
12. Painted Galaxy or Night Sky Ornaments
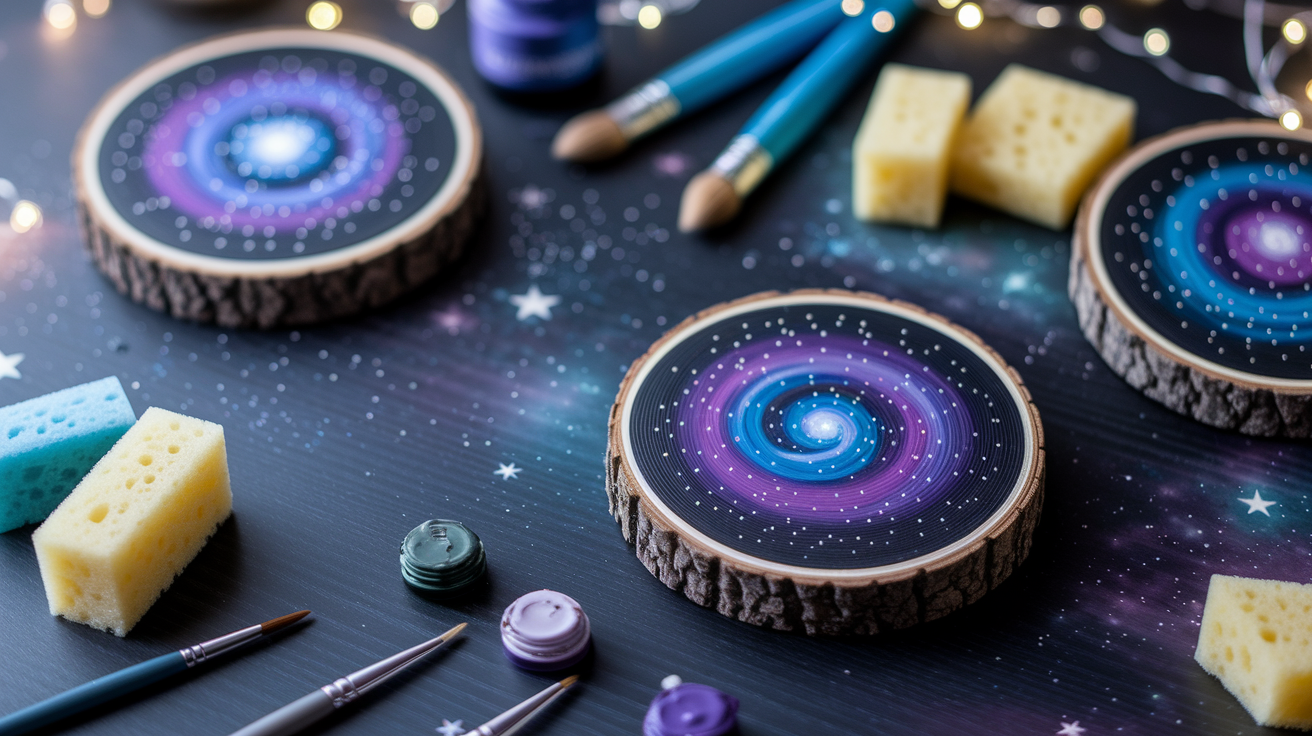
Turn wood slices into cosmic canvases with galaxy-inspired paint techniques. Blend deep purples, blues, and blacks, then add white dots for stars.
Blending Success: Work quickly while paint is wet, using sponges or soft brushes to create smooth color transitions. Add metallic accents for extra celestial sparkle.
13. Herb & Spice Infused Slices
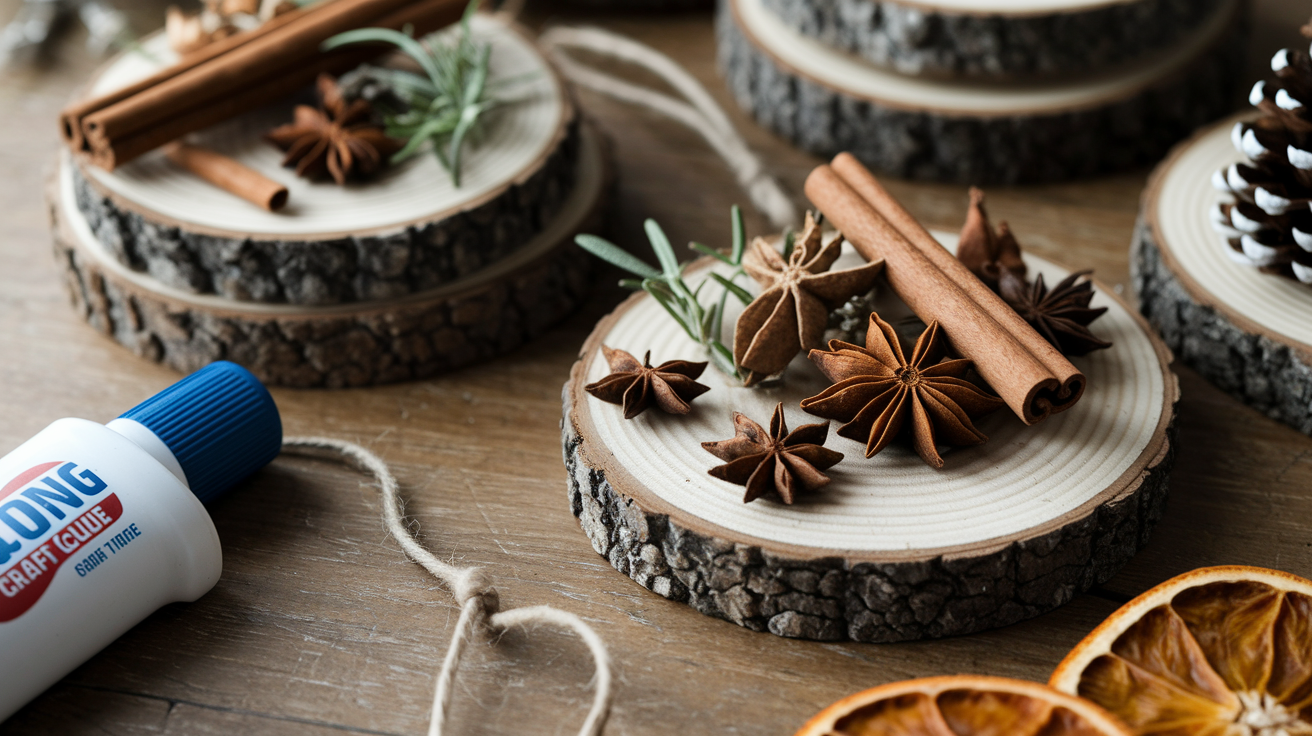
Combine visual appeal with natural fragrance by incorporating aromatic elements. Attach cinnamon sticks, star anise, dried rosemary, or other fragrant materials.
Preservation Methods: Secure items with strong craft glue and consider light protective coating to maintain scent and appearance. These work wonderfully in kitchens or dining areas where natural aromas are welcomed.
Tips for Making Long-Lasting Wood Slice Ornaments
- Always seal your wood slices before and after decorating. This prevents cracking and keeps moisture from ruining your hard work.
- Sand the edges lightly for a smooth finish. Rough edges can snag or splinter, so a quick pass with sandpaper makes a big difference.
- Use lightweight hanging hardware to avoid splitting the wood. Heavy hooks or thick wire can crack thinner slices over time.
- Let everything dry completely between steps. Rushing the drying process leads to smudged paint and weak adhesion.
- Store seasonal ornaments in a cool, dry place when not in use. Humidity and heat can warp wood, so keep it protected until next year.
Conclusion
Wood slice ornaments offer incredible flexibility for home decoration, adapting to any style from rustic farmhouse to modern minimalist.
These 13 creative ideas demonstrate how simple natural materials can transform into personalized art pieces that reflect your unique taste and seasonal preferences.
We encourage you to experiment with different techniques and combine multiple approaches for truly original creations.
Start with one or two methods that appeal to you most, then expand your skills as you gain confidence with the materials and processes.
Have you tried any of these wood slice ornament projects? We’d love to see your finished creations and hear about your experiences.
Share your photos and tips in the comments below to inspire other crafters in our community.
Frequently Asked Questions
What type of wood works best for making ornaments?
Hardwoods like oak, maple, and birch create the most durable ornaments with attractive grain patterns. Softwoods like pine are easier to work with but may be less stable for long-term display.
How do I prevent wood slices from cracking over time?
Apply a wood conditioner or sealant before decorating to minimize moisture changes that cause splitting. Store finished ornaments in stable temperature and humidity conditions away from direct heat sources.
Can these ornaments be used outdoors?
Indoor ornaments work best since most decorative materials aren’t weatherproof. If using outdoors, apply marine-grade sealant and choose weather-resistant paints and adhesives for longer lasting results.
How long do homemade wood slice ornaments typically last?
Properly sealed and cared for ornaments can last many years with minimal fading or damage. The longevity depends on the quality of materials used and how well they’re protected from moisture and extreme temperatures.
What’s the best way to hang wood slice ornaments?
Small eye screws or drilled holes work well for lightweight pieces, while heavier ornaments may need picture hanging hardware. Consider the weight and intended display location when choosing your hanging method.