

My kids used to get restless the moment the temperature dropped outside.
Then I started keeping a running list of go-to art ideas just for winter days, and everything changed for us.
If you’re searching for winter art projects for kids that are low-stress and genuinely fun, this is the list I wish I had found sooner.
I’m sharing easy projects here. All tested right at home. All kid-approved. No fancy materials needed.
No stress, no mess, just good creative fun that keeps little hands busy all season long.
Why Winter Art Projects Are Perfect for Kids

Winter means more time indoors, and that is actually a good thing. Art gives kids a healthy, creative way to fill those slow, cold days.
It builds focus, fine motor skills, and real confidence, all while having fun at the table.
I’ve seen it with my own kids. When the supplies come out, the screens go off. No arguments needed.
The best part is that winter has so many great themes to work with. Snow, animals, bare trees, and cozy scenes give kids plenty of inspiration to get started right away.
Basic Materials for Winter Art Projects
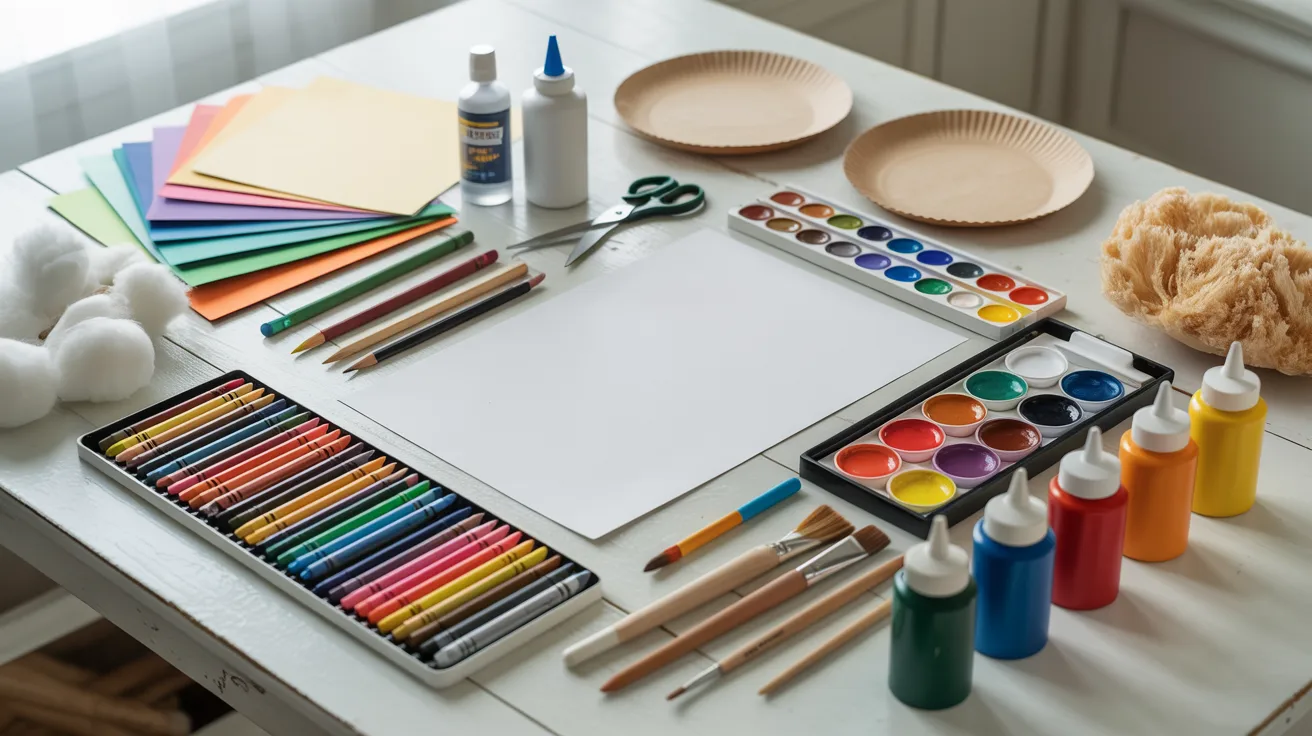
You probably already have most of what you need at home.
Drawing and Coloring Supplies: Paper, crayons, markers, oil pastels, and colored pencils.
Craft Materials: Construction paper, glue, scissors, cotton balls, and paper plates.
Painting Tools: Watercolors, tempera paint, paintbrushes, and sponges.
No special shopping trips needed. Just check your drawers and craft box first.
List of 17 Easy Winter Art Projects for Kids with Simple Instruction
Here are 17 easy winter art projects your kids can try today, with simple steps that actually work.
1. Snow Globe Winter Art Project

Draw a large circle on paper. Sketch a snowman or cozy winter house inside it. Color the full scene with crayons or markers.
Add small white dots all around to show falling snow. Draw a flat base at the bottom of the circle to complete the snow globe shape.
2. Paper Plate Penguin Craft

Paint the back of a paper plate black. Cut a white oval from paper and glue it on as the belly. Add an orange paper beak and feet.
Stick on two googly eyes. Cut two small black wings from paper and glue them to each side of the plate.
3. Snowman Cut-and-Paste Craft

Cut three white circles in different sizes. Glue them on paper from largest to smallest.
Add a small triangle for the carrot nose, paper buttons down the middle, and a colorful paper scarf. Draw stick arms on each side using a black marker.
4. Winter Landscape Painting

Paint the upper half of the paper light blue for the sky. Add rounded white hills at the bottom for snow.
Draw bare, thin trees using brown paint or a dark marker. Add a few white dots across the sky to suggest light snowfall.
5. Oil Pastel Winter Night Scene

Use oil pastels to draw rolling snowy hills and tall pine trees. Fill the sky with deep blues and purples.
Blend the colors gently with your finger to show soft moonlight glowing through the scene. Add a small white circle near the top for the moon.
6. Polar Bear Winter Art

Sketch a polar bear using simple circles and ovals for the body and head. Outline it in light blue or white.
Paint a cold blue or snowy white background around the bear to make it stand out. Add small paw prints in the snow below the bear.
7. Winter Tree Silhouette Art

Paint the whole paper with warm sunset colors: orange, pink, and yellow. Let it dry completely.
Then use black paint or marker to draw bare tree silhouettes over the colorful background. Add a few flying birds in the distance using small curved marks.
8. Snowflake Pattern Drawing

Draw one large snowflake shape in the center of the paper. Divide it into sections.
Fill each section with a different repeating pattern: dots, lines, zigzags, or crosshatching. Add small circles at the tip of each snowflake point to finish the design.
9. Penguin Directed Drawing

Draw a large oval for the penguin’s body. Add two small flippers on the sides. Draw a round head on top with two eyes and a small triangle beak.
Color the body black and the belly white. Add a simple snowy ground beneath the penguin’s feet.
10. Winter Word Pop Art

Write the word “WINTER” in large, bold block letters across the paper. Fill each letter with a fun pattern: stripes in one, dots in another, zigzags in the next.
Use bright colors for contrast. Outline each letter in black once all the patterns are filled in.
11. Christmas Cookie Garland Craft

Draw or print out simple cookie shapes like stars, bells, or circles. Color them in with markers or crayons. Cut each one out carefully.
Punch a small hole in the top and thread them onto a long piece of string. Hang the finished garland across a wall or window.
12. Cozy Winter Animal Art

Sketch a simple fox, bear, or rabbit. Before coloring, draw a cozy scarf around the neck, a little knit hat, or a tiny sweater.
Color the animal in warm, earthy tones. Add a simple snowy background behind the animal to give the scene some depth.
13. Q-Tip Snow Painting

Paint a simple winter background with blue or purple paint: trees, a house, or just an open sky. Let it dry.
Dip a Q-tip in white paint and press it all over the sky to create falling snowflakes. Use a fresh Q-tip to add larger dots close to the ground for heavier snow.
14. Winter Zentangle Drawing

Draw a large mitten, snowflake, or scarf shape on paper. Divide the inside into smaller sections. Fill each section with a repeating doodle pattern.
Take it slow. Go back over the outline with a black marker once all sections are filled to make the shape pop.
15. Fox in a Snowy Forest Watercolor

Draw simple, tall trees and a small fox sitting in the snow. Use watercolor paint for the sky and background, letting colors bleed together naturally.
Add orange for the fox after the background dries. Paint a few light blue shadows under the trees for a finishing touch.
16. Snowman Night Pastel Art

Use black construction paper for this one. Draw two or three snowmen with white or light blue soft pastels. Add stars, a glowing moon, and a snowy ground.
Blend the colors softly for a glowing night effect. Use yellow pastel lightly around the moon to show a warm glow.
17. Winter Tree Paper Collage

Tear or cut strips of brown paper for the trunk and branches. Glue them onto white or blue paper to form a bare winter tree.
Press small cotton balls around the branches and on the ground for snow. Add small torn pieces of dark paper in the background to suggest more trees in the distance.
Practical Tips for Stress-Free Winter Art Projects
Making art with kids should feel fun, not frustrating, and these simple tips will help you keep it that way.
- Set out all materials before you begin so kids don’t have to wait.
- Let kids pick their own colors, it builds real creative confidence.
- Use items already at home like cotton balls and paper bags to save money.
- Keep projects short and simple so kids finish feeling proud, not tired.
- Display finished artwork on the wall or fridge to keep kids motivated.
When the process feels easy and fun, kids will want to come back and make more.
Conclusion
I’ve tried many of these winter art projects for kids with my own kids on slow, cold days, and the results always surprised me.
The simplest ones often turn out the best.Pick one project, set out the supplies, and just start. You don’t need a perfect plan. You just need to begin.
Tried one of these? I’d love to hear how it went.
Drop a comment below, share a photo, or tag us. It truly makes my whole day!
Frequently Asked Questions
What age are these winter art projects best for?
These projects work well for kids aged 4 to 12, with a little help for younger ones.
Do I need to buy special supplies for these projects?
No. Basic items like paper, crayons, and glue are all you need.
How long do these projects take to finish?
Most take between 20 and 45 minutes to complete.
Can kids do these projects on their own without help?
Yes. Older kids aged 7 and up can follow the steps on their own.
Are these projects good for school or group settings?
Yes, most of these projects are simple enough for classrooms and group sessions.