

Foreshortening art can make your drawings look alive. It adds depth and makes figures feel like they are coming toward you.
But for many beginners, it feels confusing at first. I remember staring at a reference photo thinking, "Why does the arm look so short?" That is foreshortening in action.
In this guide, I will walk you through what foreshortening art is, why it works, and how to apply it in your own drawings.
With over a decade of drawing experience, I know what actually helps learners get this right.
We will cover the definition, a five-step drawing process, easy exercises, common mistakes, and famous examples from art history.
What Is Foreshortening Art? Technique Definition Explained
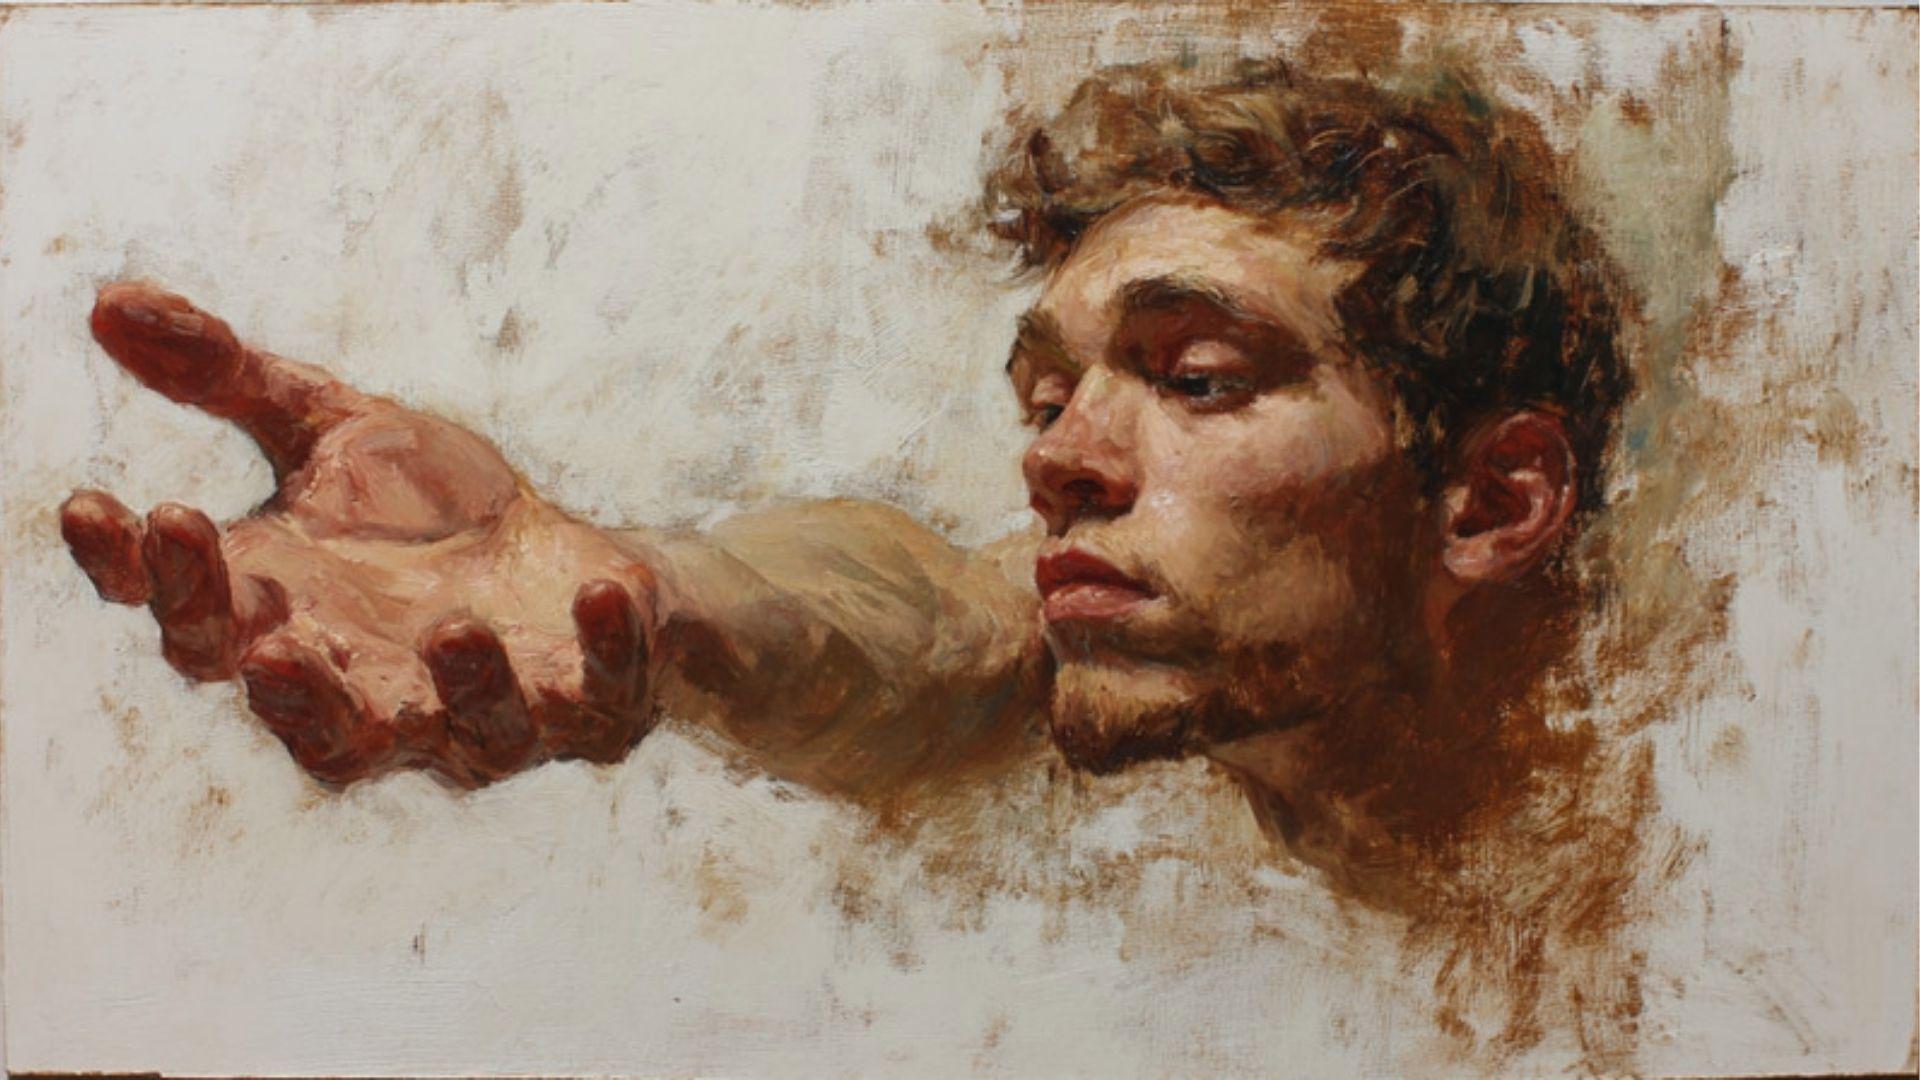
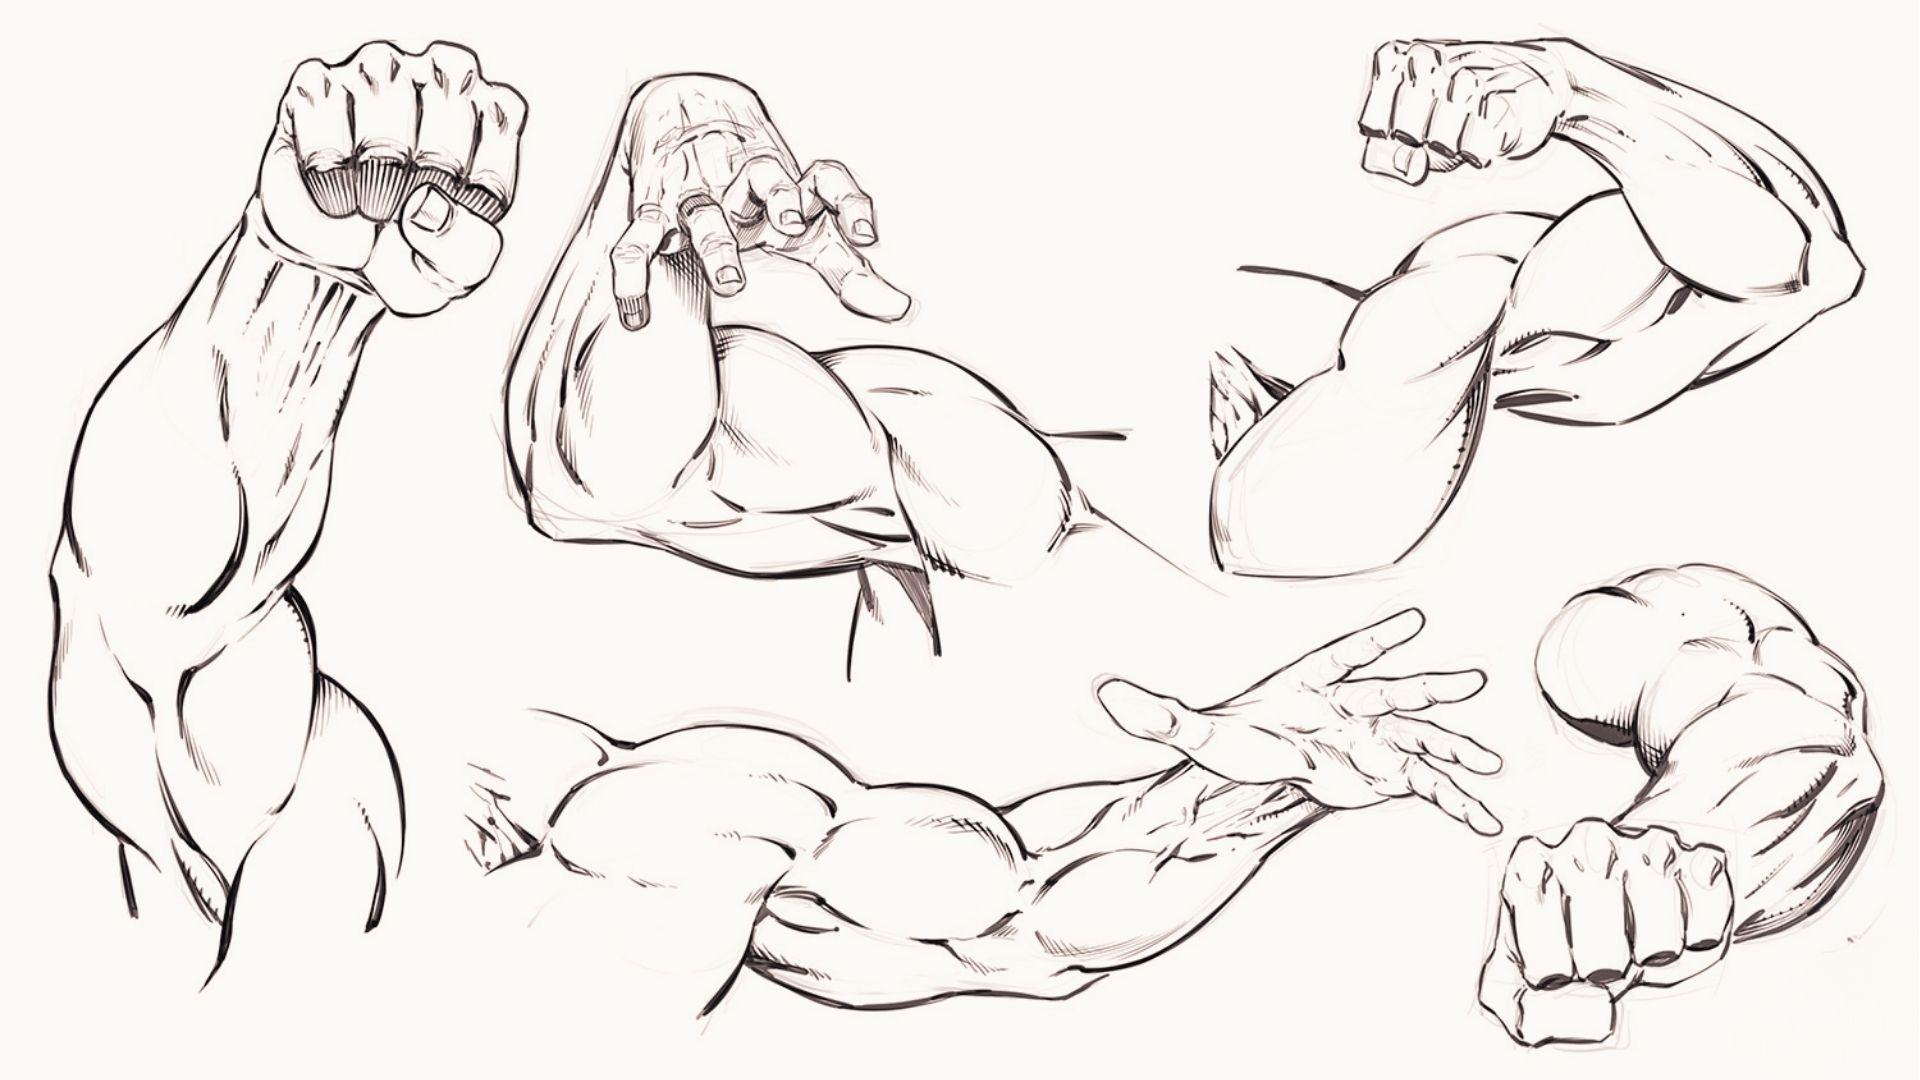
Foreshortening art is a drawing method where objects pointing toward the viewer appear shorter and more compressed than they actually are.
It is how artists show depth on a flat surface. Think of a finger pointing straight at you. It has length in real life, but in a drawing it looks pushed together.
When parts of a figure are closer to the viewer, they look larger, parts moving away look smaller. This size difference tricks the eye into seeing three dimensions.
Unlike perspective, which handles how whole scenes shrink with distance, foreshortening focuses on individual forms and their angle toward the viewer.
Without it, figures look flat and lifeless.
How to Draw Foreshortening Art: Easy Steps
Follow these five steps to draw foreshortening art with more confidence and accuracy.
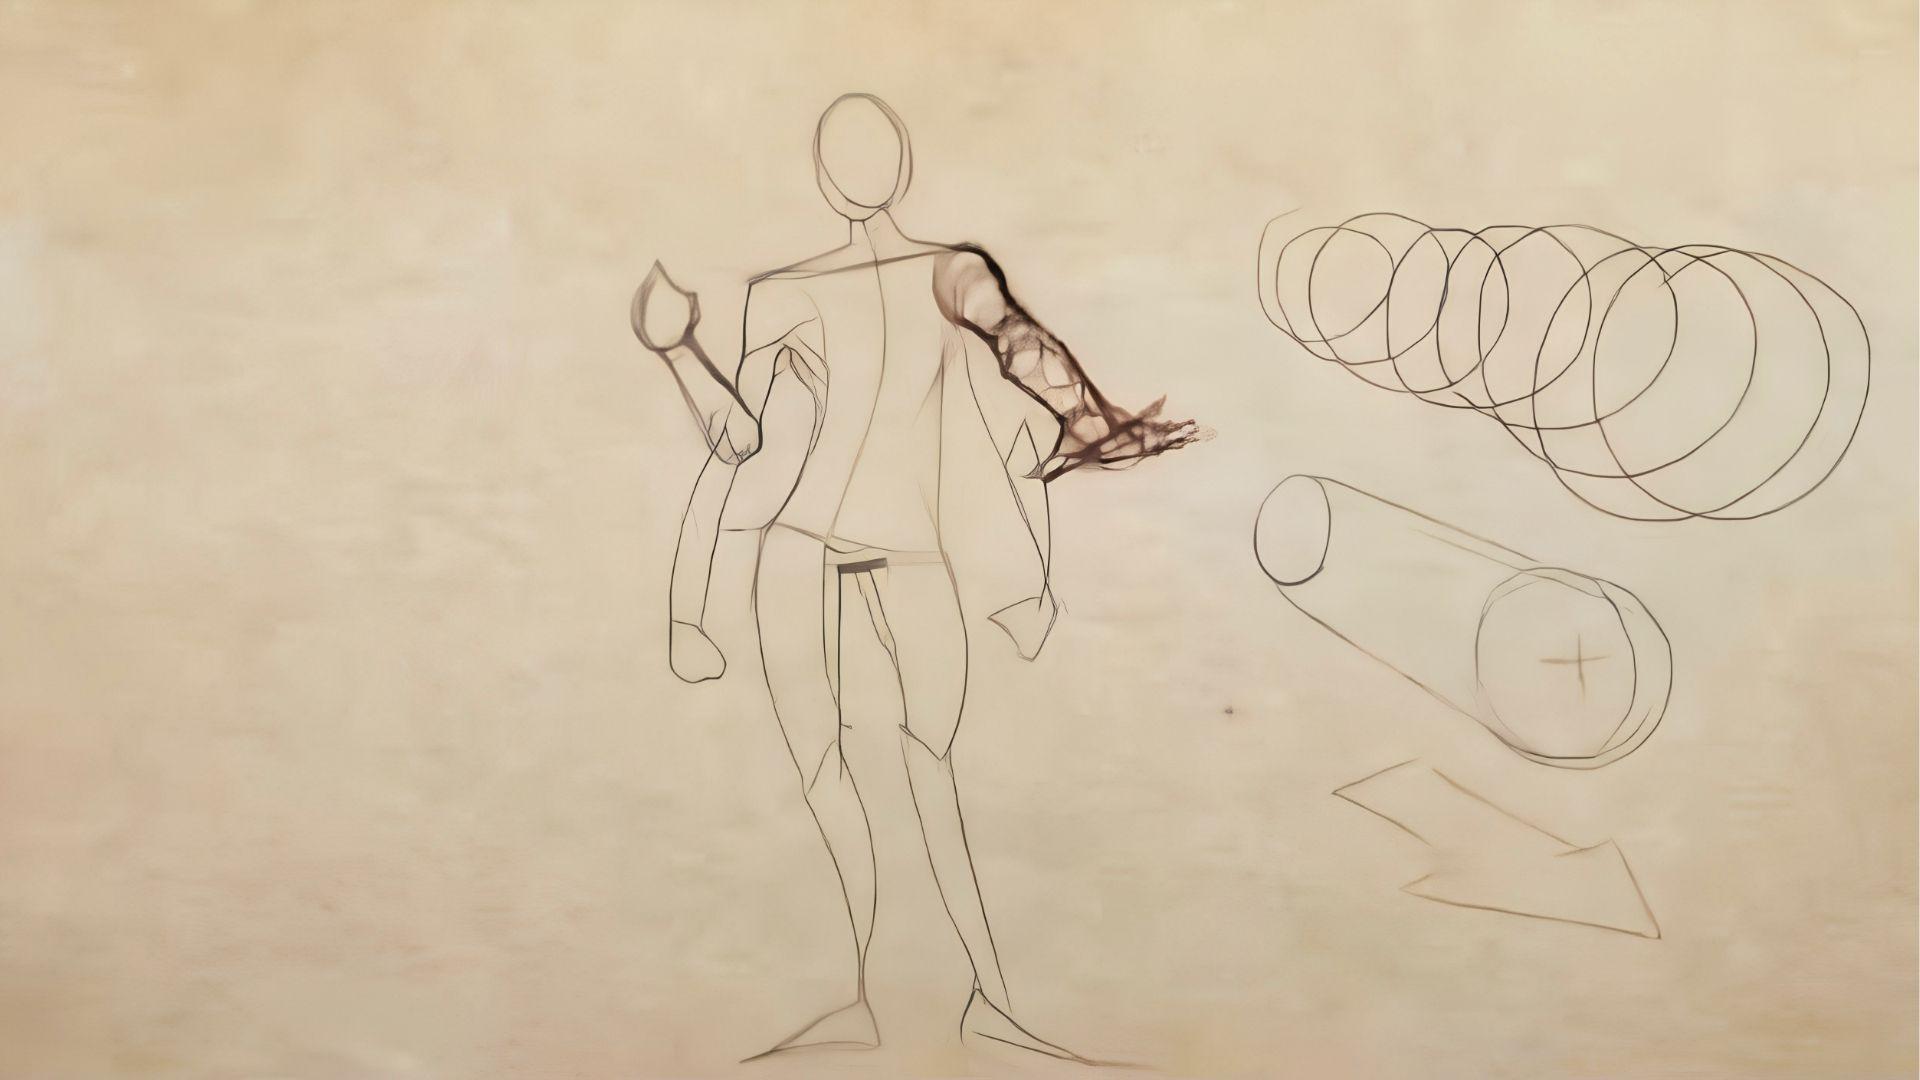
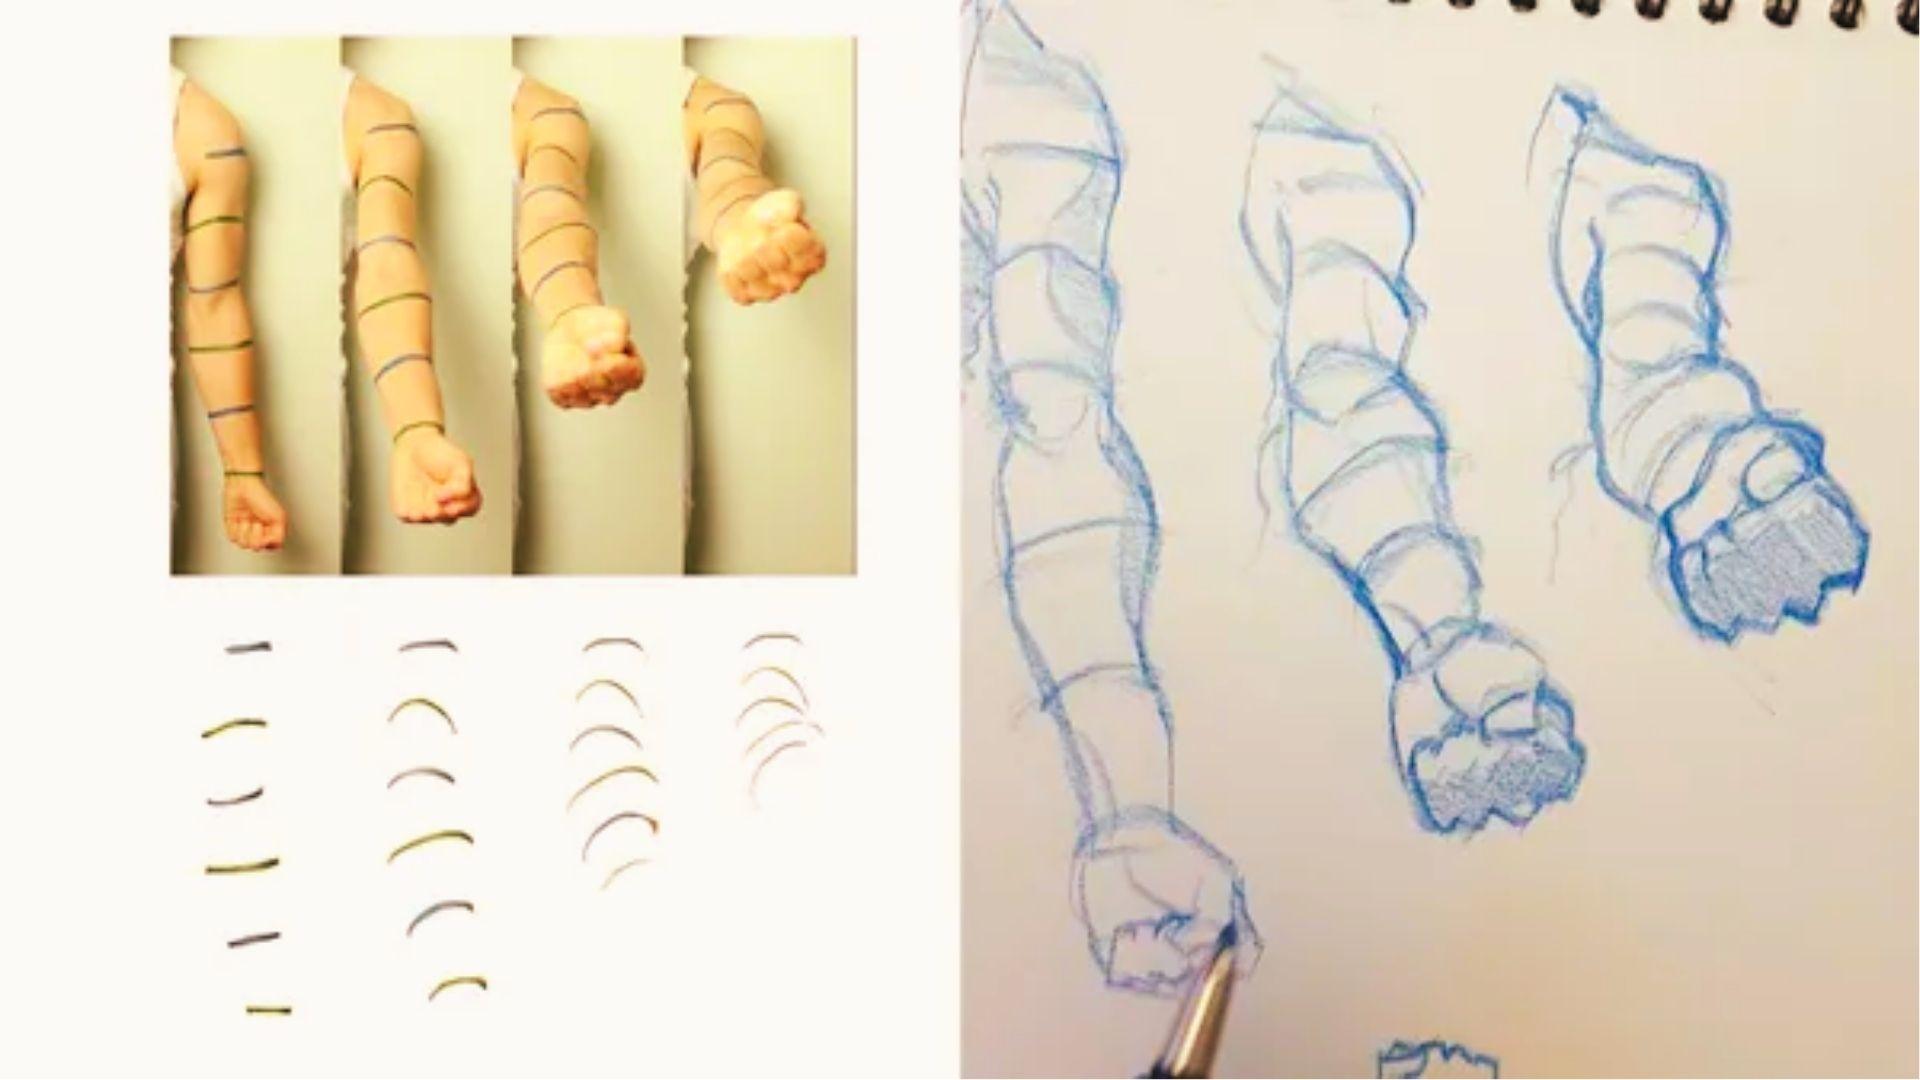
Step 1: Simplify the Subject Into Basic Forms

Before drawing anything complex, break the body or object down into simple shapes. Use cylinders for arms and legs, a box for the torso, and a sphere for the head.
When a limb is pointing at you, that cylinder will look like a short oval, not a long tube. Starting with simple forms keeps you from getting confused by details too early.
Step 2: Measure and Map the Overall Proportions
Foreshortening changes proportions dramatically. A leg pointing toward you might look only half as long as it really is.
Use a pencil to measure relative sizes before drawing. Compare the height of the head to the torso, or the length of the arm to the hand.
These comparisons help you map what you actually see, not what you think you know.
Step 3: Build a Structural Framework Using Stick Figures
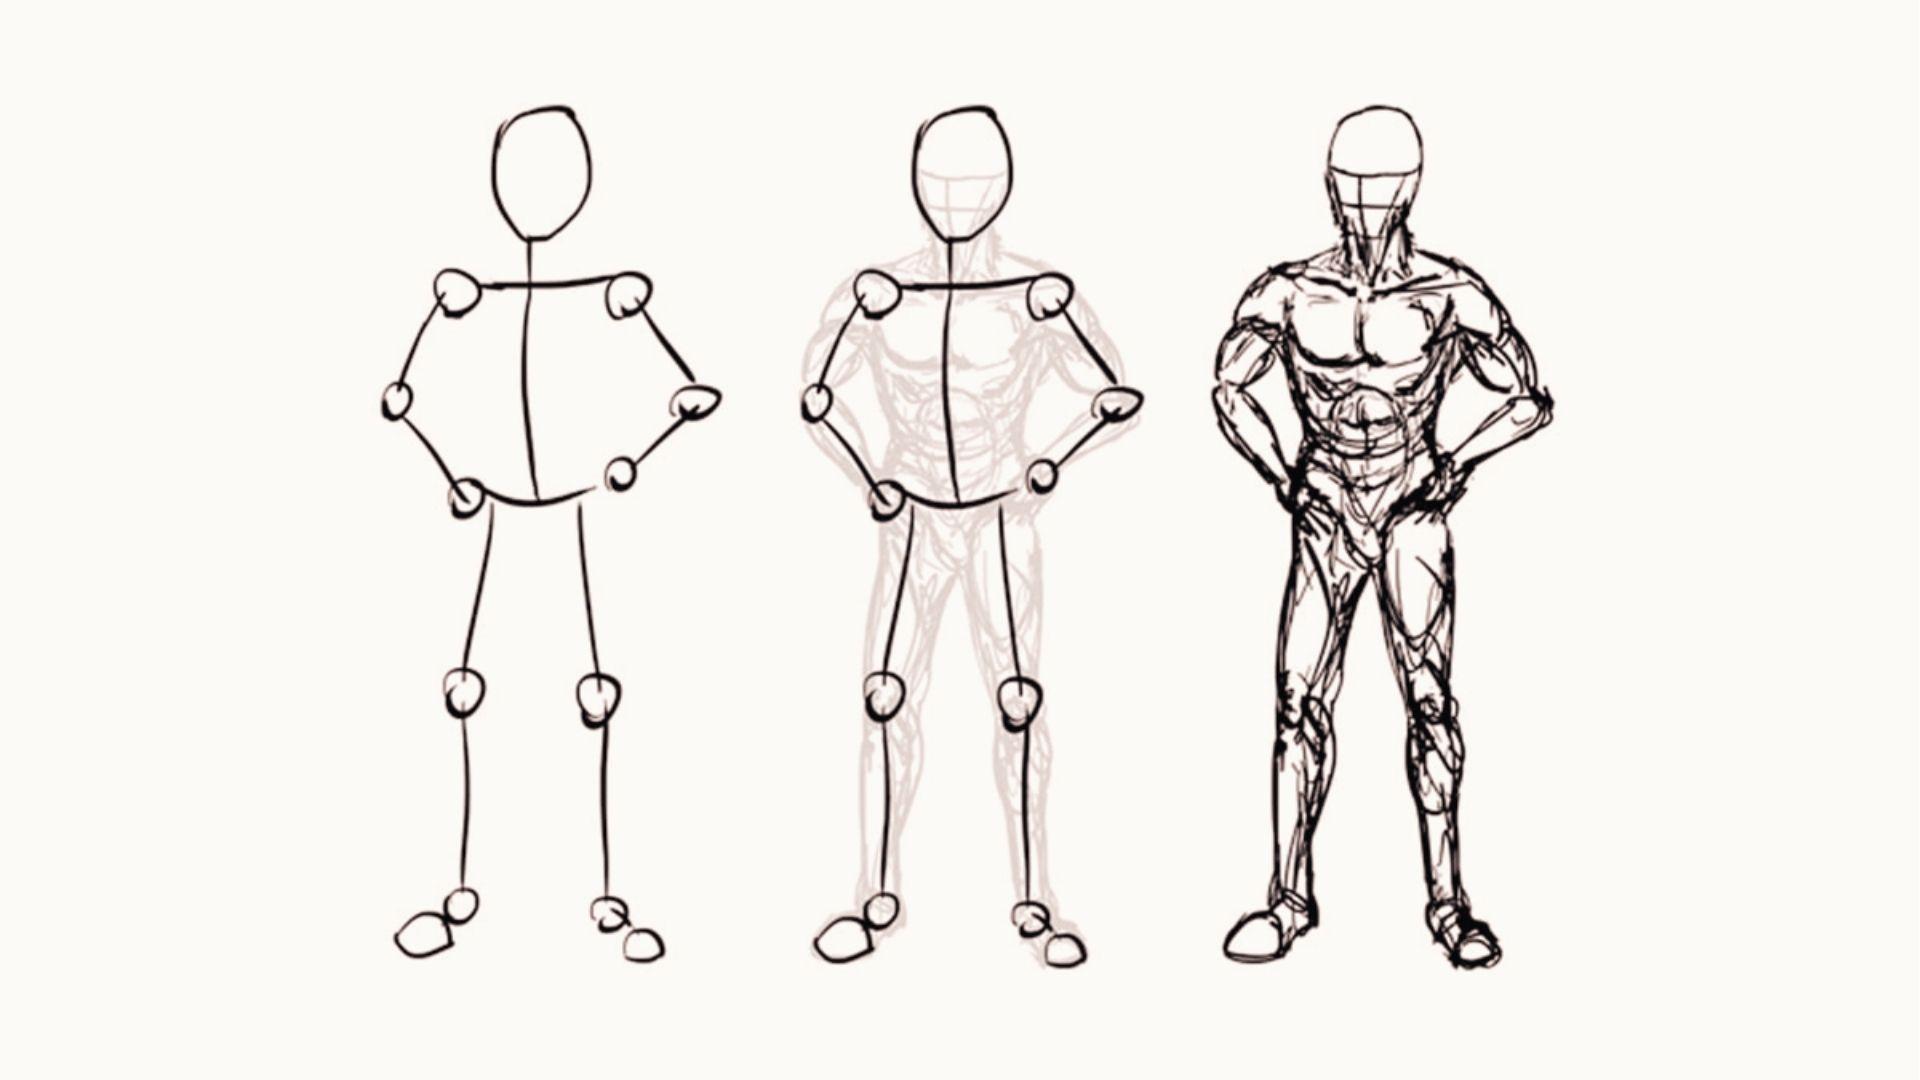
Once you have your proportions mapped, draw a loose stick figure. This gives you a road map for placing each body part.
The stick figure should follow the angle of the pose. It does not need to be perfect. It is just a guide to help you place forms correctly before adding volume.
Step 4: Use Contours, Overlaps, and Perspective to Create Depth
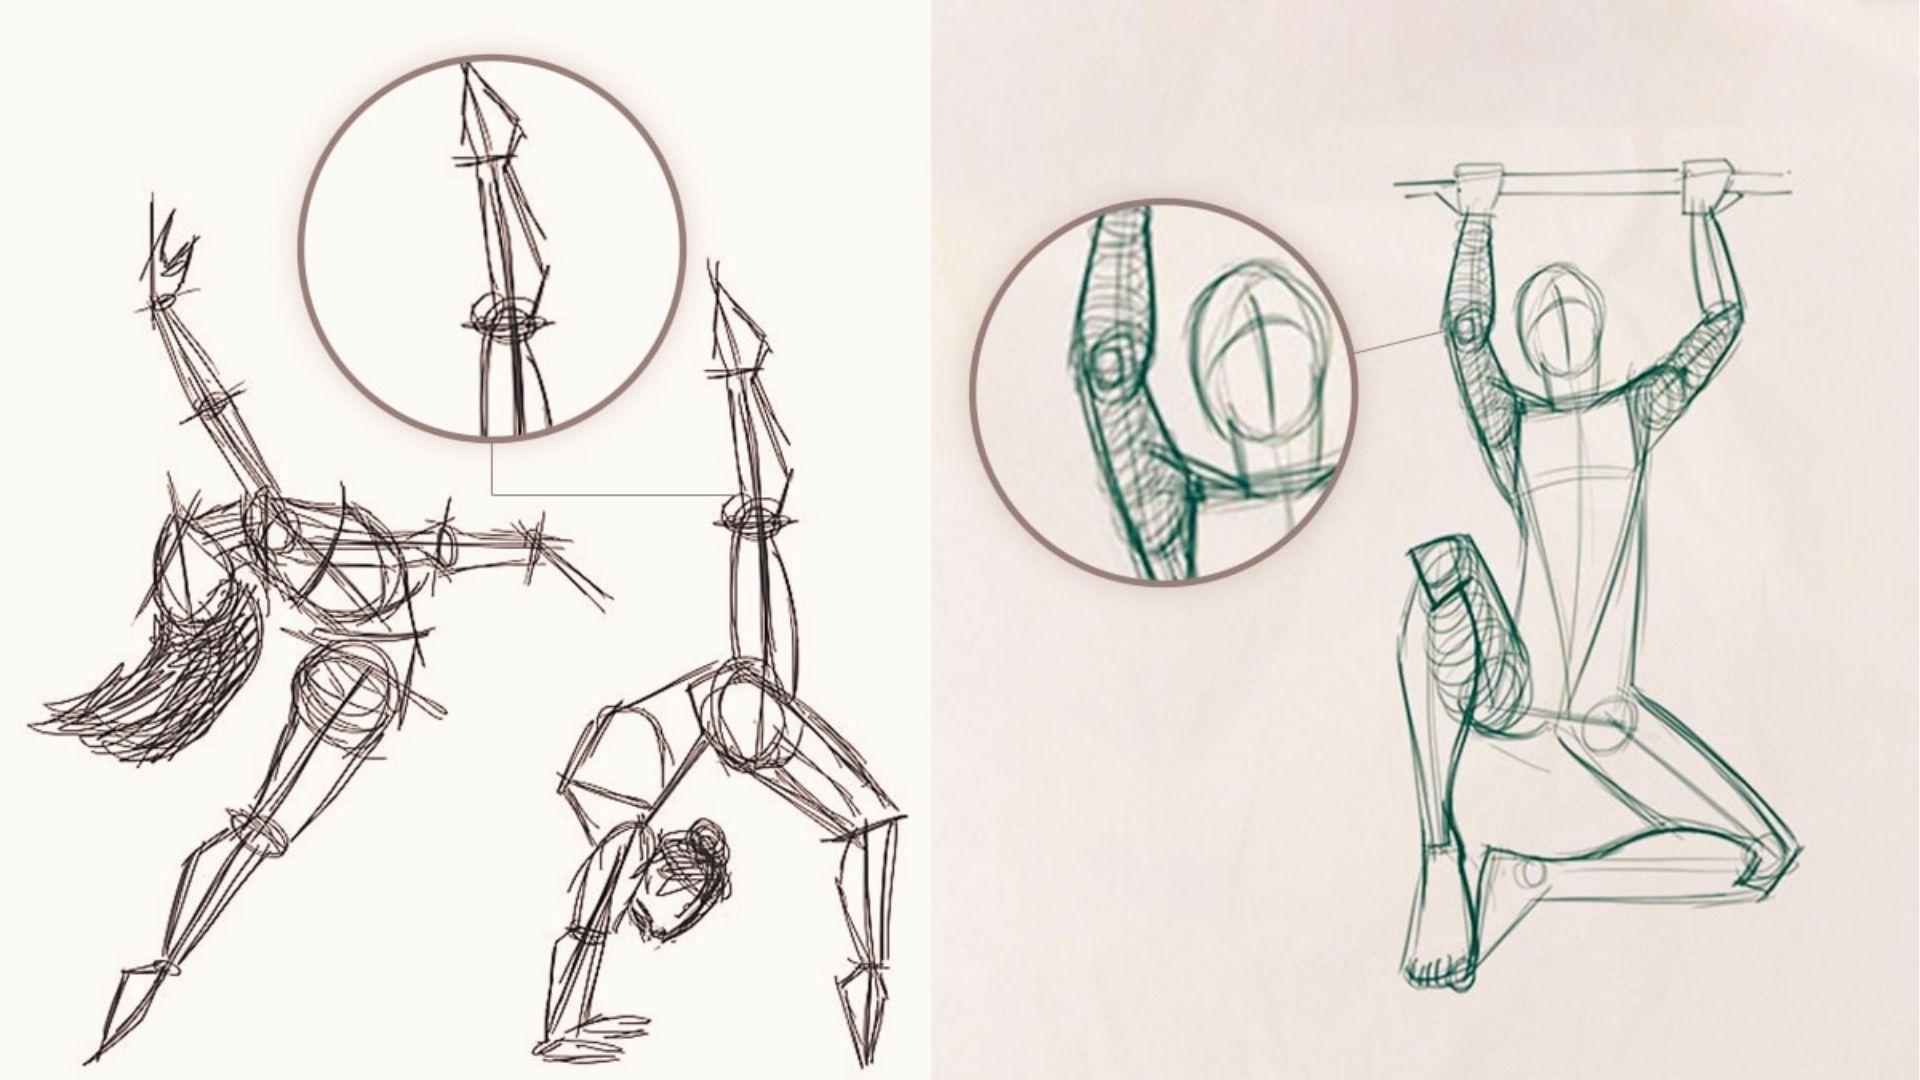
Overlaps are powerful tools in foreshortening art. When one form passes in front of another, it creates a clear sense of depth.
Add contour lines that wrap around the forms. These curved lines show which direction the surface is facing.
You can also apply basic perspective rules to your shapes, especially for boxes and cylinders, to push the three-dimensional look further.
Step 5: Add Details, Shadows, and Final Refinements
Only add details after your structure is solid. Shadows are especially important in foreshortening.
They reinforce which parts are closer and which parts are receding.
Use cast shadows and form shadows together to give your drawing more weight and realism. Keep refining until the depth feels convincing.
Easy Foreshortening Art Exercises to Improve Faster
Consistent practice with the right exercises speeds up your progress in foreshortening art.
Draw From References With Dramatic Angles
Find photos or poses where limbs are pointing directly at the camera.
Try to draw exactly what you see without correcting the proportions back to what feels "normal." This trains your eye to accept distorted forms as correct.
Practice Boxes and Cylinders in Perspective
Simple forms teach you a lot. Draw boxes and cylinders pointing toward you from different angles.
Once you understand how these basic shapes foreshorten, applying the same logic to body parts becomes much easier.
Recreate Master Drawings to Study Distortion
Copy drawings by artists who used foreshortening well. Studying how they handled overlapping forms and compressed shapes gives you real insight that theory alone cannot provide.
Use Gesture Sketches to Strengthen Observation Skills
Do quick two-minute gesture drawings with a focus on angled poses.
Gesture drawing builds speed and helps you capture the overall angle of a pose before worrying about details.
Review and Correct Flattened Forms Regularly
After finishing a drawing, check if any forms look too flat. If a limb should be coming toward the viewer but looks like it is going sideways, revise it.
Regular self-review builds awareness of your own problem areas.
Common Mistakes in Foreshortening Art
Avoiding these mistakes will save you hours of frustration and help your drawings look more accurate.
- Relying too heavily on standard body proportions instead of drawing what you actually see from the angle.
- Distorting only parts of the figure while leaving other areas looking flat and unconvincing.
- Ignoring overlaps and perspective cues that are necessary to show depth in a pose.
- Adding details and shading before the overall structure and proportions are properly established.
- Correcting compressed forms back to "normal" proportions out of habit rather than trusting the reference.
When and Where to Use Foreshortening Art Techniques

Knowing when to apply foreshortening makes your work more dynamic and visually engaging.
Using Foreshortening in Figure Drawing and Life Drawing
Any time a figure is in a dramatic pose, foreshortening applies. Life drawing classes are the best place to practice because you are working from a real three-dimensional subject.
Using Foreshortening in Comic and Character Art
Comics depend on dynamic poses. A superhero punching toward the viewer, a villain lunging forward, or a character falling all use foreshortening.
It makes action feel immediate and powerful.
Using Foreshortening in Digital Art and Illustration
Digital artists use foreshortening in character design, concept art, and animation reference.
Understanding it helps when drawing at unusual camera angles or creating action-heavy compositions.
Making Poses Look More Dynamic and Realistic
Even small amounts of foreshortening can improve a drawing. A slightly angled arm or a tilted head adds life to an otherwise stiff pose.
Use it whenever you want more energy in your figures.
Tips to Make Foreshortening Art Easy to Master
These practical tips will help you build skill without feeling overwhelmed.
- Start with simple poses before attempting complex ones
- Use a reference whenever possible, especially in early practice
- Draw the forms you see, not the forms you assume are there
- Take breaks and return to your drawing with fresh eyes
- Build confidence through consistent practice
Conclusion
Foreshortening art takes practice, but it clicks faster than most people expect.
I struggled with it too until I stopped drawing what I thought I knew and started drawing what I actually saw. That shift changed everything.
Take it one step at a time. Try one exercise this week. See how much more depth your figures gain.
If this guide helped you, leave a comment and let me know where you are in your practice.
Share this post with a fellow artist who wants to improve. And check out our other guides on figure drawing and perspective for more support.
Frequently Asked Questions
What is foreshortening art in simple terms?
Foreshortening art is a technique where objects or body parts pointing toward the viewer appear shorter than their actual size. It creates the illusion of depth on a flat surface.
Why does foreshortening look so hard to draw?
It looks hard because it contradicts what we know about proportions. A leg pointing at us looks shorter than we expect. Drawing what we see instead of what we assume is the key to getting it right.
How long does it take to get good at foreshortening?
With regular practice, most artists start to see improvement within a few weeks. Consistent sketching and studying reference images speeds up the learning process significantly.
Can beginners learn foreshortening art?
Yes. Starting with simple shapes like cylinders and boxes makes it approachable. Once you understand how basic forms are foreshortened, applying it to figures becomes much more manageable.
What reference should I use to practice foreshortening art?
Photo references with dramatic angles work well. Websites like Line of Action or Unsplash have free pose references. You can also use your own hand or arm as a simple starting reference.