

Contour line drawing changed how I see the world. This technique uses only outlines to define shapes, forms, and edges without shading or internal details.
I struggled with drawing for years until I found contour techniques. They taught me to actually observe what I was looking at instead of drawing what I thought I saw.
This skill works for artists at every level. Beginners build observational abilities while professionals refine their draftsmanship. Contour drawing strengthens hand-eye coordination, improves visual perception, and develops confidence in your mark-making.
Throughout this guide, I’ll walk you through blind contour, modified contour, and cross-contour methods. You’ll learn practical exercises, common challenges, and strategies to incorporate these skills into your artistic practice for immediate improvement.
Understanding the Basics of Contour Line Drawing

Understanding contour lines starts with knowing what they are and why they matter for your artistic development.
Definition and Purpose
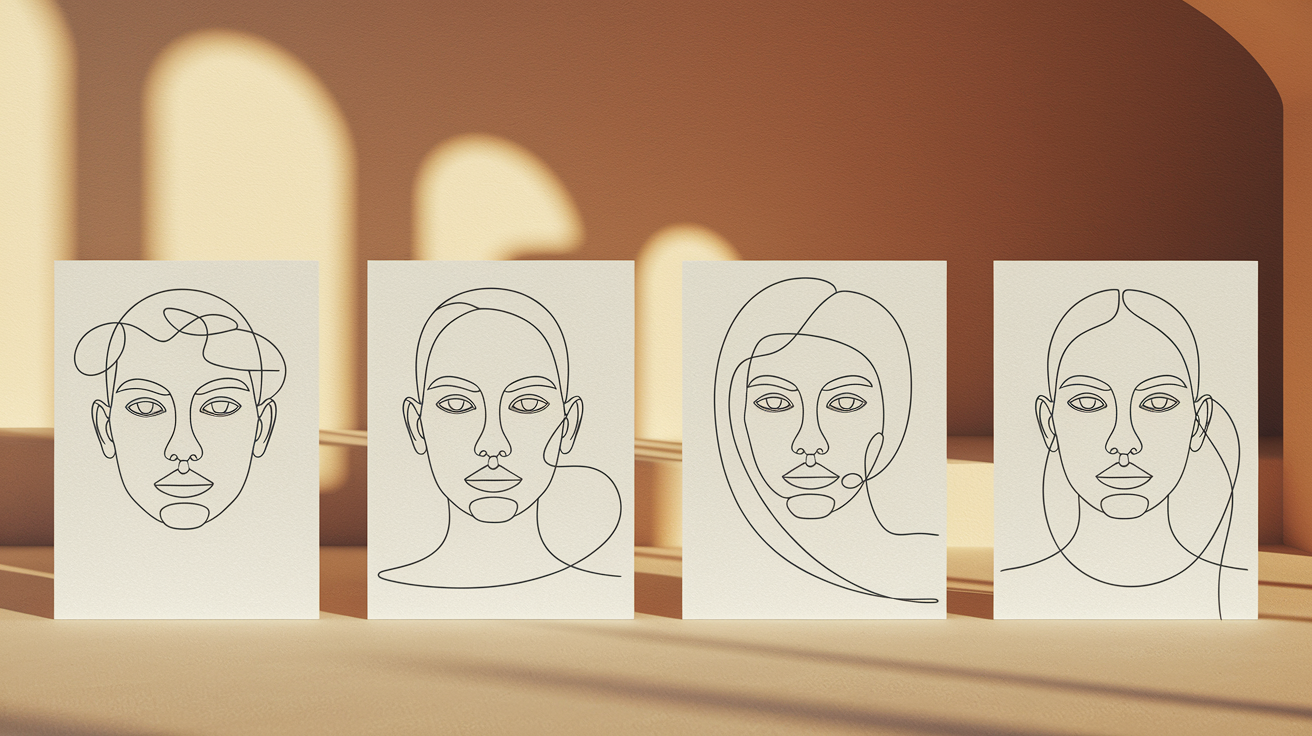
Contour lines are continuous lines that define edges, boundaries, and surface changes without shading. These lines capture essential structure by following visible edges where forms meet or surfaces change direction.
Unlike simple outlines that trace the outer perimeter, contour lines describe both external boundaries and internal form changes. This creates a more complete representation of three-dimensional objects.
True contour drawing requires careful observation of how forms turn in space. While basic outlines create recognizable shapes, contour lines reveal subtle variations in surface planes and spatial relationships.
The Artistic Value of Contour Drawing
Contour drawing develops acute observational skills that benefit all artistic work. This practice forces you to notice subtle details, proportional relationships, and edge qualities you’d otherwise miss.
The technique improves hand-eye coordination by requiring direct translation of visual information into precise marks. This connection creates a more intuitive drawing process over time.
Contour drawing strengthens fundamental draftsmanship through line quality, proportion accuracy, and spatial awareness. These skills form the foundation for advanced artistic techniques.
Inspect the Types of Contour Line Drawing
Different contour techniques develop specific skills and artistic approaches, from blind observation exercises to advanced dimensional methods.
Blind Contour Drawing
Blind contour drawing means creating artwork while looking only at the subject without glancing at your paper. This technique prioritizes pure observation over accuracy.
This method builds observational skills and artistic spontaneity. By removing the ability to correct marks, it builds trust in the drawing process and reduces perfectionist tendencies.
Practice with simple subjects like hands, household objects, or plants. Keep your eyes on the subject for the entire drawing.
Continuous Contour Drawing
Continuous contour drawing creates images using a single, unbroken line without lifting your drawing tool from the paper. This requires careful planning and confident mark-making.
This approach enhances drawing flow and line control through smooth, deliberate movements. It’s particularly valuable for capturing gesture and movement in figure drawing.
Cross-Contour Drawing
Cross-contour lines run across the surface of forms, following curves and planes to describe volume and structure. These lines wrap around forms like topographical contours on a map.
This technique adds sculptural quality by emphasizing form over flat shapes. Practice by drawing curved lines that follow the surface of rounded objects like fruits or fabric folds.
Pay attention to how these lines compress and spread based on your perspective.
Implied Contour Lines
Implied contour lines suggest edges without drawing complete outlines. Use broken lines, varied line weights, or strategic gaps to let viewers’ minds complete the forms.
This creates more dynamic drawings by engaging viewer participation. The technique works well for capturing fleeting moments, suggesting depth, or creating focal emphasis through varied completeness.
Techniques to Master Contour Drawing

Proper material selection, structured practice, and advanced combination techniques lead to professional results.
Choosing the Right Materials
Select pencils in various H and B grades for different line qualities. H pencils (2H to 4H) create light, precise lines perfect for initial sketches.
B pencils (2B to 6B) produce darker, expressive marks ideal for bold contours.
Pen and ink offer excellent precision and permanence, forcing commitment to each mark. Fine-tip pens work well for detailed work, while brush pens provide variable line weights through pressure control.
Charcoal and brush tools excel at creating expressive, gestural contours with rich blacks and varied textures. They’re ideal for dramatic figure studies and atmospheric effects.
Step-by-Step Practice Techniques
Begin each session with blind contour exercises to strengthen observational skills. Spend 5-10 minutes drawing simple objects without looking at your paper. This warm-up builds confidence and improves hand-eye coordination.
Progress to continuous line exercises, creating complete drawings with single, unbroken lines. Add cross-contour lines to describe volume and surface changes.
Incorporate hatching, cross-hatching, and parallel lines to suggest tone and texture while maintaining the linear foundation.
Combining Techniques for Advanced Results
Advanced artists blend different line styles to create expressive, dynamic artwork. Vary line weights, combine continuous and broken lines, and integrate different drawing tools within a single piece.
Watercolor and ink combinations offer striking effects with contour techniques. Apply ink contours first, then add watercolor washes. This creates tension between precise line work and fluid color application, resulting in controlled yet spontaneous artwork.
How to Use Contour Lines to Create Depth and Texture
Inspect flat drawings into dimensional artwork by mastering line variation techniques and cross-contour methods that create convincing form and surface.
Varying Line Weight and Direction
Thick and thin line variations create visual hierarchy and depth. Heavy lines indicate foreground elements or strong contrast, while lighter lines suggest background forms or areas where objects recede.
Curved and straight line combinations communicate different surface textures. Flowing, curved contours suggest soft, organic materials like fabric or hair. Crisp, angular lines convey hard surfaces like metal or stone.
Cross-Contouring and Shading
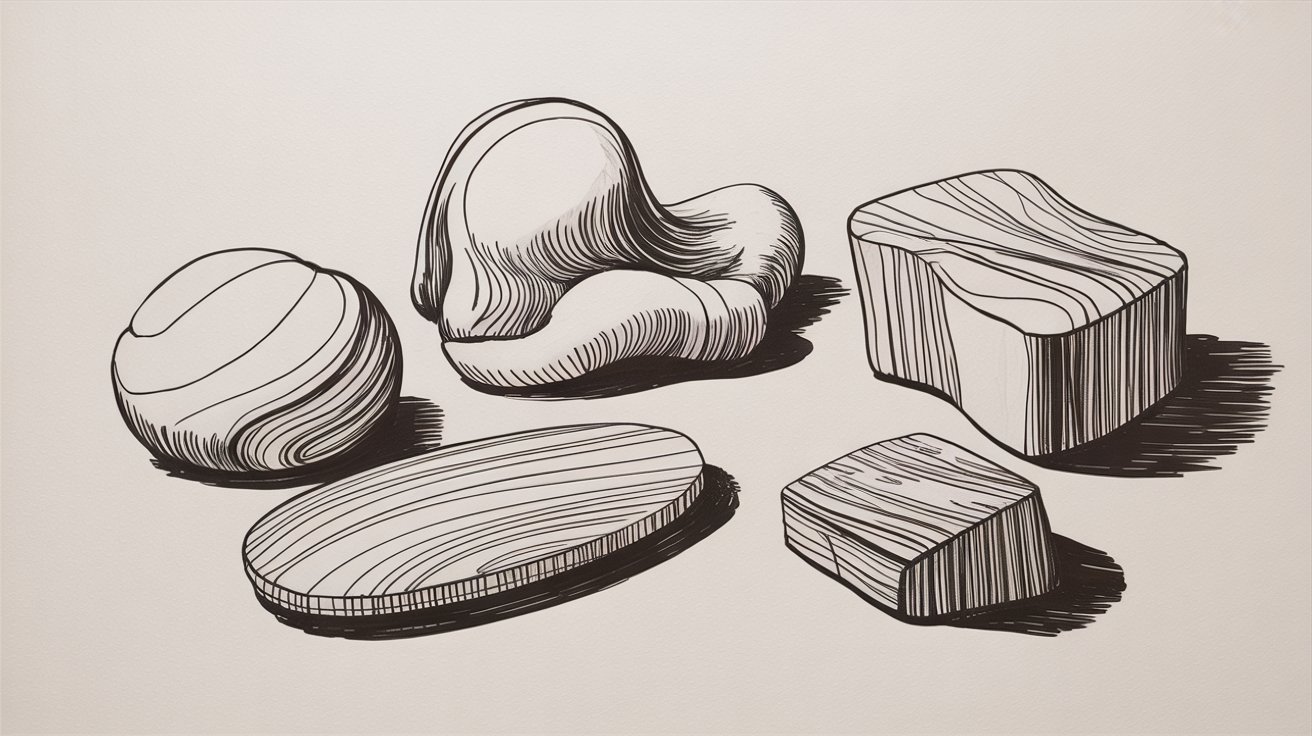
Cross-contour techniques create three-dimensional form by wrapping lines around surfaces to follow their curves and planes. These lines function like topographical maps, showing how surfaces turn toward or away from you.
Adapt cross-contour principles to specific textures. For fur, use short, curved lines following hair growth direction. Wood grain employs flowing, parallel lines that bend around forms. Fabric requires cross-contours that follow cloth movement through space.
Practical Tips for Improvement
Build consistent skills through structured daily practice and targeted exercises that strengthen fundamental contour drawing abilities.
- Establish a 5-minute contour warm-up routine at the beginning of each drawing session. These brief exercises loosen tension and build confidence before tackling complex subjects.
- Consistency matters more than duration when building your skills. Regular short practices yield better results than occasional long sessions.
- Focus daily practice on drawing common objects, hands, and faces. Household items like cups and books provide accessible subjects with varied shapes.
- Hands offer complex forms with moving parts that challenge your observation skills. Faces push your proportion skills and feature recognition further.
- Rotate between different subject types to ensure well-rounded development. Varying your practice subjects keeps things interesting and prevents getting stuck in one comfort zone.
Conclusion
Contour line drawing strengthens observation, improves hand-eye coordination, and builds confidence in mark-making. These techniques form the foundation for advanced drawing methods, making them valuable for artists at every level.
Make contour drawing a regular part of your practice through daily warm-ups. The benefits compound over time, leading to more confident and accurate drawing abilities.
Start with simple objects and gradually challenge yourself with complex forms. Share your contour drawings with fellow artists online or in local communities. This connection fosters growth and celebrates the fundamental joy of drawing.
Frequently Asked Questions
What is the difference between contour drawing and regular sketching?
Contour drawing focuses exclusively on creating outlines and edges without shading or tone. Regular sketching incorporates various techniques including shading, cross-hatching, and tonal work to create complete representations.
How long should I practice contour drawing each day?
Start with just 5-10 minutes of daily practice to build consistency. As your skills grow, you can gradually extend sessions to 15-30 minutes.
Can contour drawing help improve my other art skills?
Absolutely! Contour drawing strengthens observational abilities, hand-eye coordination, and line control that benefit all artistic mediums. These core skills transfer directly to painting, digital art, and sculpture.
What subjects work best for beginning contour drawing practice?
Simple household objects like cups, books, and fruit provide excellent starting points with clear edges. Progress to hands, plants, and faces as your skills develop.
Is it normal for my contour drawings to look distorted or inaccurate?
Yes, especially with blind contour techniques where accuracy isn’t the goal. The purpose is developing observational skills and hand-eye coordination, so embrace the learning process.