

Halloween is my favorite time of year, and making things with my kids makes it even better. If you are looking for fun and easy ideas, paper plate Halloween crafts are exactly what you need.
I have rounded up 41 ideas that work for any age, skill level, or budget.In this blog, I will share crafts from classic characters to wearable masks and spooky decorations.
No fancy tools. No expensive supplies. Just paper plates and a little creativity.I have been doing these crafts with my own kids for years, and they never get old.
You will find something here that works for your family, your classroom, or your next Halloween party.
Let’s get started.
Why Paper Plate Halloween Crafts Are Perfect for Kids
Paper plates are cheap and easy to find anywhere. Kids can paint, glue, and color on them without any fuss. These crafts help build fine motor skills and keep little hands busy for hours.
They work great at home, in classrooms, or at Halloween parties. Plus, cleanup is fast and simple.
No expensive supplies. No complicated steps. Just fun, creative time that parents, teachers, and kids all enjoy together.
Classic Halloween Characters
These timeless Halloween characters are the perfect starting point for any craft session.
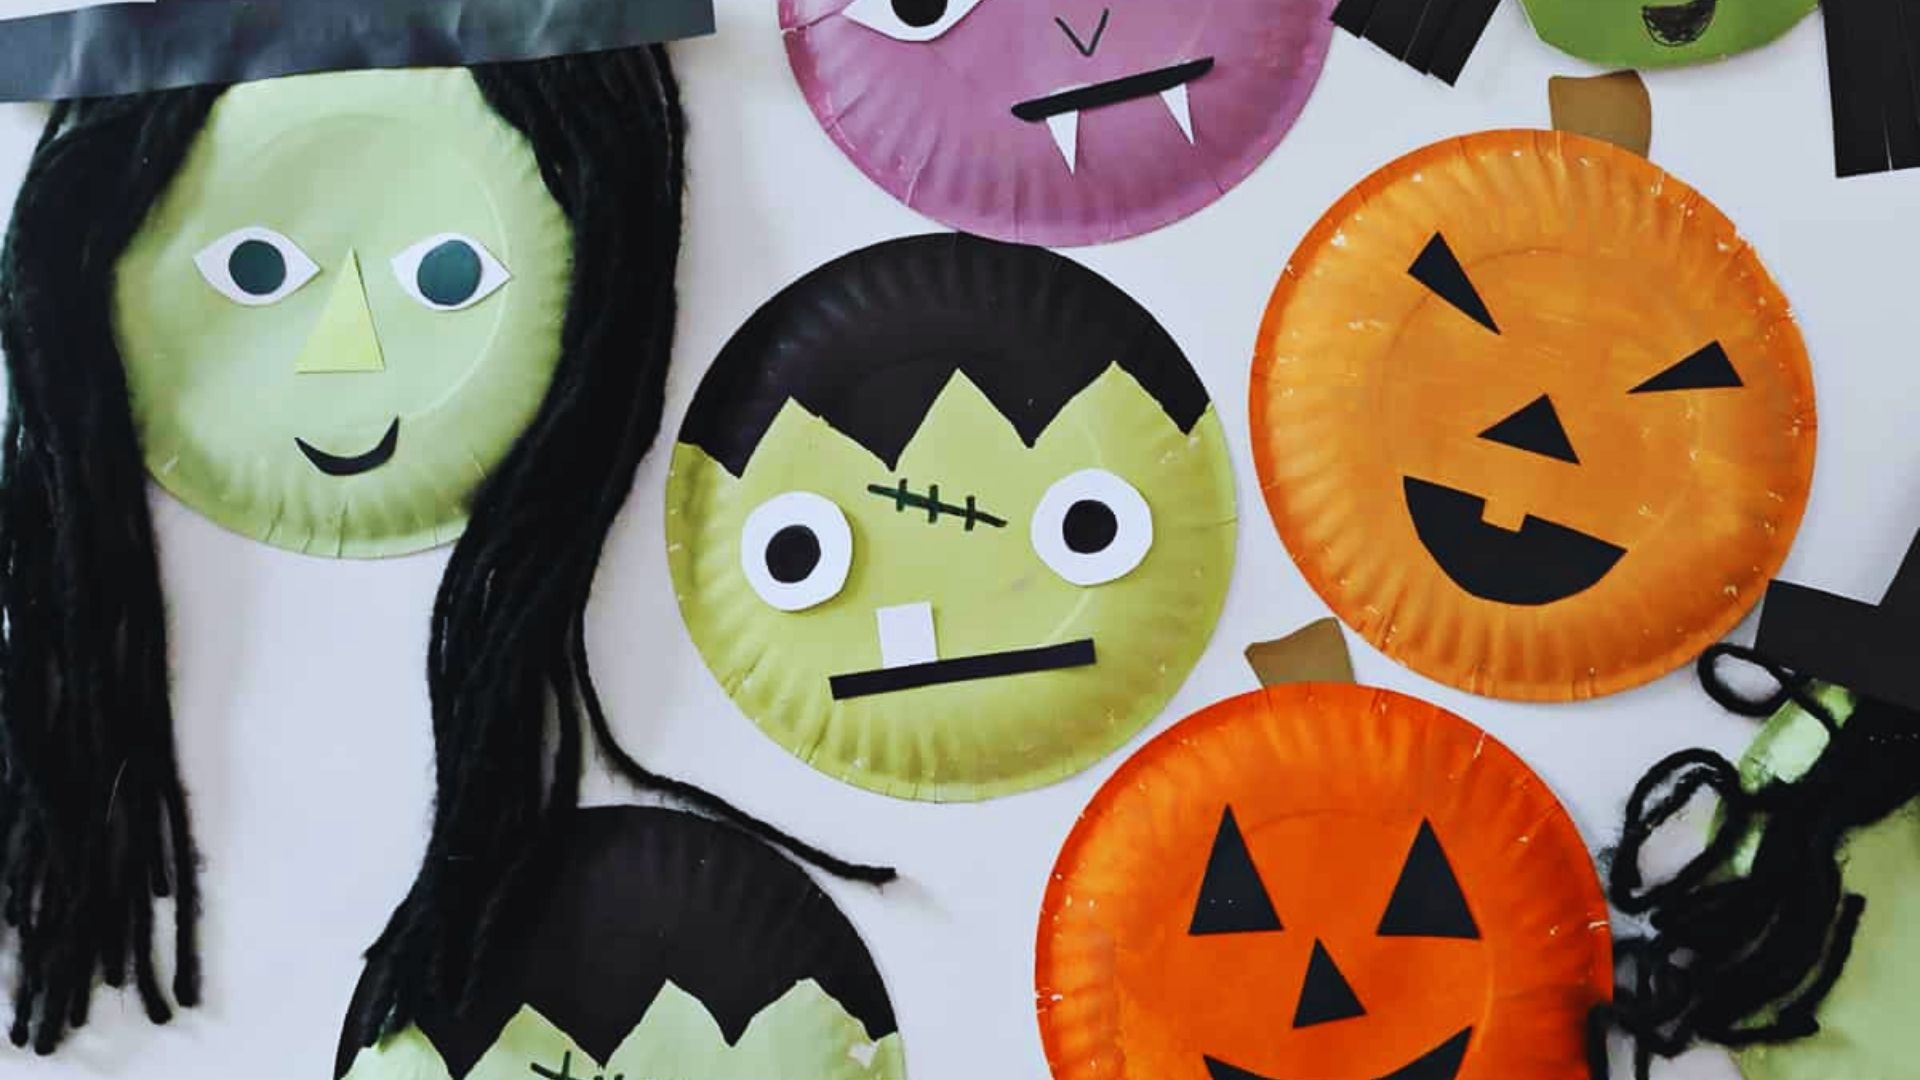
1. Paper Plate Pumpkin
Paint a paper plate bright orange and let it dry fully. Then draw or cut out triangle eyes, a nose, and a jagged smile.
Use black paint or a marker to fill them in. Your kid now has a classic jack-o-lantern that is ready to hang on the wall or display on a shelf.
2. Paper Plate Black Cat
Cut two triangles from black paper or cardstock and glue them to the top of a black-painted plate for ears.
Stick on a pair of googly eyes and poke pipe cleaners through the plate to make whiskers. It is a simple craft that looks really cute when it is finished and hung up around the house.
3. Paper Plate Witch
Paint the plate green and let it dry completely. Glue on black yarn for wild, frizzy hair along the sides. Cut a cone shape from black paper for the hat and attach it to the top of the plate. Add a crooked smile and small wart dots with a black marker to finish the look.
4. Paper Plate Frankenstein
Paint the plate bright green. Cut a strip of black paper for the flat-top hair and glue it across the top. Draw stitches across the forehead and cheek using a marker. Use silver sticker dots or small pieces of rolled foil for the neck bolts. Kids love how funny this one looks when it is done.
5. Paper Plate Ghost
Paint the whole plate white or leave it as it is. Draw two oval eyes and an open round mouth using black marker.
Cut wavy edges at the bottom of the plate if you want a more ghost-like shape. Hang it with a piece of string for a sweet and simple Halloween decoration.
6. Paper Plate Vampire
Cut a black paper collar and glue it to the bottom of the plate. Draw a pale face with slicked-back black hair on the top. Add white fangs pointing down from the upper lip and a small drip of red paint for dramatic effect. This one is always a crowd favorite at classroom craft time.
7. Paper Plate Zombie
Mix green and grey paint together to get a gross undead skin color. Paint the plate with that mixture and let it dry fully.
Draw hollow eyes, cracked lips, and uneven features across the face. Add some red paint streaks for a dramatic zombie effect that kids find both gross and hilarious.
8. Paper Plate Mummy
Cut or tear white paper strips and glue them across the plate in overlapping layers. Leave two small spaces open for wiggle eyes to be glued in place.
The layered strips give the craft a fun texture, and the moving eyes make the mummy feel alive. Kids love shaking it gently to watch the eyes rattle around.
Interactive and Movable Crafts

These crafts move, spin, and rock, making Halloween crafting even more exciting for kids of all ages.
9. Paper Plate Bat Puppet
Paint a paper plate black and cut it in half. Each half becomes one wing. Tape or glue popsicle sticks to the back of each wing piece for handles.
Add a small bat face in the center using a separate paper circle. Kids can hold both sticks and flap the wings up and down like a real bat.
10. Movable Paper Plate Ghost
Cut a ghost shape from a white plate and attach it to a base plate using a brass fastener through the center. The ghost can spin in a full circle.
You can also make a sliding version by cutting a slit in the base plate and threading the ghost cutout through on a thin cardboard strip.
11. Rocking Paper Plate Witch
Fold a small piece of cardboard into a curved arch shape and attach it to the back of a witch plate as a rocking base.
When placed on a flat table, the plate rocks gently from side to side. Decorate the front with yarn hair and a paper hat for a fun display piece that moves on its own.
12. Rocking Paper Plate Black Cat
This works the same way as the rocking witch but is shaped like a black cat. Add pointy paper ears, pipe cleaner whiskers, and a curled paper tail to the decorated plate.
The rocking motion makes it look like the cat is swaying back and forth. This one is a big hit with younger kids who love to give it a gentle push.
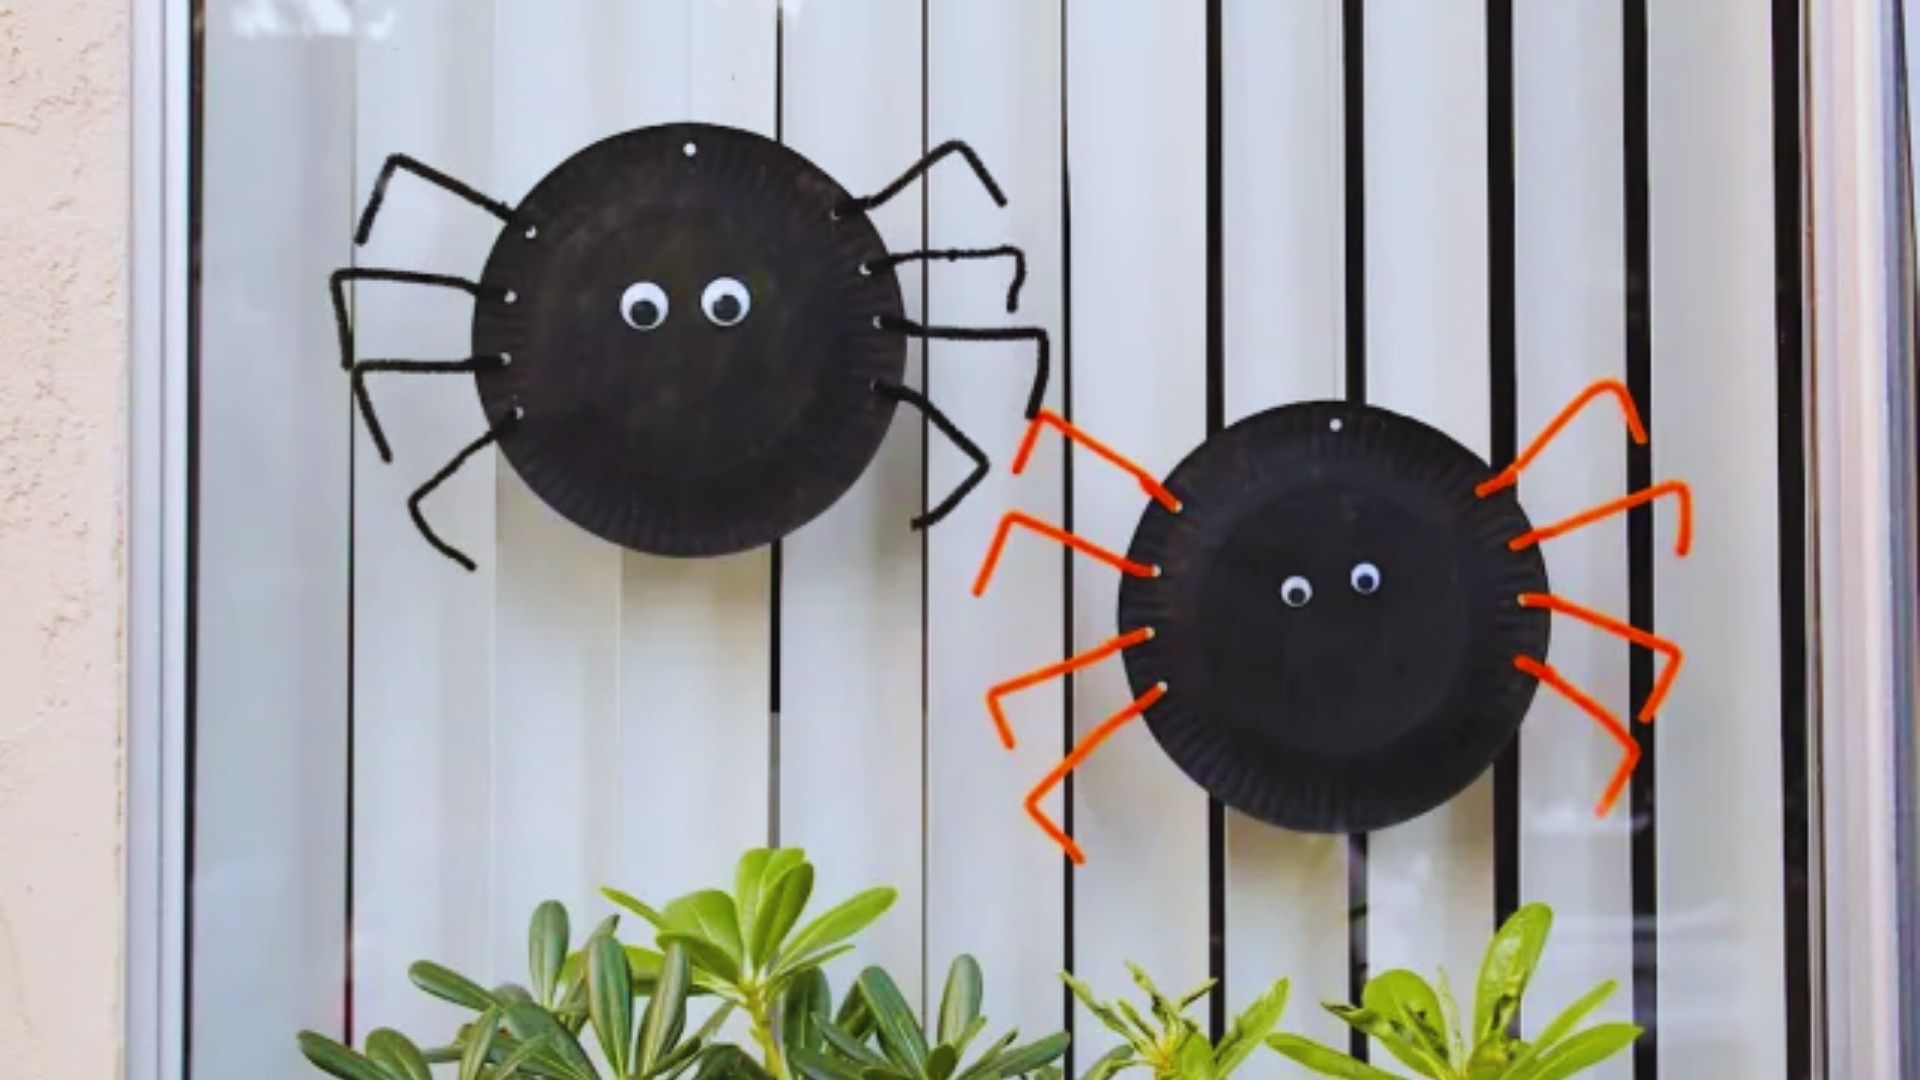
13. Paper Plate Spider with Pipe Cleaners
Paint a paper plate black and poke four pipe cleaners through each side to create eight legs in total. Bend the ends of the pipe cleaners downward for creepy spider feet.
Hang it from a piece of string and it will twist and spin in the air. Add two large googly eyes to the front to complete the spider look.
14. Paper Plate Witch on a Broomstick
Attach a long paper straw or a rolled paper tube as the broomstick. Make a small witch figure from a paper plate and carefully cut a slit through the middle of the plate.
Slide the broom through the slit so the witch can move along the broom from one end to the other. It is simple to make but surprisingly fun to play with.
15. Paper Plate Jack-O-Lantern Puppet
Decorate a paper plate to look like a pumpkin face with painted features. Tape a wide popsicle stick or craft stick firmly to the back of the plate.
Now your child has a Halloween puppet for storytelling or pretend play. You can make a full set of characters for a fun spooky little puppet show at home.
Creepy and Crawly Crafts
Spiders, webs, and skeletons make this section a must-try for any kid who loves the spookier side of Halloween.
16. Paper Plate Spider Web
Use a hole punch to make evenly spaced holes around the edge of a white paper plate. Thread white or silver yarn through the holes in a criss-cross pattern to form a web design across the plate.
Tie the yarn off neatly at the back when finished. Hang it on a door or window for a spooky but simple Halloween decoration.
17. Spider Web Wreath
Make a yarn web like the one above, but use a larger plate with the center cut out to form a ring shape. Weave the yarn through the holes punched around the ring.
Add small plastic spiders or ones made from black pom-poms on top. Hang it on your front door for a great Halloween welcome that is easy to make.
18. Skeleton Paper Plate Mask
Paint a plate white and draw hollow black eye sockets, a long triangle nose, and a wide mouth full of teeth. Cut out the eye holes so the mask can actually be worn.
Attach an elastic string through small punched holes on each side or use a craft stick as a handle. Kids can wear it for dress-up or use it while trick-or-treating.
19. Bat Decoration
Paint a full paper plate black and let it dry completely. Cut curved wing shapes out from the sides of the plate or add separate wing pieces made from black paper.
Draw small fangs and red eyes with paint or marker. Punch a hole at the top and hang it from the ceiling or a window for a classic Halloween bat decoration.
20. Flying Paper Plate Vampire
Cut a wide semicircle of black paper for a dramatic flowing cape and attach it to the back of a decorated plate. Paint the front of the plate as a pale vampire face with dark hair and sharp white fangs.
String it up with black thread so it hangs in the air like it is flying. It makes a great addition to any Halloween display at home.
21. Spider Handprint Plate
Press each of your child’s hands into black paint and stamp them firmly onto a white plate, with the fingers spread outward, to form the spider’s eight legs.
Add a black circle of paint in the center for the body and glue two large googly eyes on top. This one doubles as a sweet and personal keepsake craft every parent will want to save.
Whimsical and Fun Crafts
These playful crafts are all about color, creativity, and having a good time without worrying about the results.
22. Candy Corn Paper Plate
Divide a paper plate into three even sections and paint the bottom section yellow, the middle orange, and the top white to look like a giant piece of candy corn.
Let each section dry before painting the next to avoid mixing the colors together. Hang it on the wall or use it as a fun tray for holding small Halloween treats.
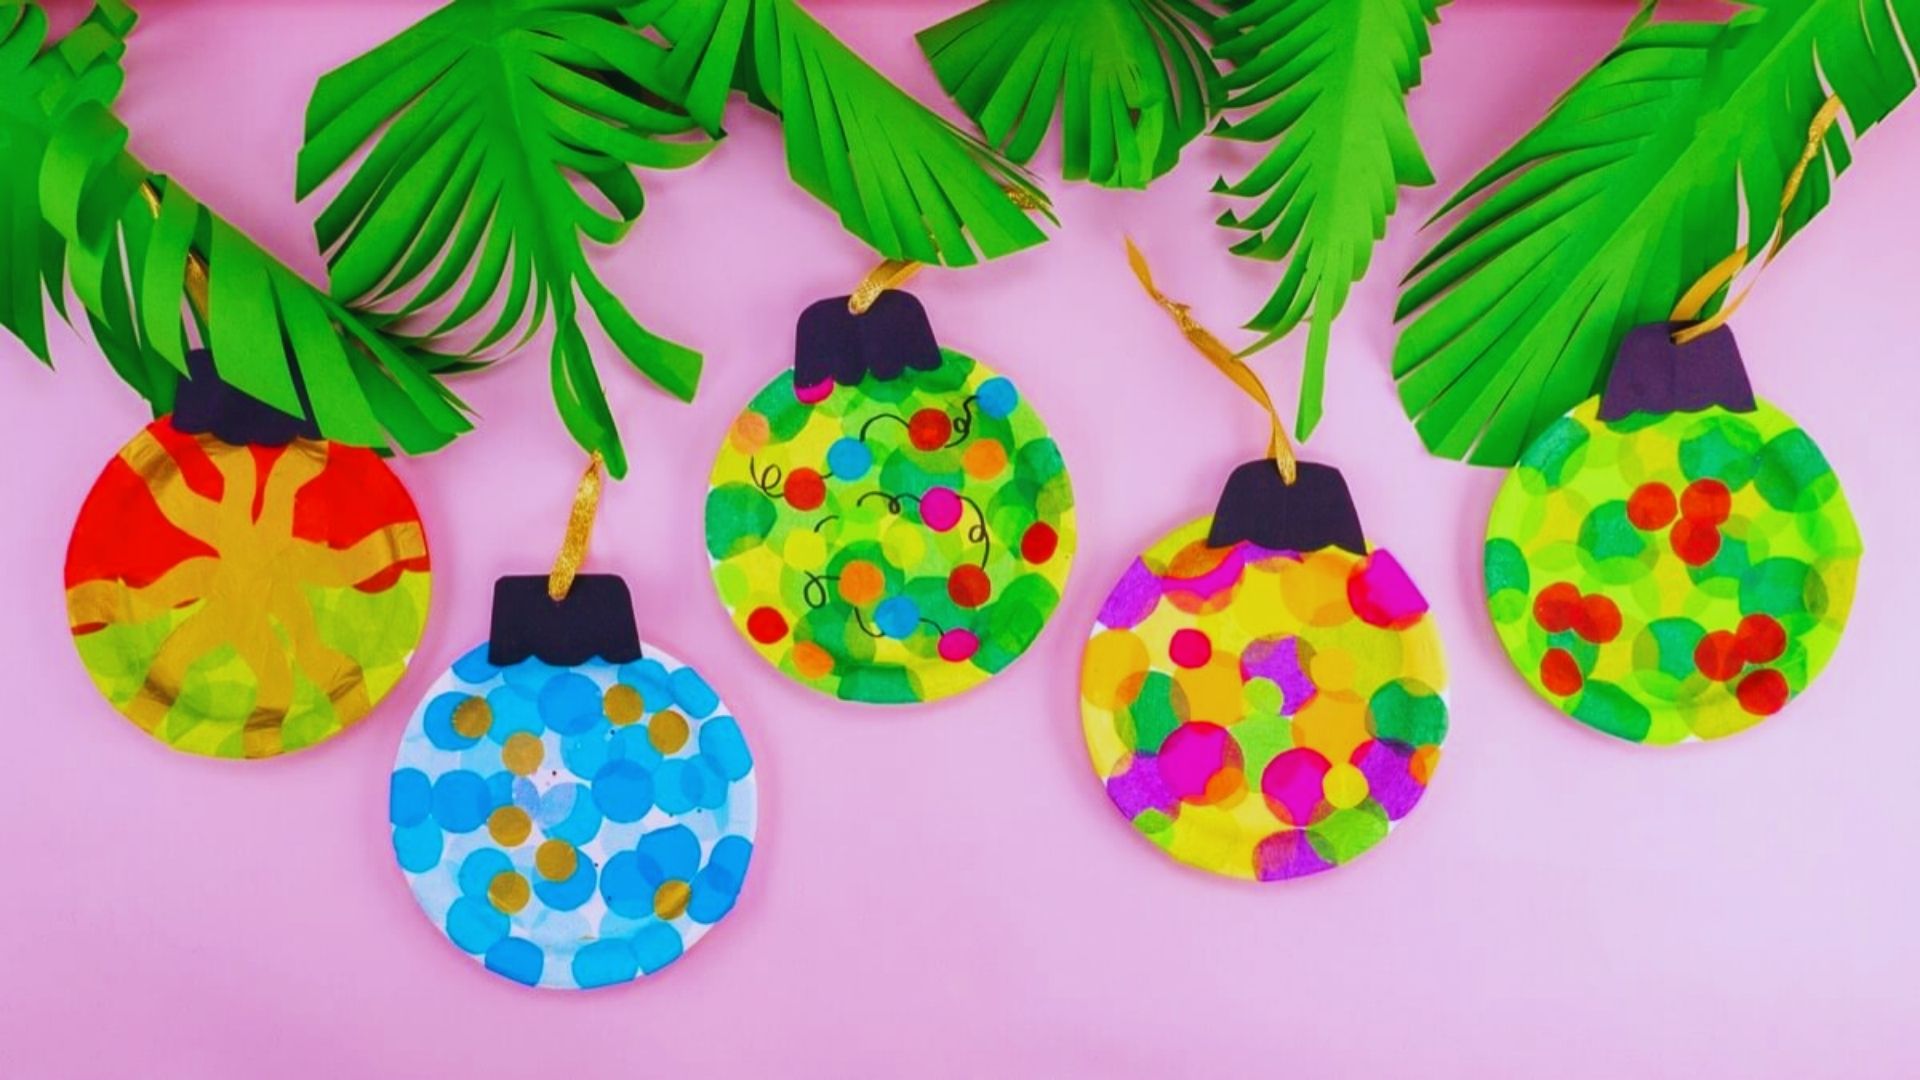
23. Yarn Jack-O-Lantern
Cover a paper plate with a generous layer of glue and wrap orange yarn around it in tight, even rows from the outside in. Let it dry completely before touching.
Once set, cut out paper eyes, a nose, and a mouth and glue them on top. The yarn texture makes this pumpkin stand out from every other painted one on the wall.
24. Frog Puppets in a Witch’s Brew
Make small green frog faces from paper plates or circles and attach craft stick handles to the back. Use a large black plate painted as a bubbling cauldron as the scene prop.
Kids can pretend to stir the brew and pop the frog puppets in and out of the cauldron. This craft sparks storytelling and imaginative play for a long time after it is made.
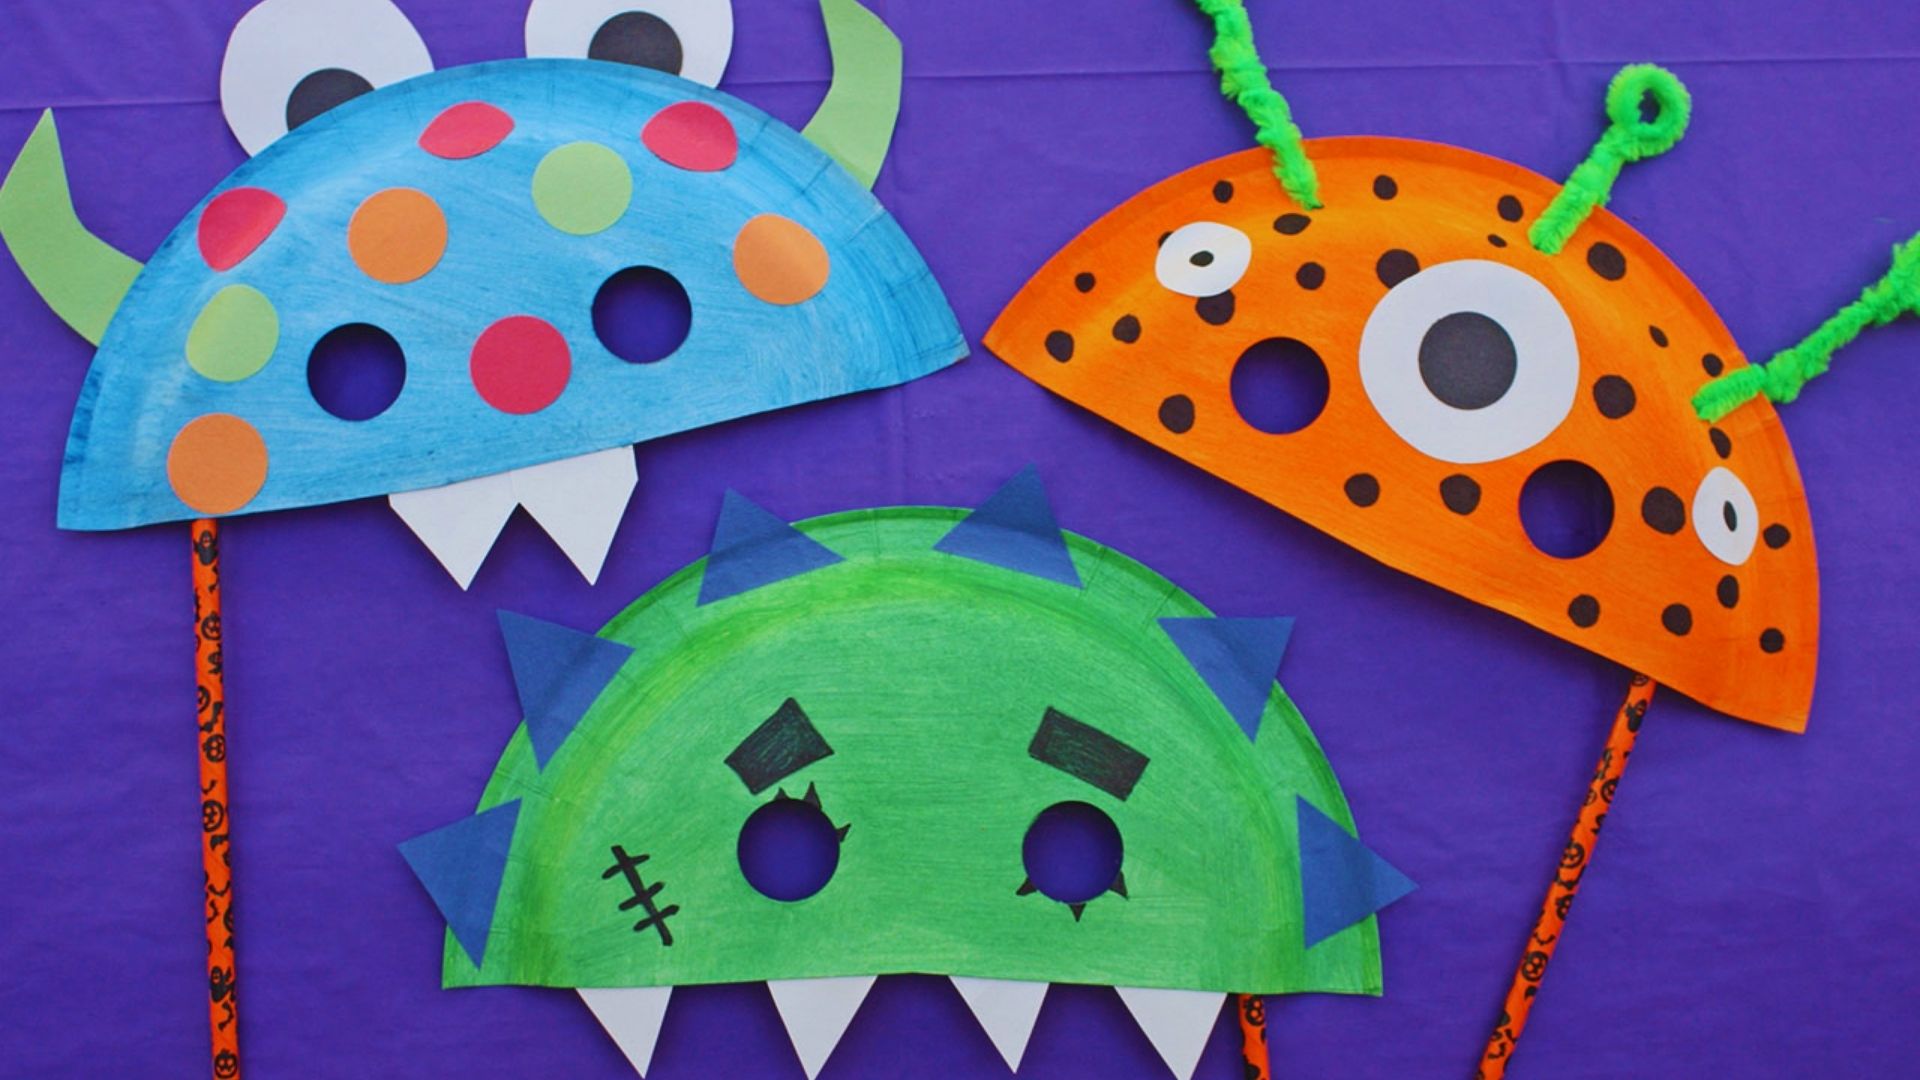
25. Paper Plate Monster
This one has absolutely no rules at all. Give kids a plain paper plate, paints, markers, googly eyes, pipe cleaners, and paper scraps.
Let them create whatever monster they can come up with on their own. Every single one will be completely different from the next.
This is personally one of my favorites because it shows exactly what each child’s imagination can do.
26. Paper Plate Alien
Paint the plate a bright and fun color like neon green, purple, or electric blue. Add several large googly eyes across the face in odd and unexpected places.
Poke pipe cleaners through the top of the plate for bendy antennas and curl the ends into swirls. This craft is easy to make, very colorful, and always gets a big excited reaction from kids.
27. Paper Plate Owl
Cut out large round eyes from white paper and draw bold black pupils on each one. Glue them to the center of the plate.
Cut out paper feathers in orange, black, and purple and layer them from the bottom of the plate upward. Add a small orange triangle beak between the eyes.
This owl looks wonderful hanging in a window when light shines through it.
Masks for Dress-Up
These wearable paper plate masks add a fun and creative twist to the craft table and are perfect for parties and playtime.
28. Fun Halloween Masks
Make a set of themed masks by painting paper plates as pumpkins, ghosts, or cats. Cut out eye holes sized right for the child who will wear it.
Add matching decorations such as carved pumpkin lines, spooky eyes, or black cat ears. Attach elastic through punched side holes or tape on a craft stick handle and your kids are ready for the party.
29. Black Cat Mask
Paint a paper plate black and let it dry fully before decorating. Cut two triangles from black or pink paper and glue them on top for pointy cat ears.
Poke pipe cleaners through the cheek area of the plate to form whiskers on both sides. Cut out eye holes and attach a craft stick at the bottom for easy holding.
It comes together fast and looks adorable.
30. Skeleton Mask
Paint a plate white. Draw black eye sockets and carefully cut them out so the wearer can see through. Add a wide grin filled with rectangular teeth below using black marker.
Draw thin lines on the forehead and cheeks to suggest bone details. Attach elastic for wearing or a stick for holding at parties. This mask works great as a costume addition.
31. Vampire Mask
Paint a plate pale white or leave it in its natural color. Draw slicked-back black hair along the top edge and bold arched eyebrows above the eyes.
Add a wide smile with two sharp white fangs hanging down from the upper lip. Cut out the eye holes and attach elastic for wearing or a stick for holding.
It is a fast costume option that always looks sharp.
32. Witch Mask
Paint the plate green and let it dry completely before adding any details. Cut yarn into long strips for wild, tangled hair and glue it to the sides and top of the plate.
Make a small cone-shaped hat from black paper and attach it firmly at the top of the plate. Draw a long pointy nose, wart dots, and a crooked smile with marker.
Cut eye holes and it is ready to wear.
Decorative Paper Plate Crafts
These paper plate crafts are made to be displayed, turning any home or classroom into a spooky Halloween space.
33. Halloween Wreath
Cut the center out of a large paper plate to create a wide ring shape. Glue dried lentils, black beans, or torn paper pieces all across the ring for interesting texture.
Paint over the whole thing in orange, black, or purple once the glue dries. Add a ribbon or a small fabric bow at the top for hanging.
It is a low-cost decoration that looks impressive on any door.
34. Black Cat Wreath
Make several small black cat faces from smaller paper plates or hand-cut paper circles. Attach the cat faces around a larger ring cut from a full plate with even spacing between them.
Add tiny pipe cleaner whiskers to each individual cat face for detail. Hang the finished wreath on a door or wall for a fun, cat-themed Halloween decoration that took barely any time.
35. Cupcake Liner Wreath
Flatten cupcake liners in orange, black, and purple and glue them all over a ring-shaped plate base in overlapping layers. Build up enough layers to make the wreath look full and fluffy.
Add a paper spider, bat, or small ghost in the center as a finishing touch. The mix of colors and textures makes this a great sensory craft option for younger children.
36. Paper Plate Halloween Scenes
Use several paper plates together to build a full Halloween scene display. Paint one plate as a glowing full moon, another as a silhouette haunted house, and another as a dark graveyard with crooked headstones.
Arrange the plates on a wall and layer them together to create depth. This works well as a group project for classrooms or family craft nights at home.
37. Jack and Sally Paper Plate
Paint one plate pale with hand-stitched face details for Sally and another solid black with a spiral hill silhouette for Jack.
Add small cut-paper details like Sally’s colorful patchwork body sections or Jack’s classic pinstripe suit strips.
These are great for older kids who love the movie and want to make something with a little more detail and meaning behind it.
38. Swirly Paper Plate Ghost
Paint a paper plate white and draw swirling circular designs all over the surface in light grey or silver paint.
Cut wavy, uneven edges along the bottom of the plate to shape it like a flowing ghost. Add two solid black oval eyes near the center of the face.
The swirl patterns give the ghost a whimsical and artistic look that stands out from a plain white ghost.
39. Paper Plate Witch Hat
Cut a large paper plate from the edge to the center in a straight line. Overlap the two cut edges and tape them together to form a cone shape.
Paint the cone black inside and out and let it dry. Cut a wide brim shape from another plate with a circle removed from the center and attach the cone through it.
This works as a table decoration or a small wearable hat for a doll.
40. Paper Plate Candy Basket
Fold a paper plate in half and staple or glue the sides partway to form a small open pocket at the top. Decorate the outside as a pumpkin, ghost, or monster face using paint and markers.
Punch two small holes at the top folded edge and thread a pipe cleaner through both holes to form a sturdy handle.
Kids can use it to collect small treats and candies at a class Halloween party.
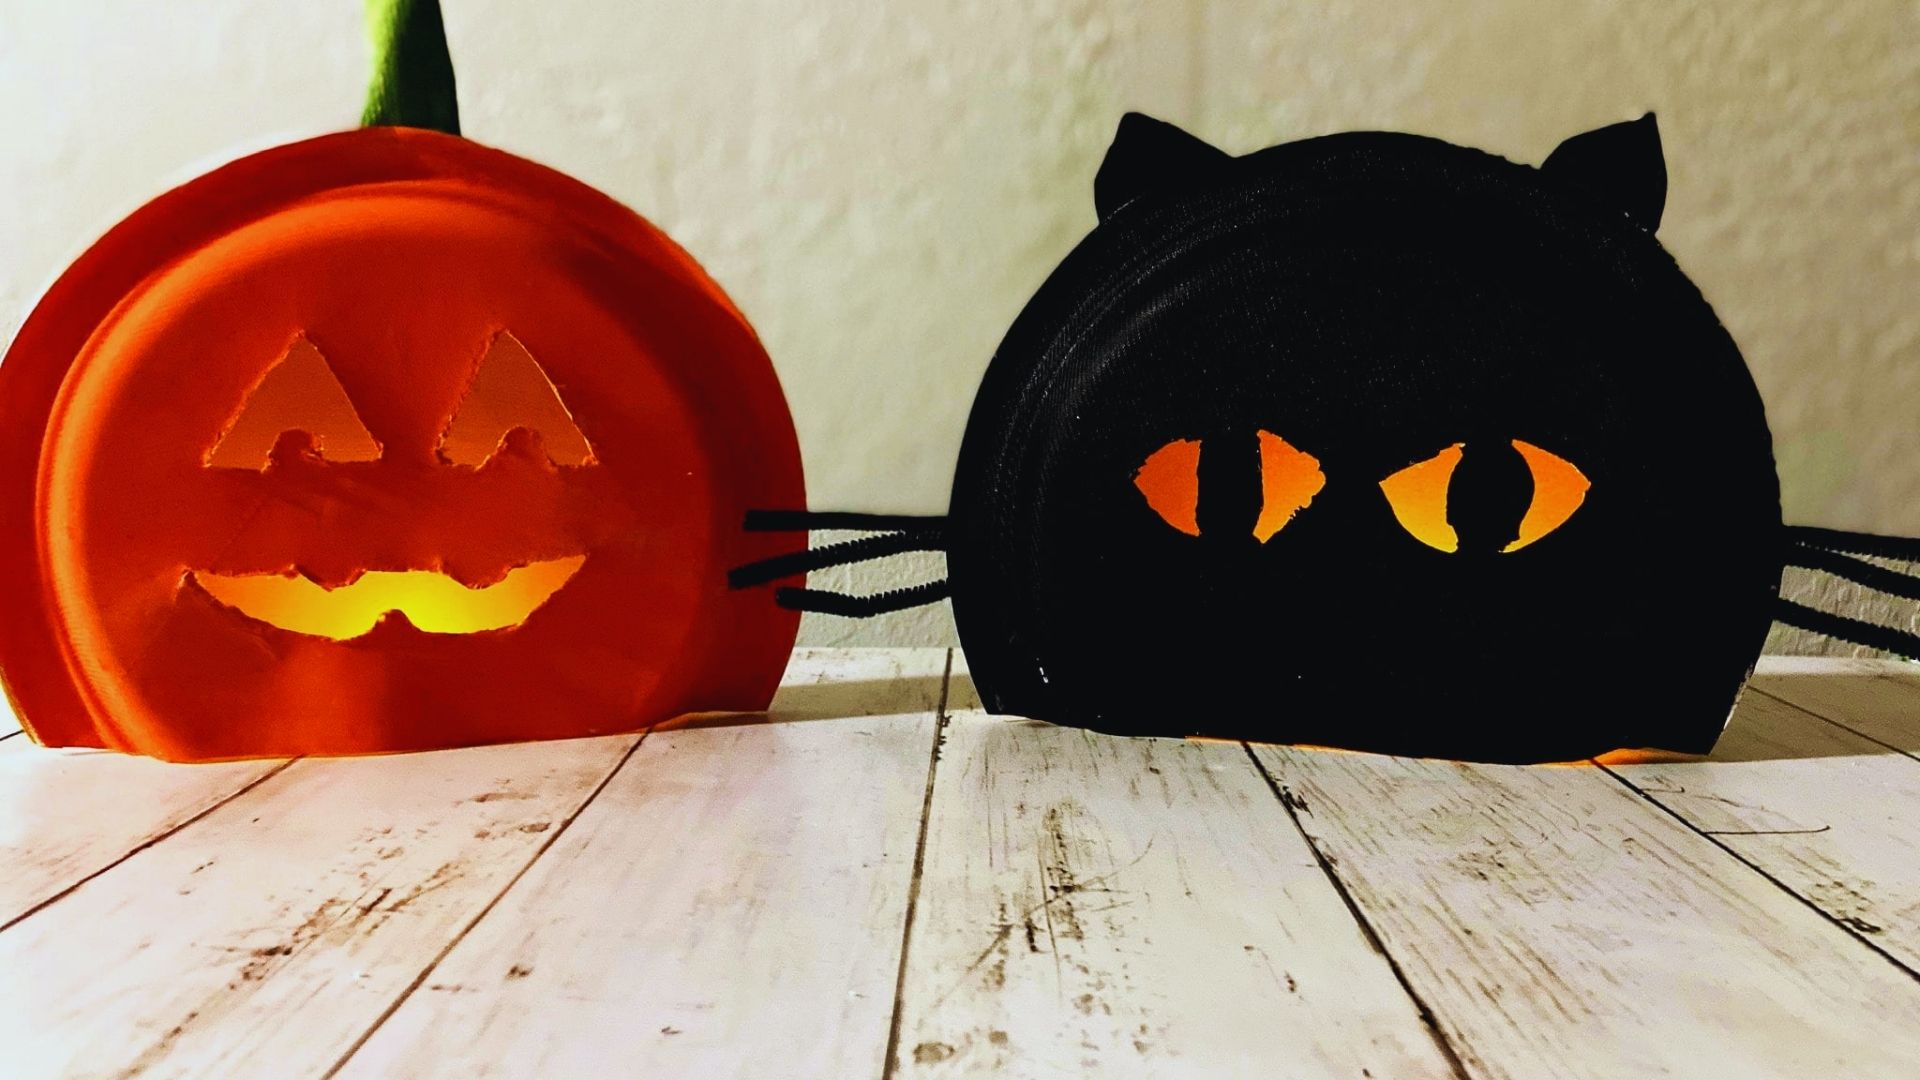
41. Paper Plate Pumpkin Luminary
Paint a paper plate orange and let it dry all the way through. Carefully cut out triangle eyes, a small triangle nose, and a wide jagged mouth using scissors or a craft knife with adult help.
Curve the plate into a cylinder shape and tape the two side edges together securely. Drop a battery-powered tea light inside the cylinder.
The soft glow that shines through the cutout face looks incredible in a dark room.
Tips for Crafting With Kids
Good prep makes everything run smoother. Here are a few things I always keep in mind before we start a crafting session.
- Use non-toxic paints and child-safe scissors. Kids will touch everything, so always check labels before buying.
- Encourage creativity over perfection. A lopsided pumpkin made by your child beats a perfect one made by you every time.
- Prep all materials before you begin. Having everything ready means less stopping, more crafting, and way less mess.
- Make it a group or classroom activity. Each child picks a character and by the end you have a full Halloween gallery on the walls.
- Display the finished crafts around the house. Hang them on doors, tape them to windows, and let kids enjoy seeing their work all season long.
Conclusion
I hope these paper plate Halloween crafts give you and your kids plenty of ideas for a fun and creative Halloween season.
From classic pumpkins to flying vampires and glowing luminaries, there is something here for every age and every skill level.
I have made many of these with my own children, and the mess was always worth every second of the fun we had.
Pick one craft or try them all this October. Either way, you will end up with happy kids and a home full of handmade Halloween spirit.
Which one are you going to try first? Drop a comment below and let me know, I would love to hear about it!
Frequently Asked Questions
What age group are paper plate Halloween crafts best suited for?
These crafts work well for kids aged 3 and up. Younger children may need adult help with cutting, while older kids can handle most steps on their own.
What supplies do I need for paper plate Halloween crafts?
You will need paper plates, non-toxic paint, markers, googly eyes, glue sticks, pipe cleaners, yarn, scissors, and craft sticks. Most items are easy to find at any dollar store.
Can these crafts be used as classroom Halloween activities?
Yes. These crafts are low-cost, easy to manage in groups, and can be finished in under an hour for most designs on the list.
How can I make the crafts last longer as decorations?
Once dry, cover the finished craft with a thin layer of clear Mod Podge or sealant spray to protect the paint all season long.
Are these paper plate crafts safe for toddlers?
Most are safe with adult supervision. Use child-safe scissors and non-toxic paints. Skip small parts like googly eyes for very young toddlers to avoid any risk.