

Orchids look hard to draw, but they don't have to be. This guide breaks the process into small, simple steps anyone can follow.
You'll learn how to study the flower's shape, set up basic guidelines, and build your drawing from start to finish.
We'll also cover the right tools, common mistakes, and ways to add texture and shading once your outline is ready. By the end, you'll have a clean orchid drawing you made yourself.
I've taught beginner art lessons for years, and orchids are one of the most requested topics. This guide pulls from what actually works for new artists, not just theory. Let's get started.
Understanding the Basic Structure of an Orchid Flower

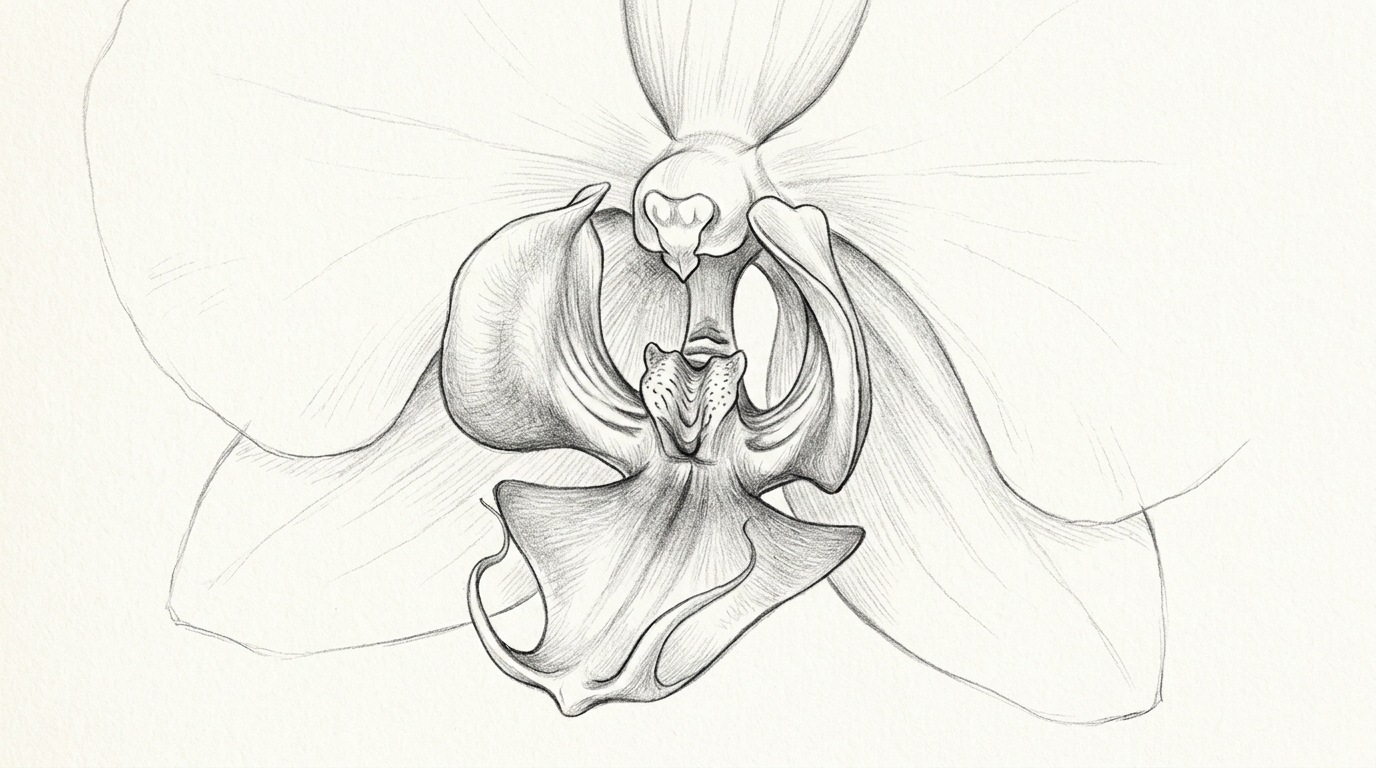
An orchid has a center column, side petals, an upper petal, and lower petals that spread wider. Knowing these parts helps you place each piece correctly instead of guessing.
Guidelines act like a map. A simple circle or oval gives you a frame to build around, so petals stay balanced and proportions don't go wrong halfway through.
Before you start, look at a real orchid or a clear photo. Notice how the petals overlap and where the center sits. A few minutes of looking goes a long way.
Materials Needed for Orchid Flower Drawing
The basic tools you need to get started, from pencils to paper, without spending too much.
A set of pencils ranging from HB to 4B works well for most beginners, paired with plain, slightly textured drawing paper.
Keep a regular eraser for big fixes and a kneaded eraser for lightening lines without smudging. A ruler can help with your first guideline circle if you want extra accuracy.
For your workspace, find a spot with good natural light and enough room to rest your arm freely. A clean, flat surface makes a real difference in how steady your lines turn out.
Orchid Flower Drawing Easy Tutorial for Beginners
A simple step-by-step process that breaks the orchid into manageable shapes, from the first circle to the final outline.
Step 1: Draw the Main Guideline Circle
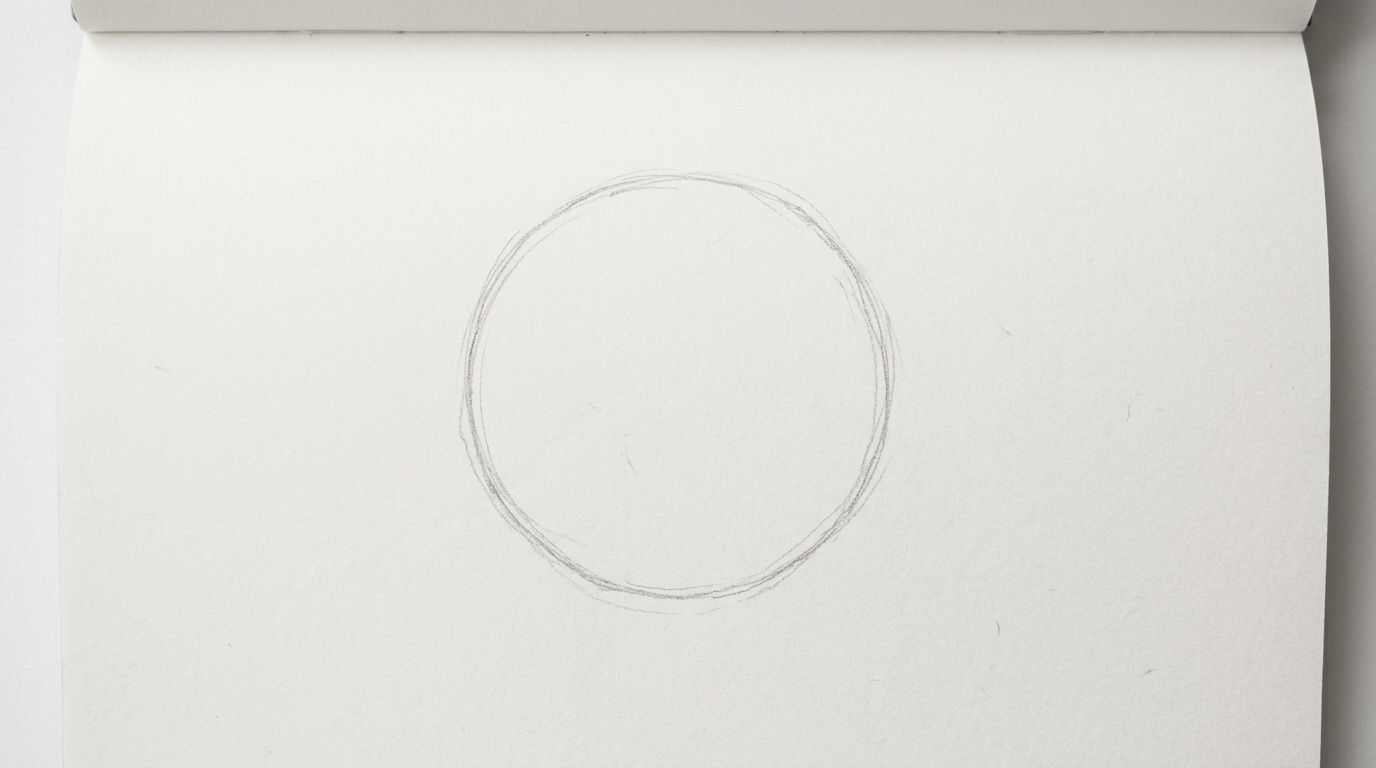
Start with a light circle in the middle of your page. This circle marks the rough size of the flower and helps you keep all the petals in proportion.
Step 2: Sketch the Flower Center

Inside the circle, add a small shape for the flower's center, often called the lip. This part is usually larger and more detailed than the other petals.
Step 3: Map Out the Side Petals
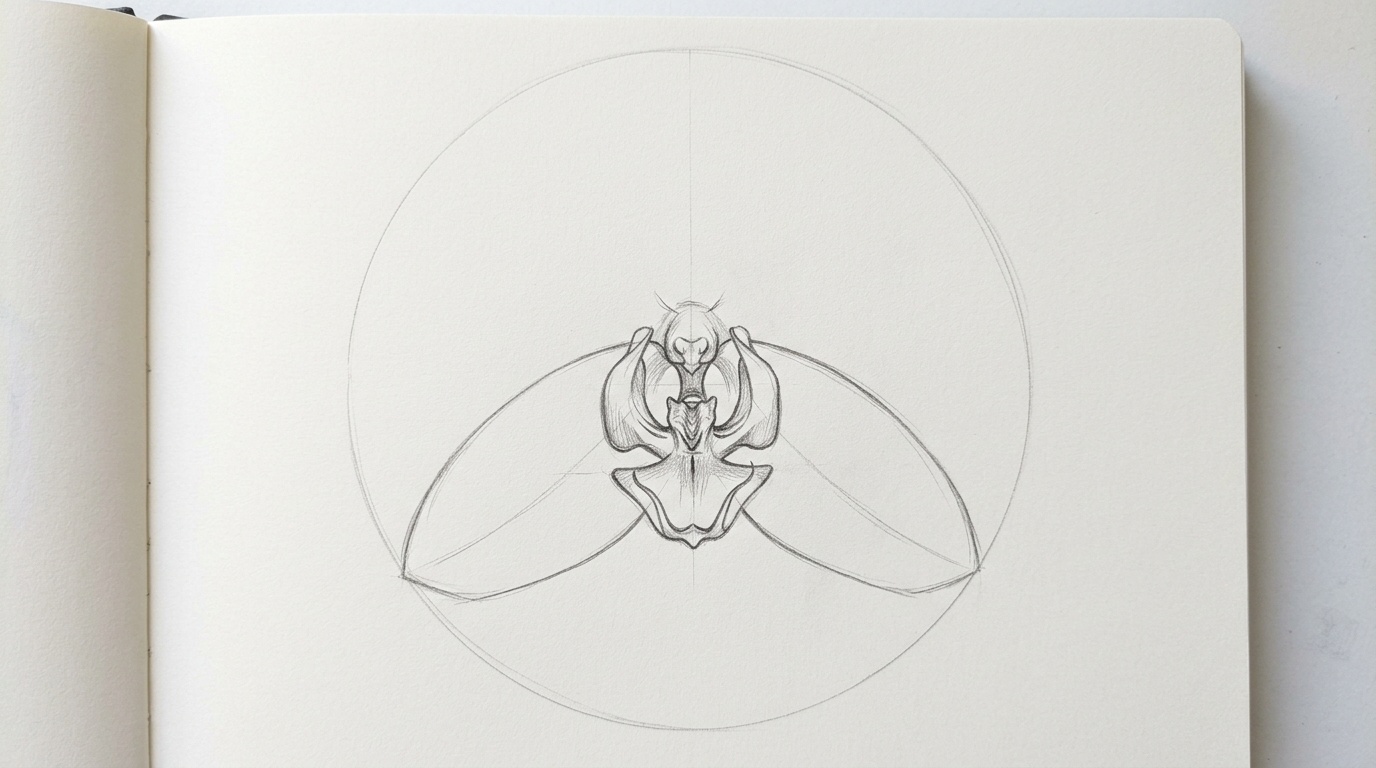
Add two petal shapes on either side of the center. These usually angle slightly outward and are smaller than the top and bottom petals.
Step 4: Add the Upper Petal
Draw a petal shape above the center. This one is often rounder and sits slightly behind the side petals, depending on the angle of the flower.
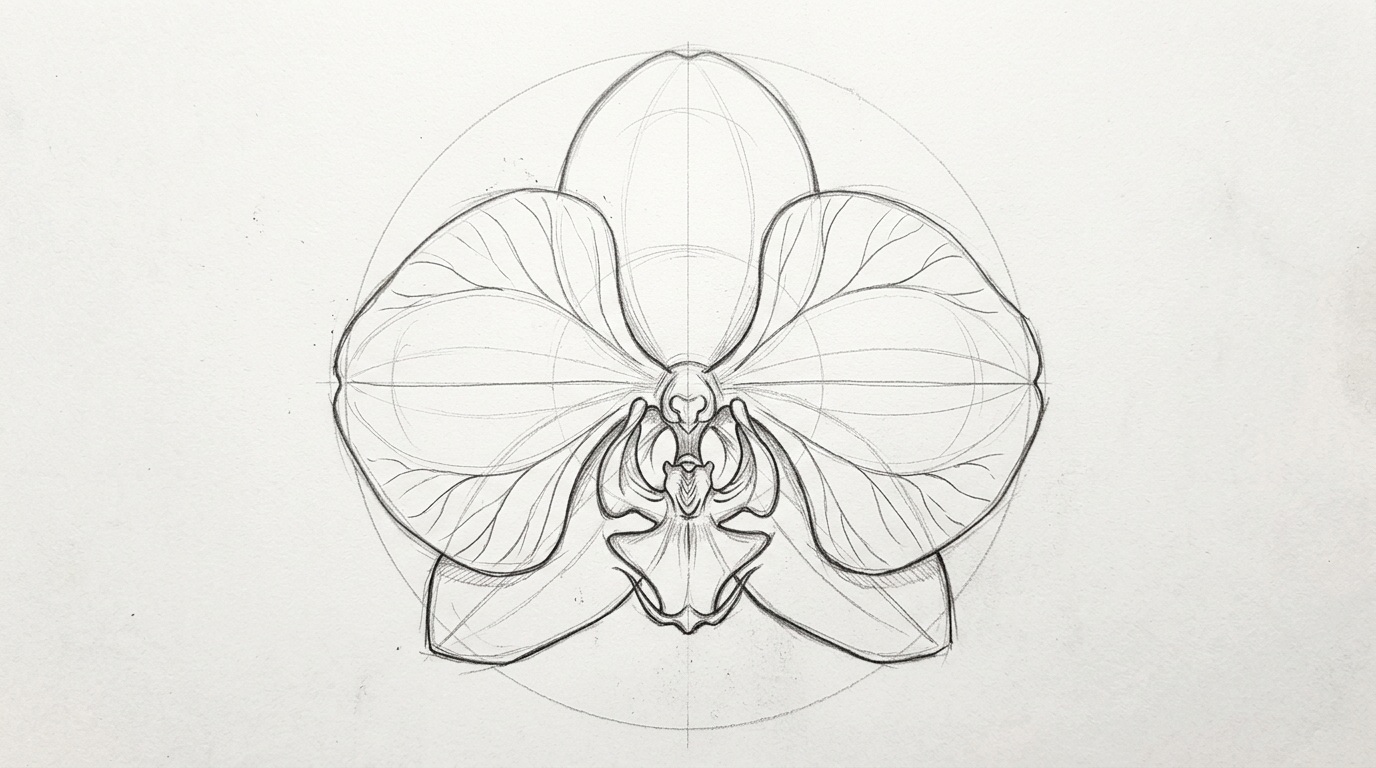
Step 5: Draw the Lower Petals
Add the two lower petals, which tend to be wider and curve outward. These often overlap slightly with the side petals.
Step 6: Define the Orchid's Core Details

Refine the center shape with small curves and folds. This is the most detailed part of the flower, so take your time getting the basic lines right.
Step 7: Sketch the Stem
Add a simple curving line for the stem below the flower. Keep it light, since you can adjust its angle later.
Step 8: Remove Guidelines and Refine the Outline
Once your basic shapes look balanced, gently erase the guideline circle. Clean up the petal edges so the outline looks smooth and natural.
How to Create a Clean Orchid Flower Drawing Outline

How to turn your rough sketch into a tidy outline ready for shading and detail work.
Refining Petal Edges and Curves
Go over each petal edge with a slightly firmer line. Smooth out any rough or jagged spots so the curves flow naturally from one petal to the next.
Correcting Proportions Before Detailing
Step back and check if any petal looks too big, too small, or oddly placed. Fix these issues now, before adding shading, since changes are easier at this stage.
Making the Flower Look More Natural
Avoid even petals. Real orchids have slight variations in size and angle. Small, uneven curves often make the drawing look more believable.
Orchid Flower Drawing in Pencil: Adding Depth and Texture

Simple shading and texture techniques that give your orchid drawing a sense of form and dimension.
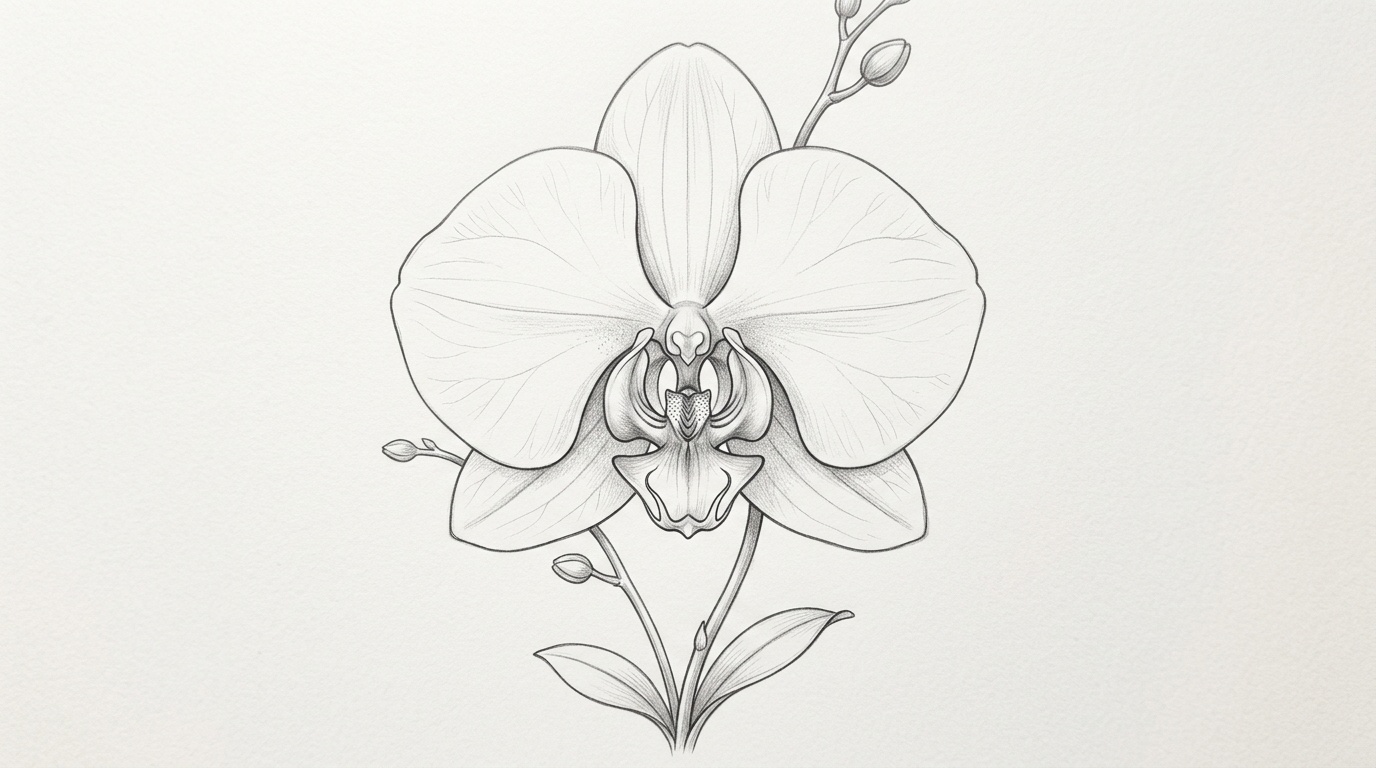
Drawing Petal Veins and Surface Details
Add thin, curved lines along each petal to show veins. Keep these light and slightly varied, since orchid veins are rarely perfectly straight.
Applying Light and Shadow
Decide where your light source is coming from. Shade the opposite side of each petal slightly darker to create a sense of form.
Shading the Flower Center
The center usually needs the darkest shading, since it has more folds and depth. Build up tone gradually with light pencil strokes.
Creating Dimension in the Stem and Petals
Add a bit of shading along one side of the stem and the edges of overlapping petals. This helps separate each part visually.
Techniques for a Realistic Orchid Flower Drawing

Practical methods for making your orchid drawing look more lifelike and three-dimensional.
Observing Natural Petal Shapes
No two petals are exactly alike. Look closely at reference photos and notice small bends, curls, and uneven edges, then add similar details to your drawing.
Building Realistic Contrast
Use a range of pencil pressures, from very light to fairly dark. Strong contrast between light and shadow areas adds depth to the flower.
Showing Overlapping Petals Effectively
Where petals overlap, the petal behind should have a slightly darker edge near the overlap. This small detail helps show which petal sits in front.
Enhancing Depth With Layered Pencil Strokes
Build up shading in light layers instead of pressing hard right away. Layering lets you control how dark each area gets and keeps the texture smooth.
Common Mistakes Beginners Make When Drawing Orchids
A look at frequent errors new artists make, and simple ways to avoid or fix them.
Making Petals Too Symmetrical
Perfectly matching petals can look stiff. Allow small differences in size and curve between petals on each side of the flower.
Using Dark Lines Too Early
Heavy outlines early on make mistakes harder to fix. Keep your early sketch light so you can adjust shapes without leaving marks behind.
Ignoring Overlaps and Flower Layers
Skipping overlap details makes petals look flat and separate. Pay attention to which petals sit in front and shade accordingly.
Overworking the Shading
Adding too many layers of dark shading can make the drawing look muddy. Stop once you reach a good contrast and avoid going over the same area repeatedly.
Tips to Improve Your Orchid Flower Drawing Skills
Helpful habits and practice methods that build confidence and steady improvement over time. Here are a few simple ways to keep getting better.
- Practice with reference photos. Use clear photos of real orchids from different angles to understand how the petals look from various viewpoints.
- Focus on observation before detailing. Spend time studying the flower's shape before adding fine details, since a solid basic structure makes the rest of the drawing easier.
- Experiment with different pencil techniques. Try different grips, pressures, and stroke directions, as small changes can create very different textures and effects.
- Redraw the same flower to build confidence. Drawing the same orchid a few times helps you notice small improvements each round and builds steady confidence.
- Take breaks and return with fresh eyes. Stepping away for a bit often helps you spot mistakes or areas to improve that you missed before.
Conclusion
You've made it through the whole process, from the first guideline circle to shading and small details. That's real progress.
I still remember my first orchid drawing looked more like a pinwheel, and that's okay. Every artist starts somewhere messy.
Try this orchid flower drawing tutorial today, and don't worry about getting it perfect on the first try.
If this guide helped you, leave a comment below and let me know how your drawing turned out.
Feel free to share this post with a friend who loves to draw, and check out more tutorials on the blog.
Frequently Asked Questions
Do I need expensive materials to start orchid flower drawing?
No, basic pencils and regular paper work fine. A small eraser and good lighting matter more than costly supplies.
How long does it take to finish an orchid flower drawing?
It depends on your pace, but beginners can often finish a simple version in 30 to 60 minutes, including light shading.
Should I trace an orchid photo first?
Tracing can help you understand proportions, but freehand practice builds skill faster. Try sketching first, then compare with a reference photo.
Why do my petals look flat after shading?
Flat petals usually mean shading is too even. Add darker areas near overlaps and lighter areas where light hits directly.
Can I use this guide for other flowers too?
Yes, the same steps for guidelines, shapes, and shading apply to many flowers. Orchids are just a good starting point for practice.