
")
Sunsets are one of the most loved subjects in art, and for good reason. The warm colors, soft light, and calm feeling make them hard to resist.
I still remember the first time I tried drawing one. It looked nothing like a sunset. But once I learned a few simple shapes and easy blending tricks, everything clicked.
If you are a beginner, do not worry. You do not need fancy skills. In this guide, I will walk you through the full process, step by step, with tips that actually work.
Understanding the Basics of a Sunset Drawing

Before you draw, it helps to know what makes a sunset look real.
Key Elements of a Sunset Scene
Every good sunset drawing has these four things:
- The horizon line, which divides the sky from the ground or water
- The sun, usually placed just above or sitting on the horizon
- Sky gradients, where colors shift from bright yellow to deep orange and purple
- Silhouettes of trees, hills, or water to add depth and drama
How Light and Shadows Work
Light is everything in a sunset drawing. The area closest to the sun is always the brightest. As you move toward the edges of the sky, the colors get darker and cooler.
The foreground, like trees or hills, appears almost completely dark because the light source is sitting behind them.
Once you understand this, your sunset will instantly look more natural and balanced.
Materials You Need to Draw a Sunset

Getting the right supplies makes the whole process easier.
Basic Drawing Supplies
Stock up on these before you start:
- Pencils (HB for sketching, 2B and 4B for shading)
- Colored pencils or markers if you want color
- A good eraser and a sharpener
- Drawing paper or a sketchbook
Optional Tools for Better Results
These are not must-haves, but they help a lot:
- A blending stump or tissue for smooth shading
- A white pencil or gel pen to add highlights
- A ruler to draw a clean, straight horizon line
How to Draw a Sunset (Step-by-Step)
Follow these five simple steps and you will have a beautiful sunset drawing done in no time.
Step 1 – Draw the Horizon and Sun

Start by drawing a straight horizon line across your paper. Place a half-circle sun near the center, sitting right on the horizon. Keep it light for now. This is just your base sketch, so do not press too hard with your pencil at this stage.
Step 2 – Add Background Elements

Now add some hills, mountains, or a water body behind the horizon line. Keep the shapes simple and slightly layered. You do not need perfect details here. Basic outlines work just fine and actually look better in a sunset scene with silhouettes.
Step 3 – Sketch Clouds
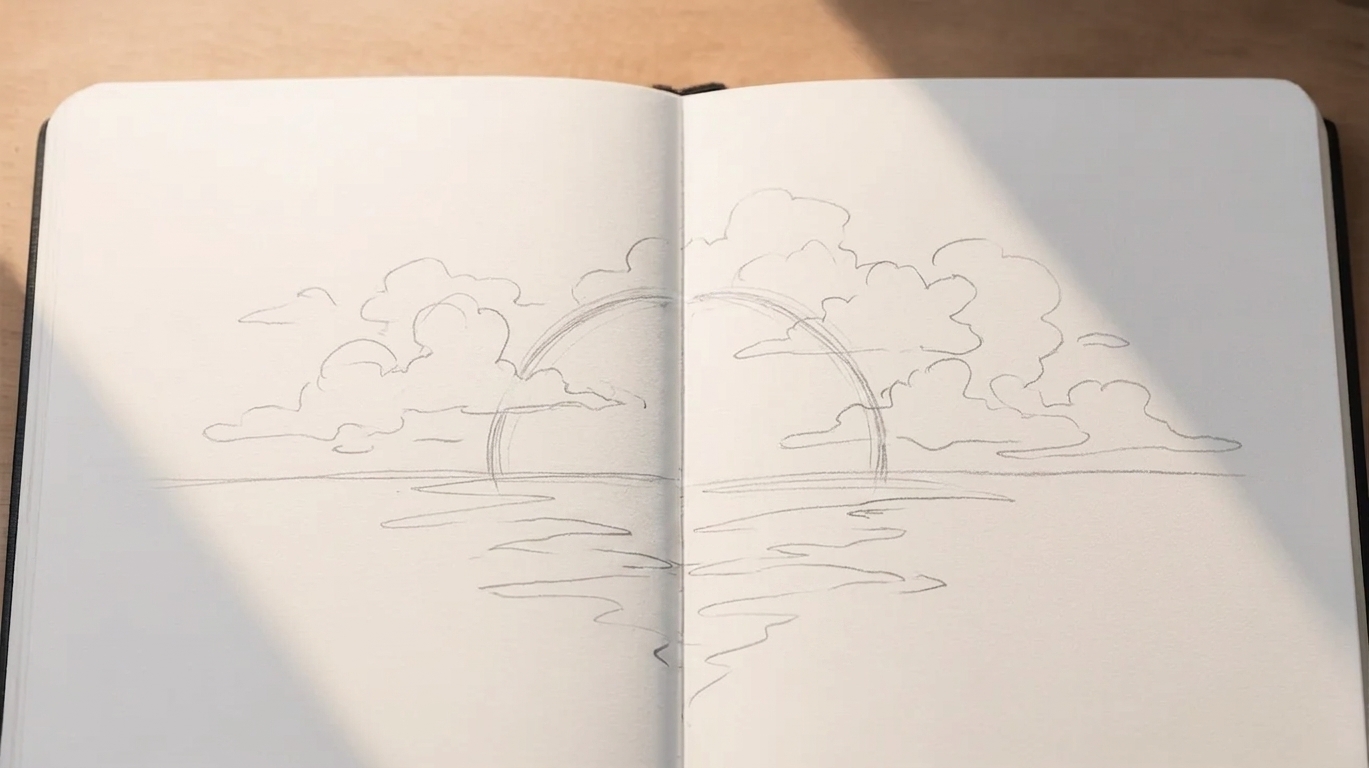
Draw soft, uneven cloud shapes around the sun. Do not make them too perfect or round. Real clouds have irregular edges. Keep your lines light and loose. A few simple curves are all you need to give your sky some life and movement.
Step 4 – Shade or Color the Sky

Start shading or coloring closest to the sun using your lightest tones. Slowly blend outward into deeper oranges, reds, and purples. Take your time with this step. Smooth blending is what makes the sky look real and gives your sunset that warm, glowing feel.
Step 5 – Add Details and Highlights
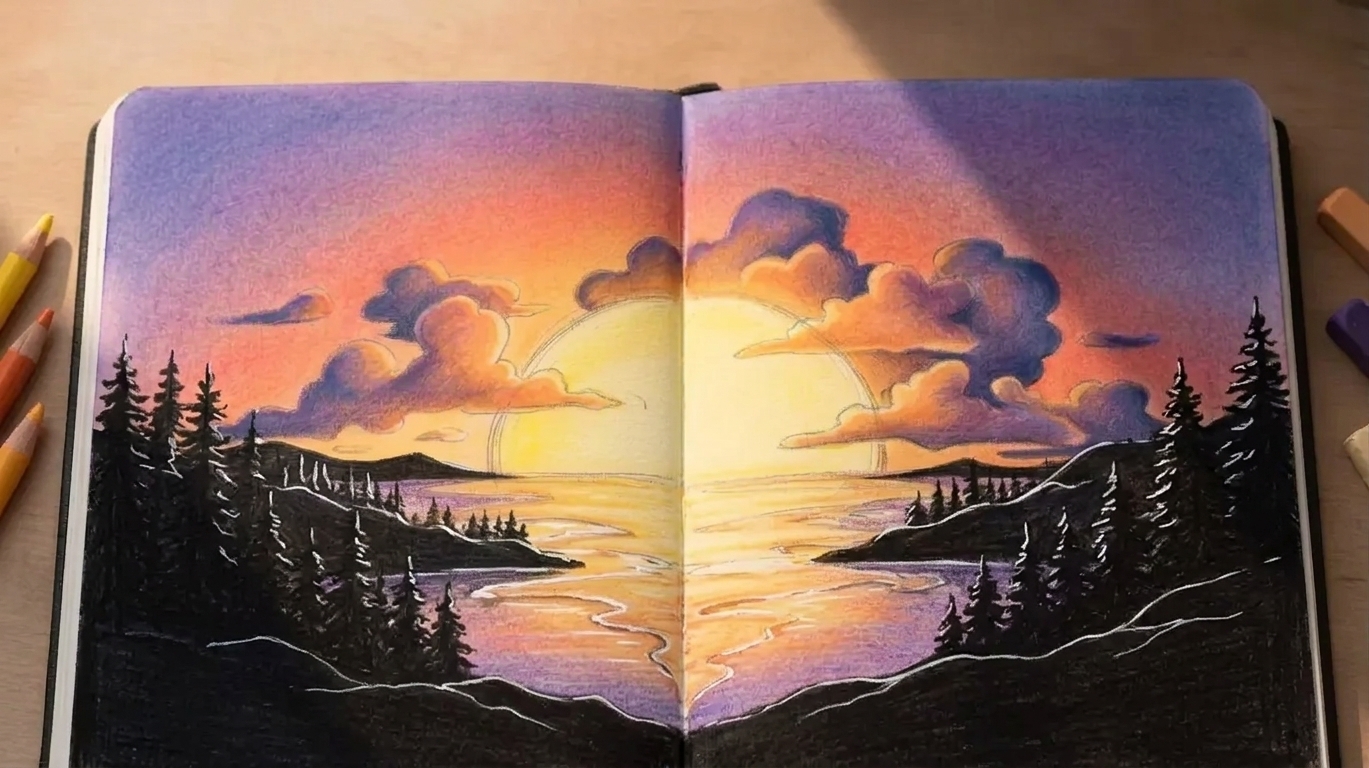
Darken your foreground shapes to create strong silhouettes. Add small highlights using a white pencil or gel pen. If there is water, add soft reflections of the sun and sky. Do a final round of blending and touch-ups to clean everything up nicely.
Tips for a Better Sunset Drawing
Small habits make a big difference in how your final drawing turns out.
- Use a blending stump or tissue to smooth out your shading. Harsh lines can ruin the soft feel of a sunset sky.
- Push the contrast between your bright sky and dark foreground. The stronger the difference, the more depth your drawing will have.
- Always keep the area around the sun the lightest part of your drawing. Adding dark tones there too early is a common mistake.
- Build your colors or shading in thin layers instead of going heavy all at once. This gives you much more control over the final look.
- Step back and look at your drawing from a distance every few minutes. It helps you spot areas that need more blending or adjustment.
Conclusion
Drawing a sunset gets better every single time you try. Your first one may not look perfect, and that is completely fine. I have been there too.
The key is to keep going and try different styles, lighting, and compositions with each new drawing. Some days go for a ocean sunset.
Other days try hills or a city skyline. Each attempt teaches you something new. So pick up your pencil, start today, and watch yourself improve with every stroke.
Frequently Asked Questions
What supplies do I need to draw a sunset for the first time?
You only need a pencil, eraser, and drawing paper to get started. Colored pencils or markers can be added later once you get comfortable.
Can a complete beginner draw a realistic sunset?
Yes, absolutely. Sunsets are made of simple shapes and basic shading techniques that anyone can learn. With a little practice, you will surprise yourself.
How do I blend colors smoothly in a sunset drawing?
Use a blending stump, tissue, or even your fingertip to soften the transitions between colors. Work in light layers and blend slowly for the best results.
What colors work best for a sunset drawing?
Yellow, orange, red, and deep purple are the go-to colors for a classic sunset. You can also mix in pink and light blue for a softer, more natural look.
How long does it take to draw a sunset?
A simple sunset drawing can take anywhere from 20 to 45 minutes. As you practice more, you will get faster and your results will keep getting better.