

A Christmas village is a miniature display of small houses, buildings, and figures that creates a festive winter scene during the holiday season.
These charming collections transform any space into a magical winter wonderland that captures the spirit of Christmas through detailed architecture and cozy lighting effects.
Making your own DIY Christmas village offers significant advantages over purchasing pre-made sets.
The cost savings alone make this project attractive, as store-bought villages can be quite expensive while homemade versions use affordable materials.
This beginner-friendly craft provides excellent benefits for crafters of all ages and skill levels.
The process helps develop creativity, fine motor skills, and problem-solving abilities while producing beautiful results that become treasured family decorations.
Each handmade piece carries personal meaning and can be customized to reflect your family’s style and preferences.
Materials and Supplies Needed

Paper Mache Houses
Paper mache houses serve as the foundation structures for your village buildings, providing lightweight yet sturdy bases that accept paint and decorative elements well.
These pre-formed shapes come in various architectural styles and sizes, allowing you to create diverse village layouts without complex construction requirements.
Cone Trees and Shadow Box Houses
Cone-shaped trees add vertical interest and natural elements to your village display, while shadow box houses create depth and dimension for more complex building designs.
These specialized forms help establish the village’s scale and provide opportunities for creative lighting effects and interior decorating.
Paints and Finishes
Chalk paint or acrylic paint provides excellent coverage on paper mache surfaces, creating smooth, professional-looking finishes in any color scheme.
Mod Podge comes in multiple varieties including Gloss, Matte, Satin, and Sparkle formulations, each offering different protective and decorative effects for your finished pieces.
Decorative Materials
Snow paste creates realistic winter effects on rooftops and ground areas, while scrapbook paper offers endless pattern possibilities for siding, roofing, and architectural details.
Glitter adds magical sparkle to windows and snow-covered areas, spray adhesive ensures secure attachment of lightweight elements, and pinecones with miniature wreaths provide natural finishing touches that enhance the cozy holiday atmosphere.
Step-by-Step Guide to Creating Your Christmas Village Houses
This comprehensive guide walks you through each phase of construction, from basic painting techniques to final decorative touches for professional-looking results.
Step 1: Painting the Houses
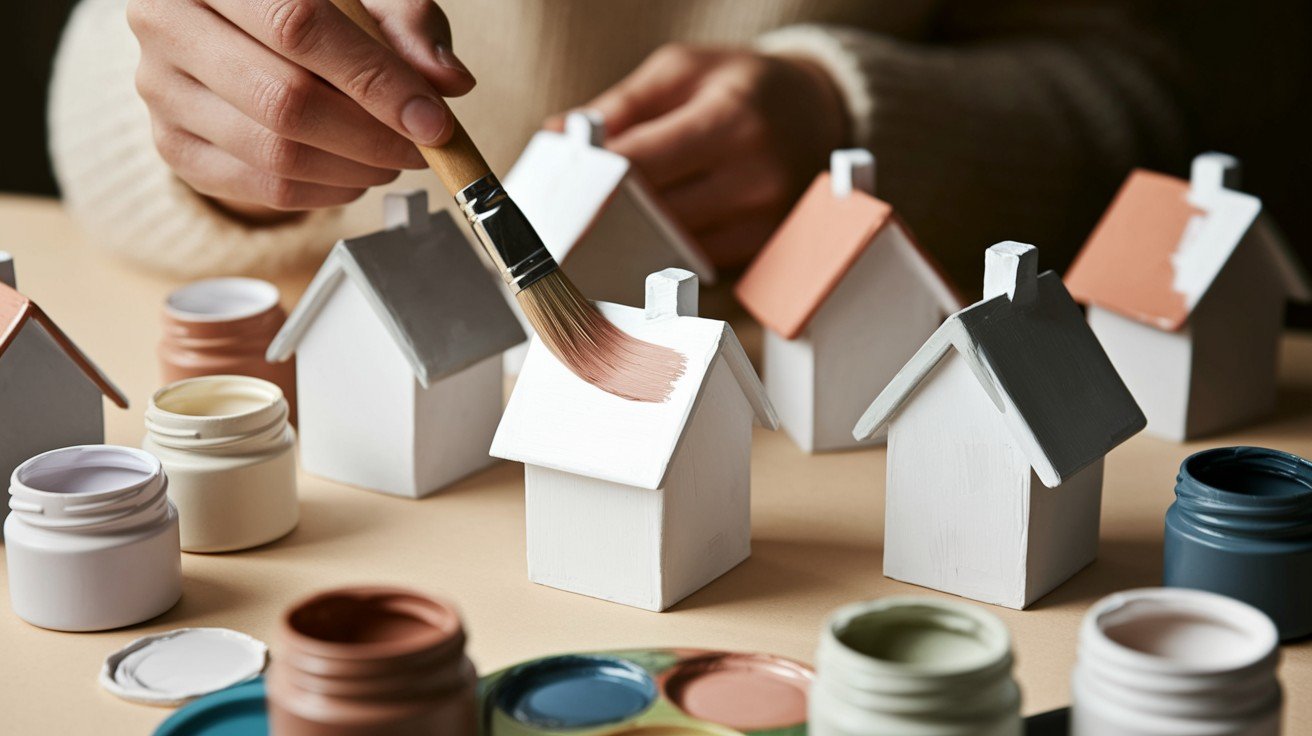
Begin with proper base coating techniques by applying thin, even layers of chalk paint or acrylic paint to your paper mache houses.
Start with lighter colors and work toward darker shades, allowing each coat to dry completely before adding the next layer.
This gradual approach prevents streaking and ensures smooth, professional coverage.
For chimneys and roofs, use contrasting colors to create visual interest and architectural definition.
Apply roof paint in long, steady strokes following the roofline direction, while chimneys benefit from slightly darker tones that suggest weathering and use.
Consider the overall color scheme of your village to ensure individual houses complement each other while maintaining their unique character.
Step 2: Adding Snow Effects

Snow paste application requires a gentle touch to achieve realistic winter textures on rooftops and architectural details.
Load a small amount of snow paste onto a palette knife or foam brush, then dab it onto roof edges, windowsills, and other areas where natural snow would accumulate.
Work in small sections to maintain control over the texture, creating uneven, organic patterns that mimic real snowfall.
For realistic snow texture, vary the thickness of application and use a stippling motion to create natural-looking drifts.
Avoid covering entire surfaces uniformly, as real snow creates irregular patterns based on wind direction and architectural features that provide shelter.
Step 3: Decorating and Stenciling
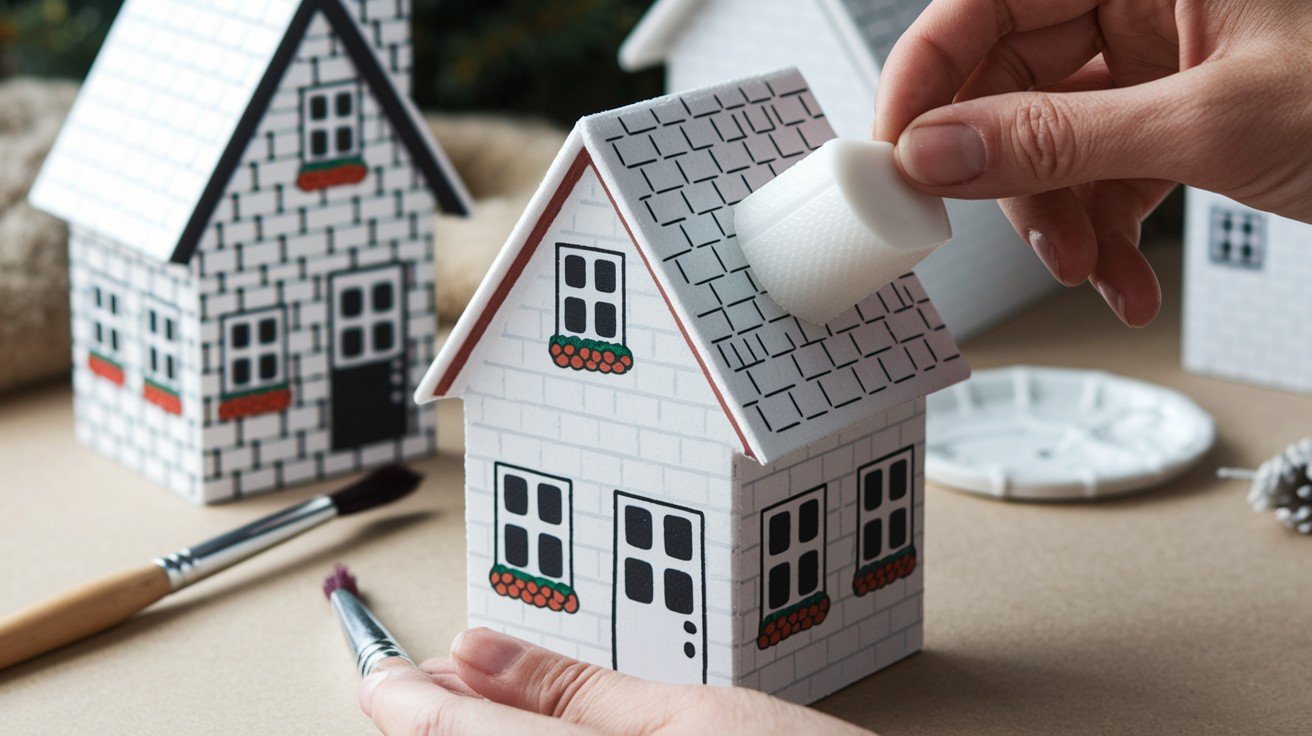
Adhesive stencils provide precise patterns for brick work, window frames, and architectural details that would be difficult to achieve through freehand painting.
Position stencils carefully on dry painted surfaces, pressing edges firmly to prevent paint bleeding underneath.
Use a foam dauber or stencil brush with minimal paint to create clean, crisp lines. Remove stencils immediately after painting while the paint is still wet to avoid peeling.
Hand-painted details like door handles, window boxes, and shutters add personality and charm to each house.
Use fine brushes and steady hands for these small elements, taking time to let each detail dry before adding adjacent features.
Step 4: Creating Glitter Roofs (Optional)
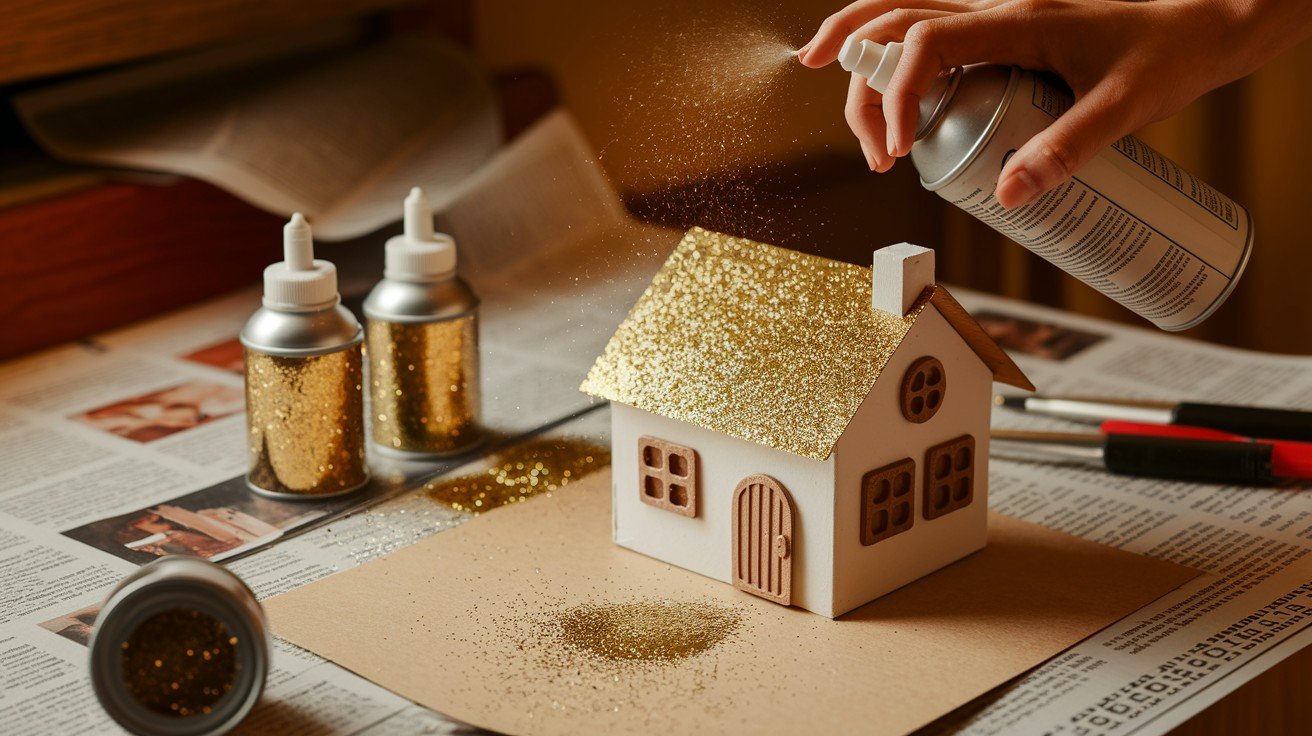
Transform ordinary roofs into magical, sparkling surfaces using spray adhesive and glitter application techniques.
Work in a well-ventilated area and protect surrounding surfaces with newspaper or plastic sheeting.
Apply spray adhesive in light, even coats to roof sections, working on one area at a time to prevent the adhesive from drying before glitter application.
Sprinkle glitter generously over the adhesive while it remains tacky, then gently tap excess glitter onto paper for reuse.
This minimizes waste and mess while ensuring complete coverage.
Allow the adhesive to cure completely before handling, and store leftover glitter in sealed containers for future projects.
Step 5: Making Pinecone Trees and Mini Wreaths
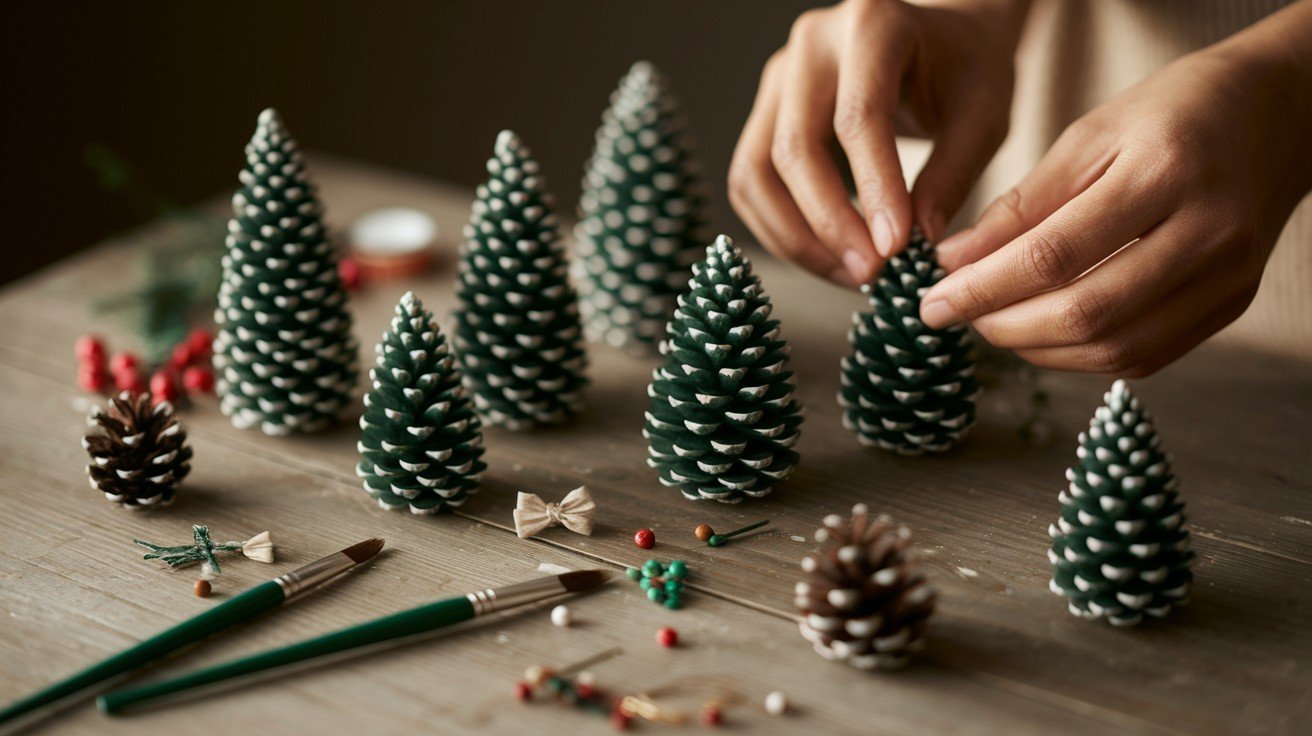
Select pinecones with good shape and open scales for the most realistic tree appearance.
Clean pinecones thoroughly by removing debris and loose scales, then consider light sanding of the bottom for stable positioning.
Create pinecone trees by painting the tips of scales with green paint or leaving them natural for a more rustic appearance.
Add small dabs of white paint to simulate snow-covered branches. For mini wreaths, use small, round pinecones or create circular arrangements from individual scales.
Attach tiny berries, small bows, or miniature decorations using craft glue, ensuring each element is proportionate to the overall village scale.
Styling and Display Ideas
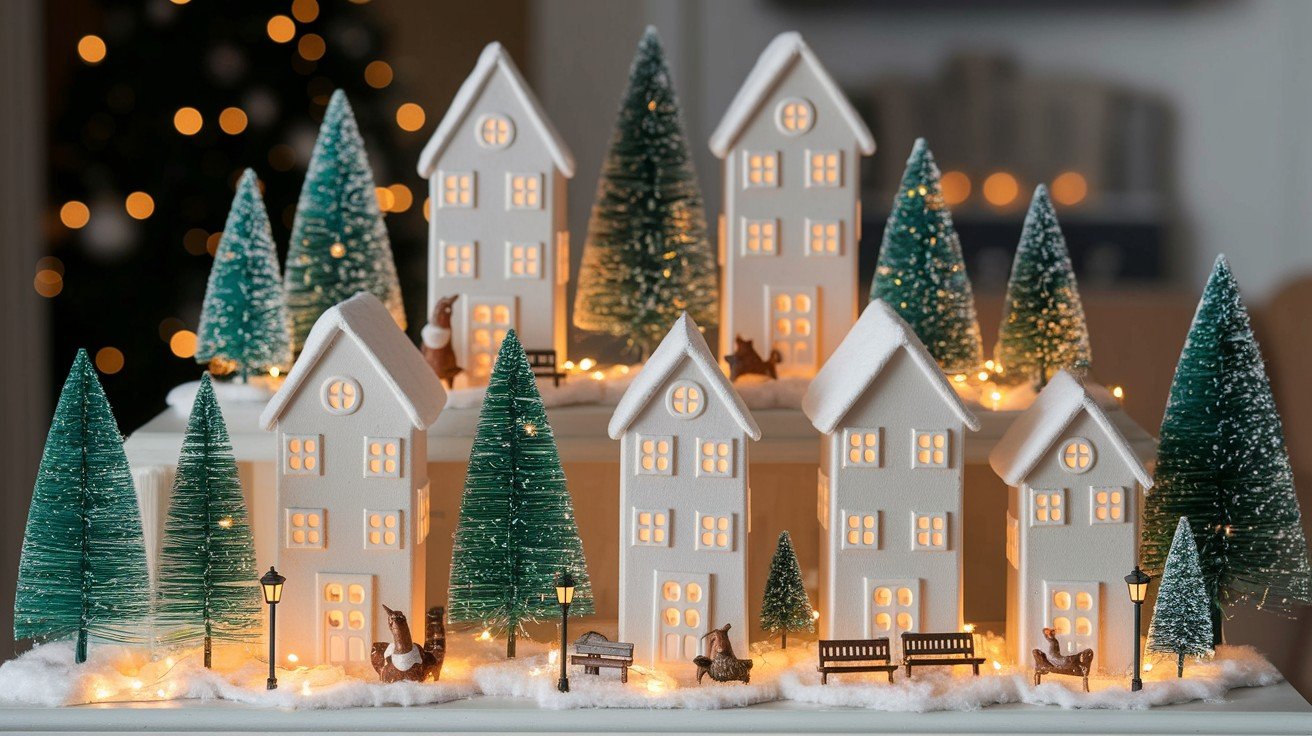
Creating an effective display for your Christmas village requires thoughtful consideration of space, lighting, and visual balance.
Shelves and mantels provide ideal platforms for village arrangements, offering different height levels that create depth and visual interest in your display.
When arranging houses on shelves, position taller buildings toward the back and shorter structures in front to ensure all pieces remain visible.
Consider the natural flow of foot traffic in your room when positioning your village, ensuring the display can be appreciated from various angles.
Combining your handmade houses with bottle brush trees and other holiday decorations creates a cohesive, professional-looking winter scene.
Mix different shades of green trees with occasional white or frosted versions to create visual variety and simulate a realistic forest environment.
Other complementary decorations include miniature park benches, street lamps, and small animals that bring life to your village streets.
Incorporating lights and miniature figures transforms a static display into a magical, animated scene.
LED string lights work exceptionally well for village lighting, as they produce minimal heat and can be woven throughout the display safely.
Place lights inside translucent houses to create warm, glowing windows, or string them behind buildings to create dramatic silhouettes.
Miniature figures add scale and narrative to your village, suggesting daily life and seasonal celebration.
Tips for Growing Your Village Over Time
- Building a Christmas village gradually over several years creates anticipation and allows for budget-friendly expansion while developing a truly personal collection.
- Adding one or two new houses or trees each year makes the project financially manageable while giving you something special to look forward to during holiday preparation time.
- This gradual approach also allows you to refine your crafting techniques with each new addition.
- Matching your village colors to existing home decor ensures the display complements your space rather than competing with other decorative elements.
- Consider your room’s color palette when selecting paint colors for houses, choosing shades that harmonize with furniture, wall colors, and other holiday decorations.
- Document your color choices with photos or paint samples to maintain consistency as you add new pieces over time.
- Budget-friendly sourcing of materials makes village expansion affordable and sustainable long-term.
- Shop post-holiday clearance sales for paper mache houses and decorative elements at significant discounts.
- Thrift stores often carry unused craft supplies and holiday decorations that can be repurposed for village projects.
- Dollar stores provide inexpensive glitter, paint brushes, and basic supplies that work perfectly for these projects.
Conclusion
Creating your own DIY Christmas village houses offers a delightful combination of creativity, affordability, and holiday tradition that brings families together during the festive season.
This beginner-friendly project proves that beautiful holiday decorations don’t require expensive purchases or advanced crafting skills – just patience, imagination, and basic supplies.
The true magic happens when you add personal touches that reflect your family’s style and preferences, making each house uniquely yours.
Remember that there’s no wrong way to approach this craft; let your creativity guide the process and enjoy every step from painting to final placement.
Your handmade village will become a treasured part of your holiday traditions for years to come.
Subscribe to our newsletter for more inspiring holiday DIY ideas that help make your celebrations extra special.
Frequently Asked Questions
How much does it cost to make a complete DIY Christmas village?
A basic starter village with 3-5 houses typically costs $15-25 using paper mache houses, basic paints, and simple decorative materials. Costs can be reduced further by shopping post-holiday sales, using materials you already have at home, or gradually building your collection over multiple years.
What’s the best paint to use on paper mache Christmas village houses?
Chalk paint and acrylic paint both work excellently on paper mache surfaces, providing good coverage and durability for holiday decorations. Chalk paint offers a matte finish that’s forgiving for beginners, while acrylic paint provides more color options and can create both matte and glossy finishes.
How long does it take to complete one Christmas village house?
A single house typically takes 2-4 hours to complete, including drying time between paint coats and decorative applications. The actual hands-on crafting time is usually 1-2 hours, with additional waiting periods for paint and adhesives to cure properly.
Can children safely participate in making Christmas village houses?
Children ages 6 and up can help with many steps like painting, applying snow paste, and placing decorative elements with adult supervision. Hot glue guns and spray adhesives should be handled only by adults, but children can use craft glue alternatives for most decorating tasks.
How should I store my DIY Christmas village houses when not displayed?
Wrap each house individually in tissue paper or bubble wrap to prevent scratches and breakage during storage periods. Store wrapped pieces in sturdy boxes with dividers, and keep them in cool, dry locations away from extreme temperature changes that could affect paint or decorative elements.