

Looking for pottery painting ideas that actually work? You’re in the right place.
I’ve spent years teaching pottery painting to beginners and experts alike. This guide solves your biggest challenge – finding designs that look amazing without needing art school skills.
Here’s exactly what you’ll learn:
- Foolproof beginner techniques
- Nature-inspired designs
- Seasonal and holiday patterns
- Kid-friendly projects
- Functional pottery ideas
- Gift and keepsake designs
- Trendy artistic styles
Want to paint your first mug or create beautiful home decor? These 41 ideas will guide you step-by-step. No guesswork. No confusion.
Every technique includes:
- Simple instructions
- Material lists
- Pro tips from my studio experience
Ready to transform plain pottery into beautiful art? Let’s start creating!
Easy Pottery Painting Ideas for Beginners
Starting your pottery painting journey? These simple designs are perfect for first-timers.
1. Polka Dots and Stripes
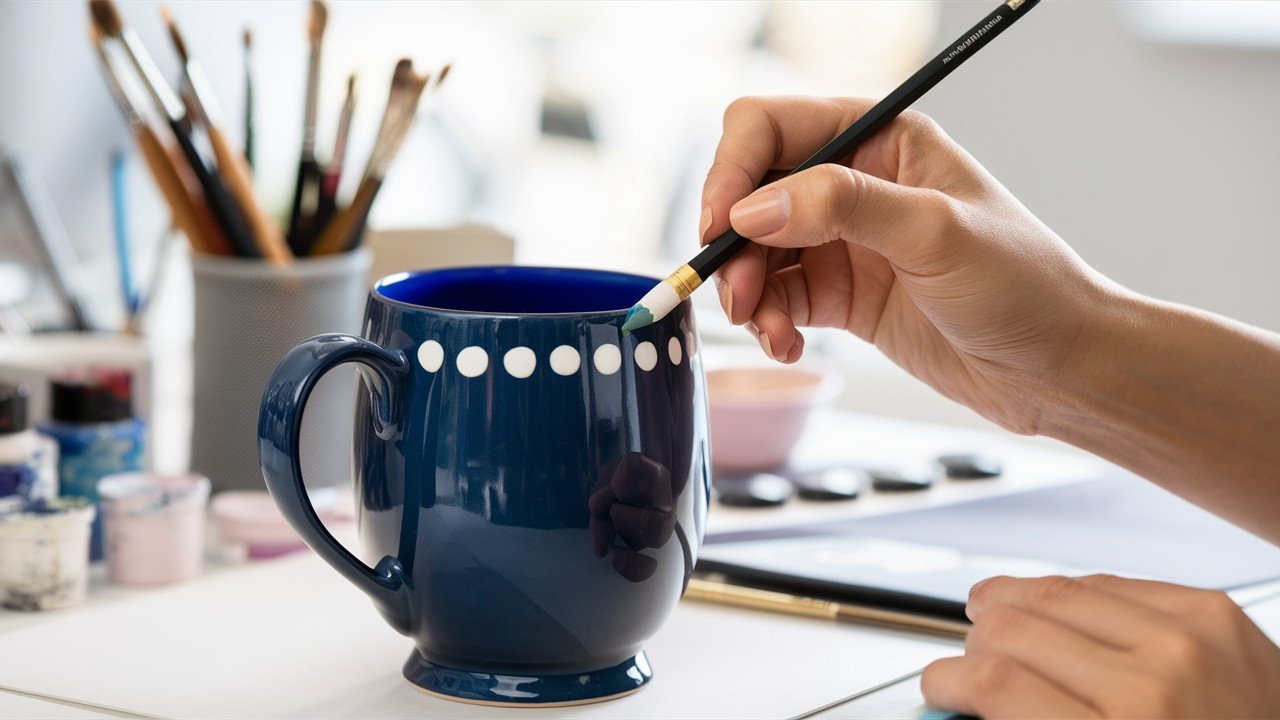
Polka dots are foolproof. Use the eraser end of a pencil dipped in paint. Space them evenly or create random patterns.
Materials needed: Pencil with eraser, acrylic paint, small plate for paint. Choose contrasting colors like white dots on blue pottery for maximum impact.
Stripes work great too. Use painter’s tape for crisp lines. Remove the tape while the paint is still wet.
Expert tip: Make stripes different widths for visual interest. Try vertical, horizontal, or diagonal patterns.
2. Heart and Star Stencils
Stencils take the guesswork out of shapes. You can buy them or make your own from cardboard.
DIY stencil method: Draw shapes on cardboard, cut with a craft knife. Sand rough edges for smooth results.
Pro tip: Hold the stencil firmly while dabbing paint through it. Use a sponge or stencil brush for best coverage.
Color combinations: Pink hearts on white mugs, gold stars on navy plates, or rainbow hearts for kids’ pieces.
3. Fingerprint Flowers
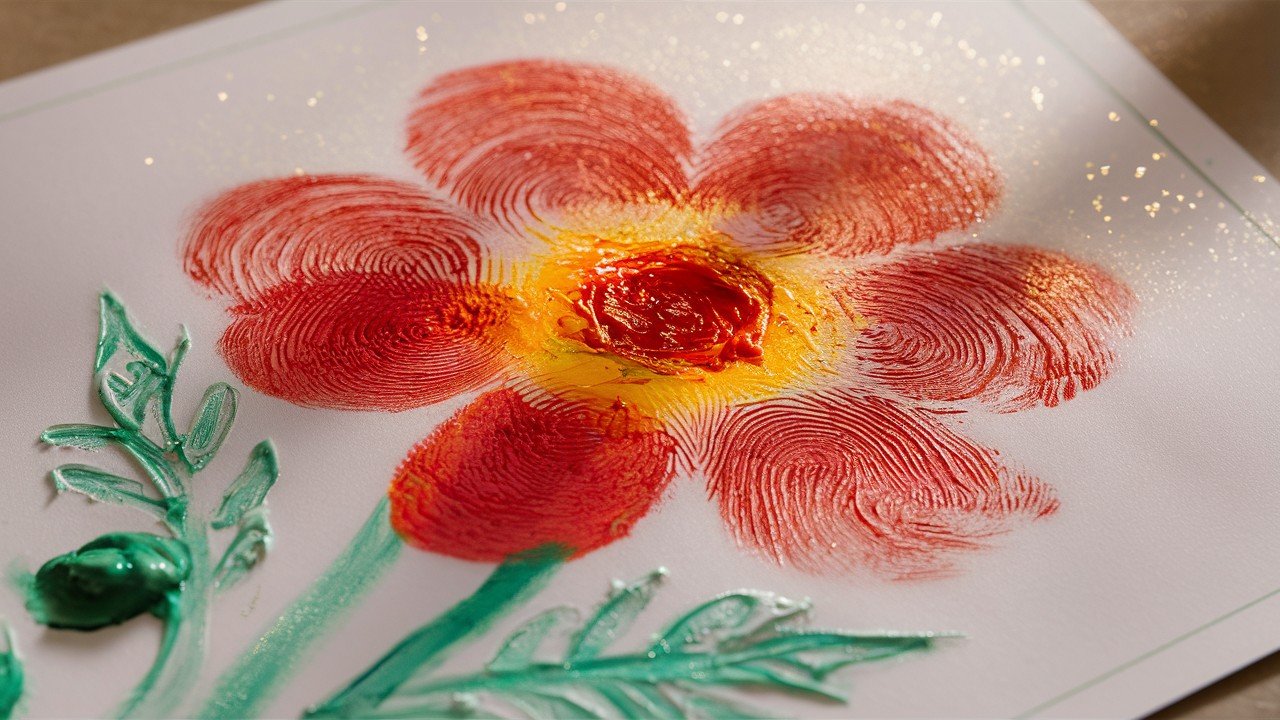
This technique creates adorable blooms. Press your fingertip in paint, then onto the pottery. Add stems with a thin brush.
Step-by-step process: Make fingerprint petals in a circle. Add a center dot in contrasting color. Paint green stems and leaves last.
Kids love this method! It’s messy but so much fun. Protect surfaces with newspapers.
Creative variations: Try different finger combinations – thumb for sunflower centers, pinky for tiny buds.
4. Gradient Color Washes
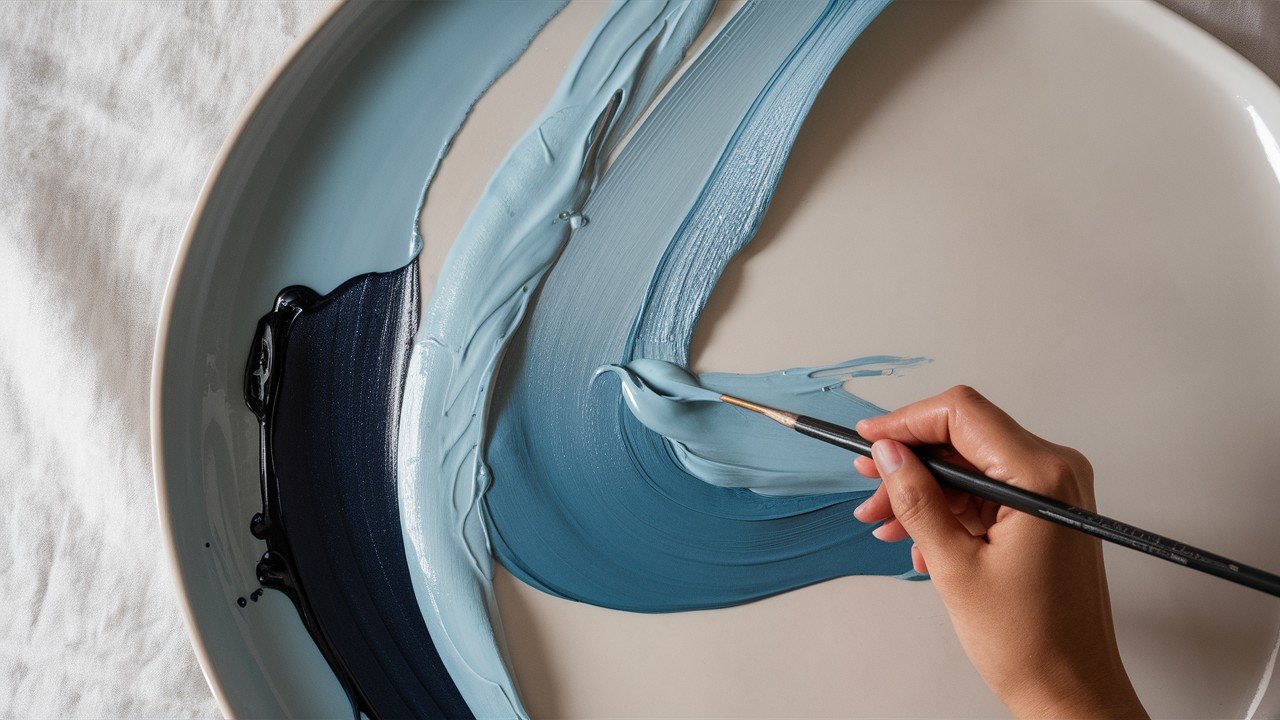
Blend two colors while they’re wet. Start with the lighter color, then add the darker one.
Technique details: Apply light color first with a wide brush. While wet, add darker color and blend with soft, overlapping strokes.
Work quickly before the paint dries. The result? Beautiful, dreamy effects.
Best color combos: Blue to white (sky effect), yellow to orange (sunset), pink to purple (romantic).
5. Abstract Shapes and Lines
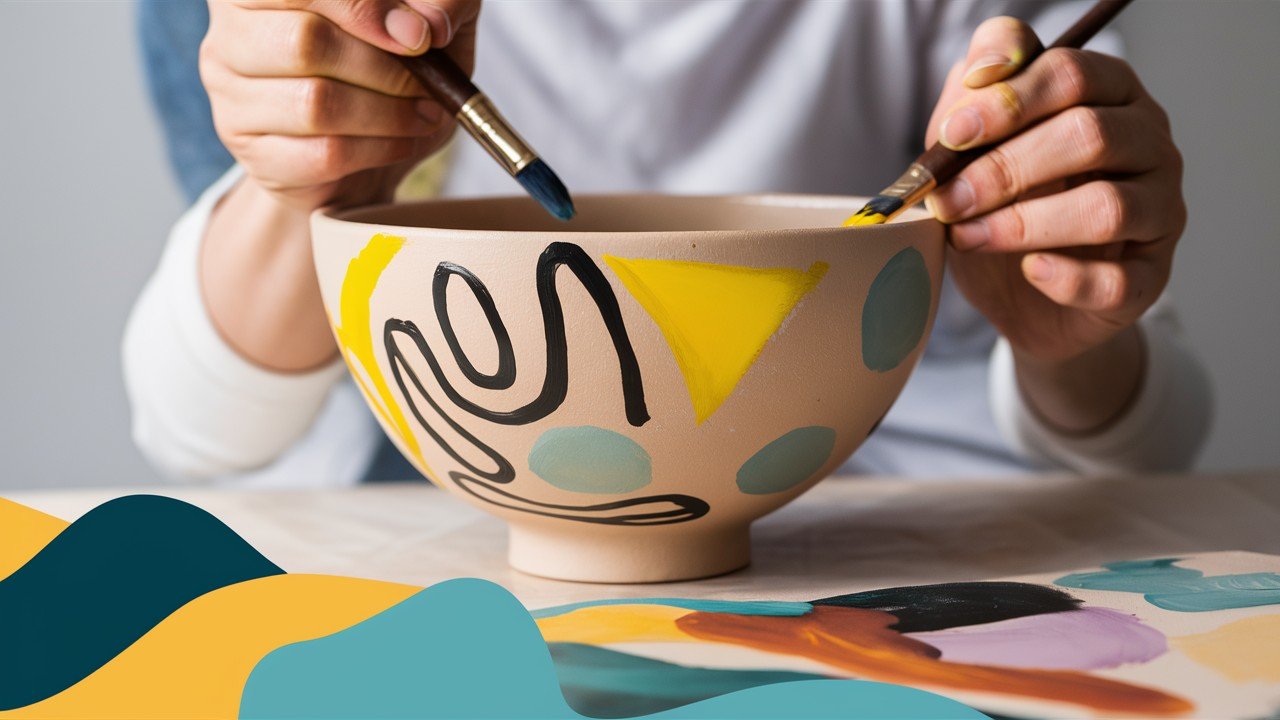
There are no rules here. Paint whatever feels right. Squiggles, triangles, or wavy lines all work.
Getting started: Use different brush sizes for variety. Thick brushes for bold shapes, thin brushes for details.
Remember: Abstract art is about expression, not perfection. Let your mood guide the design.
Inspiration sources: Look at fabric patterns, nature textures, or modern art for ideas.
6. Monogram Initials
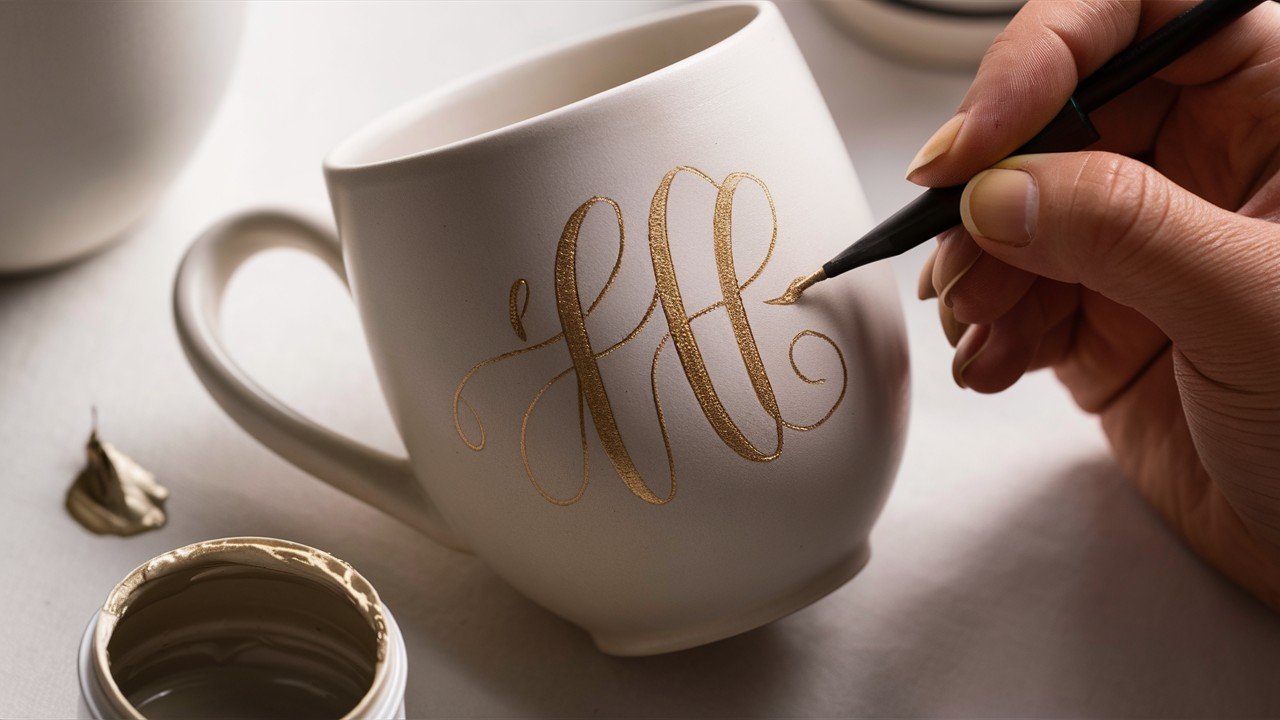
Paint your initials in fancy fonts. This personalizes your piece instantly.
Font ideas: Cursive script for elegance, block letters for modern look, or bubble letters for fun.
Practice on paper first. Then transfer to your pottery using light pencil marks as guides.
Enhancement tips: Add decorative flourishes around letters. Use metallic paints for a luxurious feel.
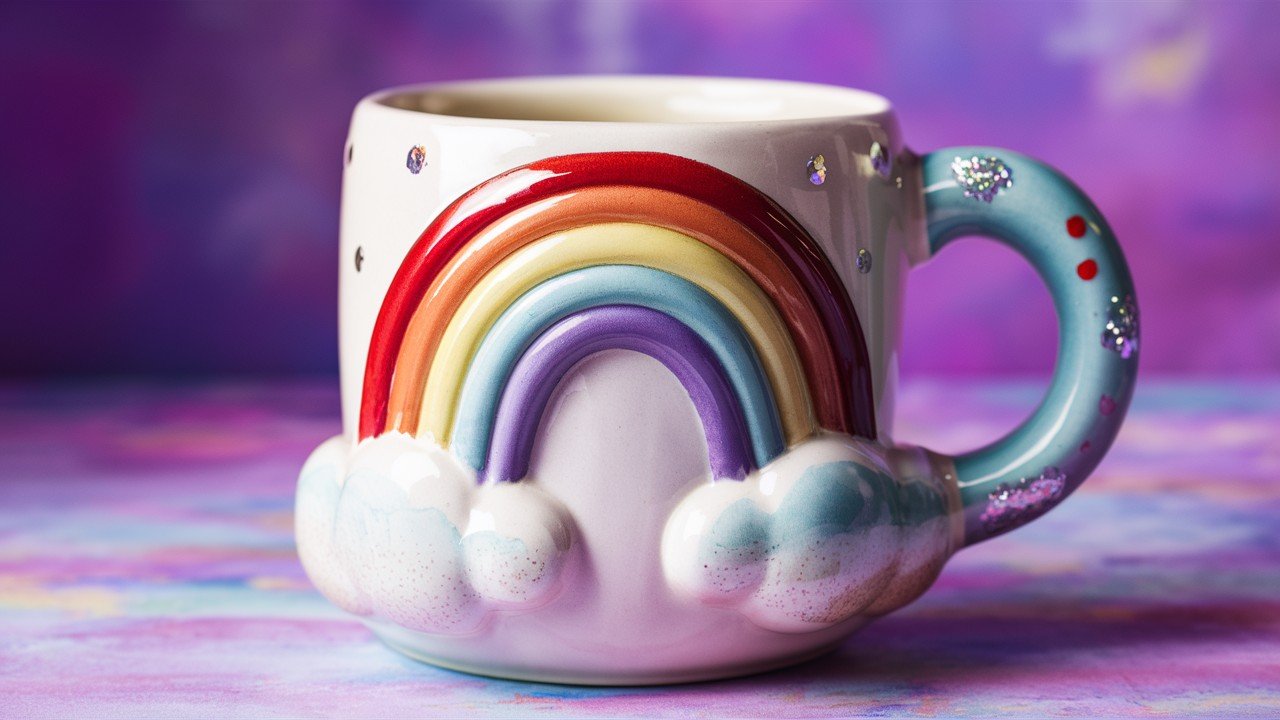
7. Rainbow Arches on a Mug
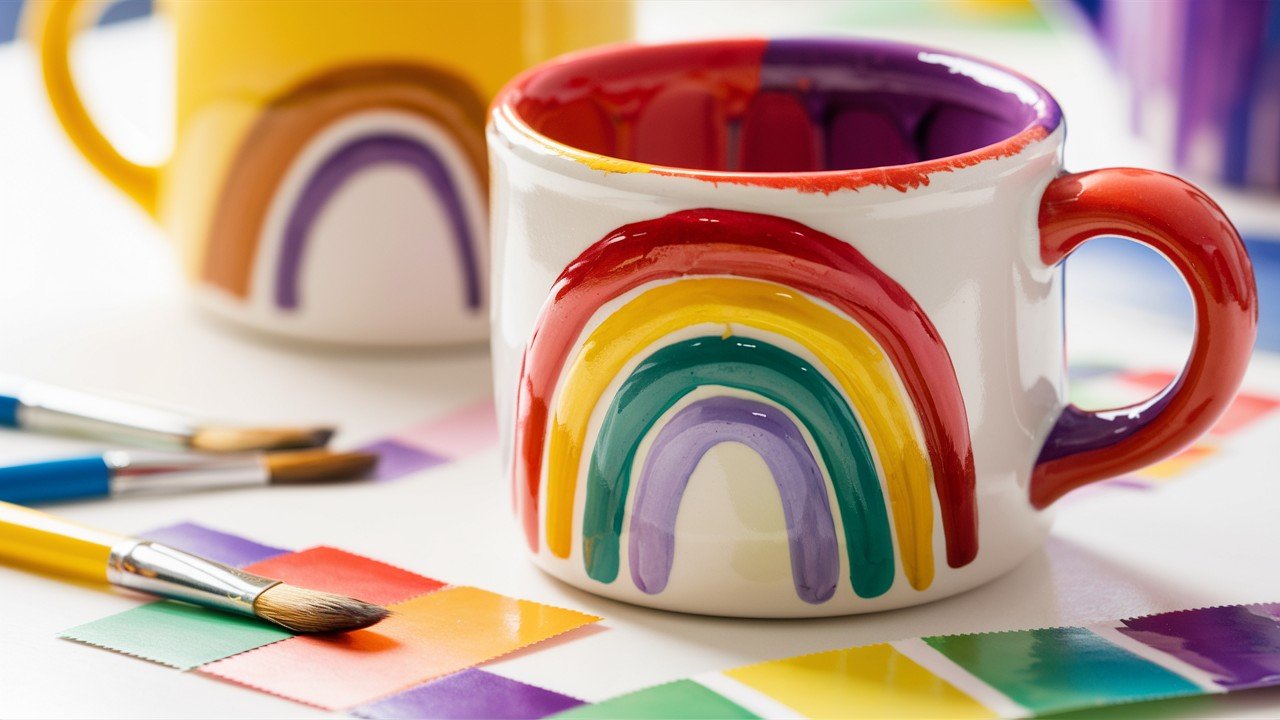
Paint colorful arches around your mug. Use red, orange, yellow, green, blue, and purple.
Painting order: Start with red at top, work down through the color spectrum. Keep arches consistent size.
This design brightens any morning coffee routine. Perfect for kids’ cups or cheerful kitchen decor.
Pro technique: Use painter’s tape to create perfect arch shapes. Remove while the paint is slightly wet.
Nature-Inspired Pottery Designs
Nature provides endless inspiration for pottery painting. These designs bring the outdoors inside.
8. Leaf Imprints with Real Leaves
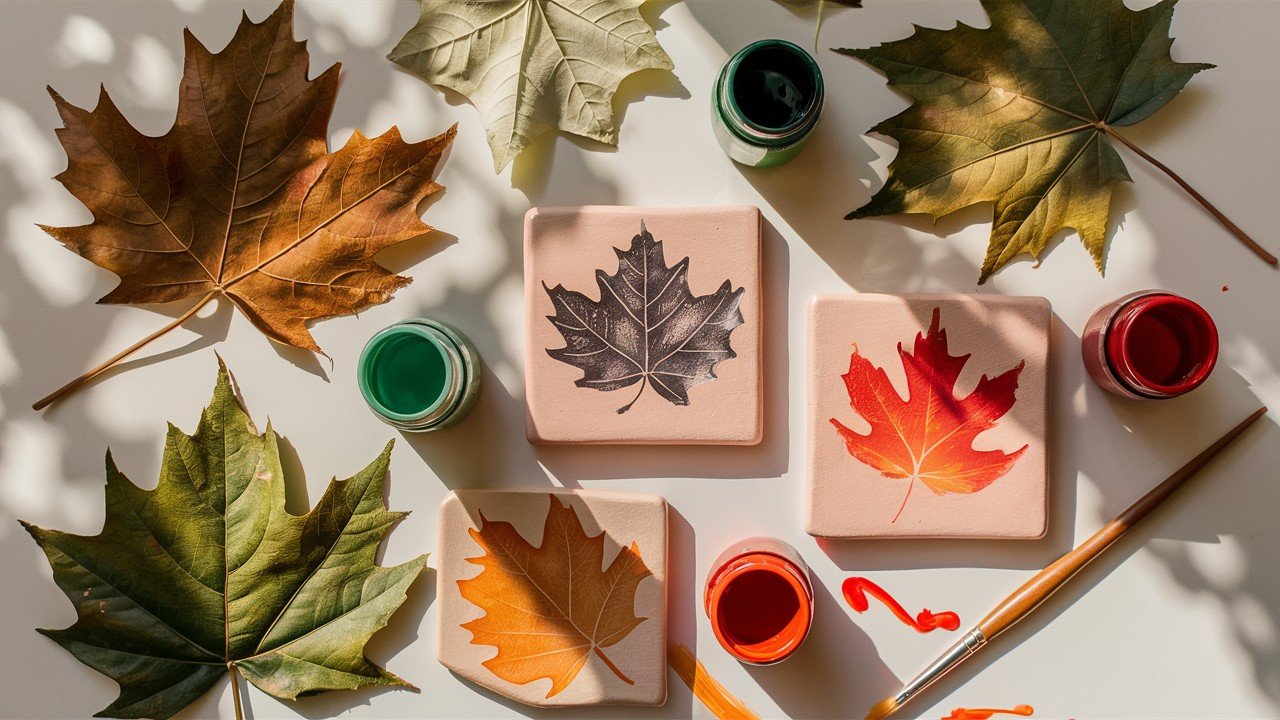
Collect leaves from your yard. Paint them and press onto your pottery. The natural texture creates beautiful prints.
Best leaf types: Maple, oak, and fern leaves have distinct shapes. Avoid thick or waxy leaves that won’t print well.
Technique steps: Brush paint evenly on leaf surface. Press firmly onto pottery for 10 seconds. Lift straight up to avoid smudging.
Try different leaf shapes for variety. Mix small and large leaves for layered effects.
Color suggestions: Autumn colors (red, orange, yellow) for fall pieces, or green tones for spring designs.
9. Cherry Blossom Branches
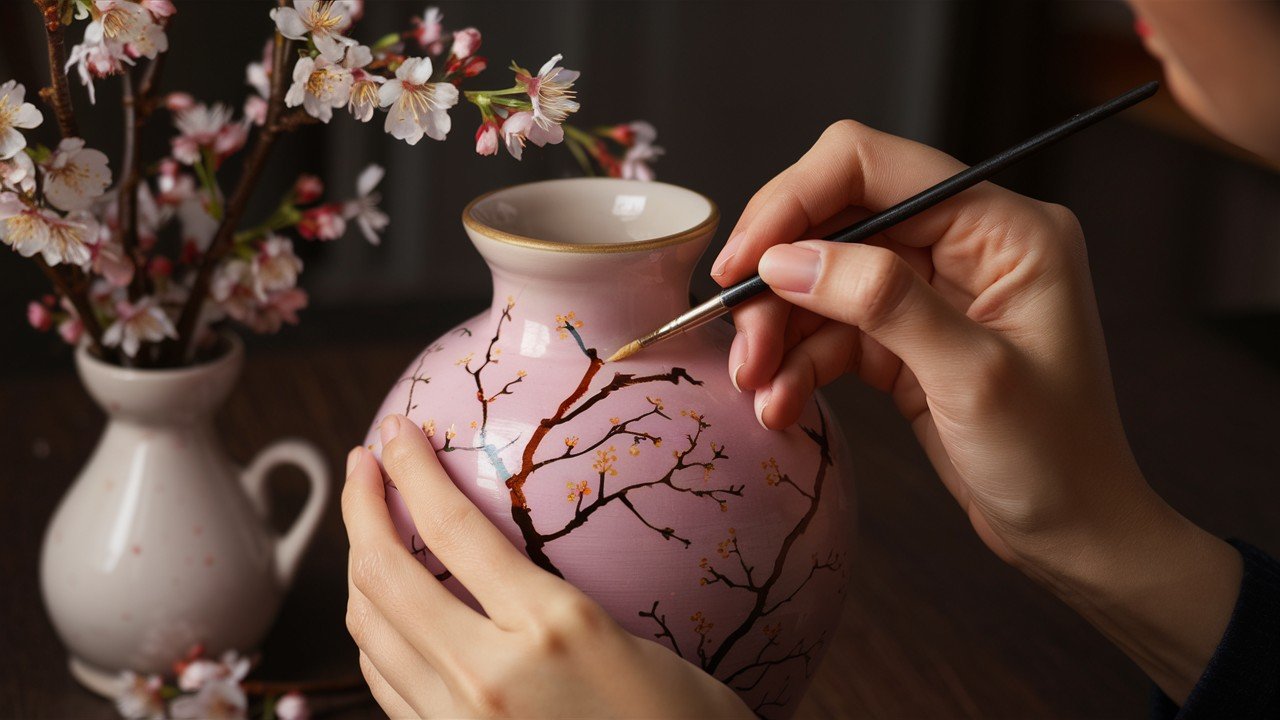
Paint brown branches first. Add pink or white blossoms using a sponge. Dab gently for realistic texture.
Branch painting: Use a thin brush for fine branches. Vary thickness and add small twigs for authenticity.
This design looks great on vases and bowls. Perfect for Asian-inspired decor.
Blossom technique: Dip sponge in paint, dab off excess. Gently press around branches in clusters of 3-5 flowers.
Finishing touches: Add tiny yellow centers with a cotton swab. Paint small green leaves sparingly.
10. Sun and Moon Celestial Art
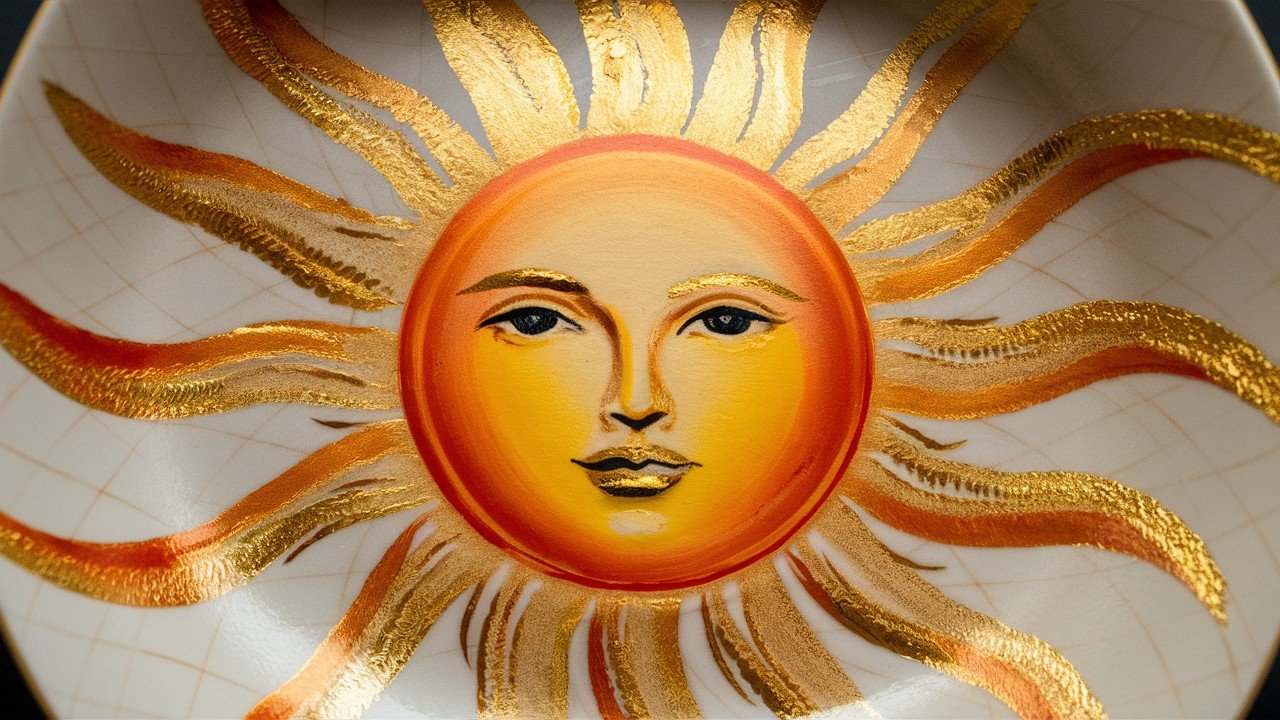
Paint a golden sun on one side, silver moon on the other. Add stars around them.
Sun details: Use warm colors (yellow, orange, gold). Add radiating lines or wavy rays for energy.
Use metallic paints for extra sparkle. They catch light beautifully and add a luxurious feel.
Moon variations: Crescent moon, full moon, or moon phases around the piece. Use cool silver or white.
Star placement: Scatter small stars randomly. Use different sizes for depth. Add tiny dots with a toothpick.
11. Cacti and Succulent Patterns

These plants are trendy and easy to paint. Use simple green shapes with small details.
Cactus shapes: Tall columnar, round barrel, or paddle-shaped prickly pear. Keep forms basic but recognizable.
Perfect for modern home decor. Minimalist and stylish.
Succulent details: Paint rosette patterns with overlapping petals. Use various green shades for dimension.
Finishing elements: Add tiny spines with a thin brush. Paint small flowers on top in bright colors.
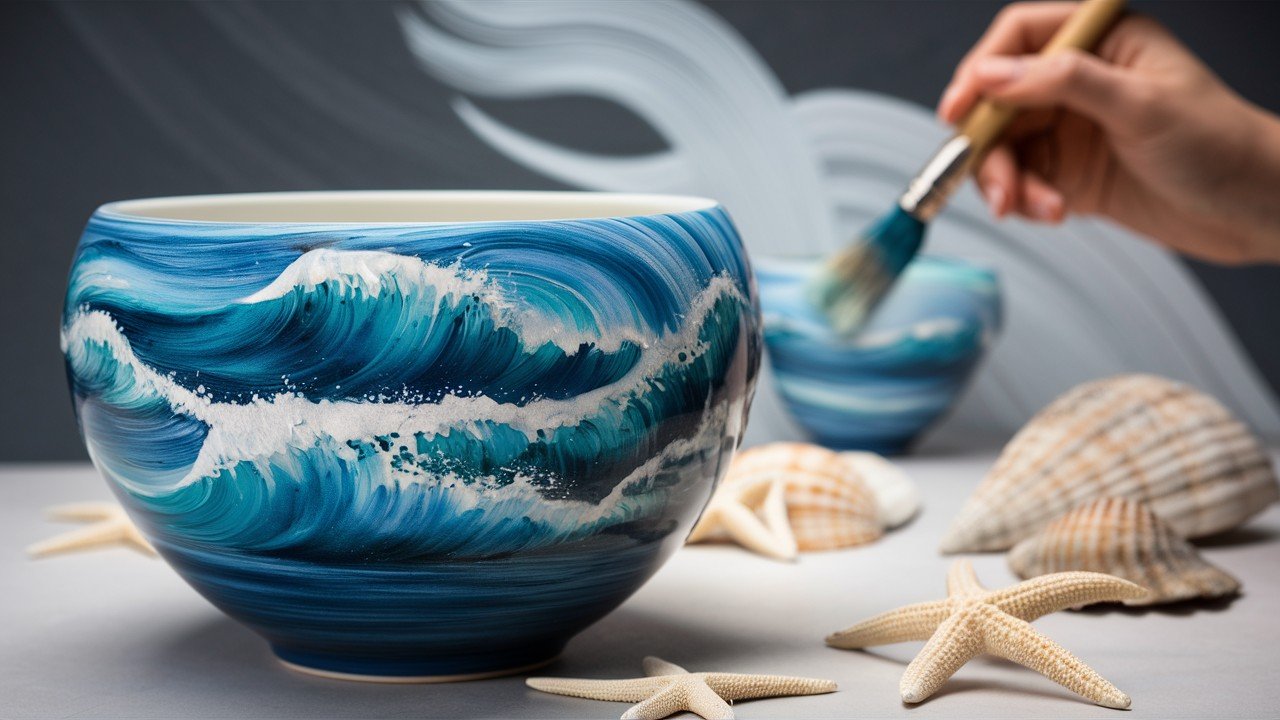
12. Ocean Waves and Seashells
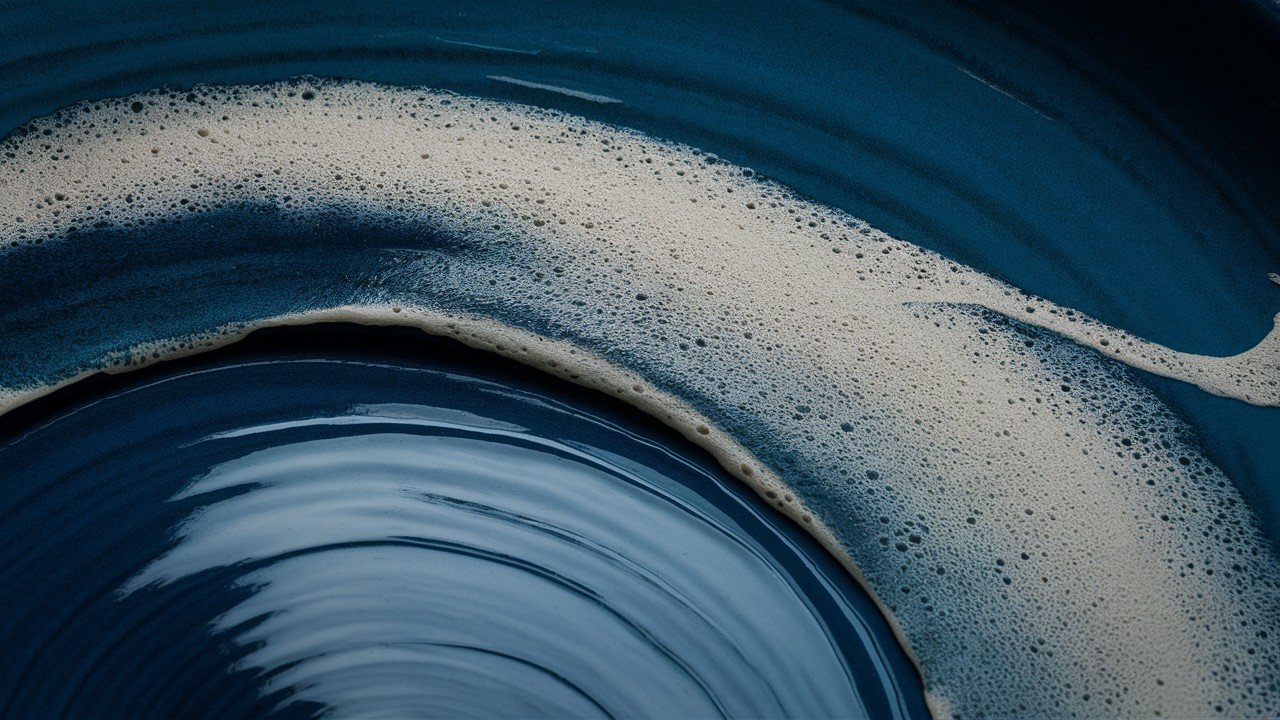
Create flowing wave patterns in blues and whites. Add small seashells along the bottom.
Wave technique: Use curved brush strokes in overlapping layers. Blend white foam into blue water while wet.
This design works beautifully on plates and bowls. Brings beach vibes to any meal.
Shell varieties: Paint scallop shells, conch shells, or sand dollars. Use natural colors like cream, pink, coral.
Water effects: Add white highlights for sun reflection. Use deeper blues for wave shadows.
13. Mountain Landscape Silhouettes
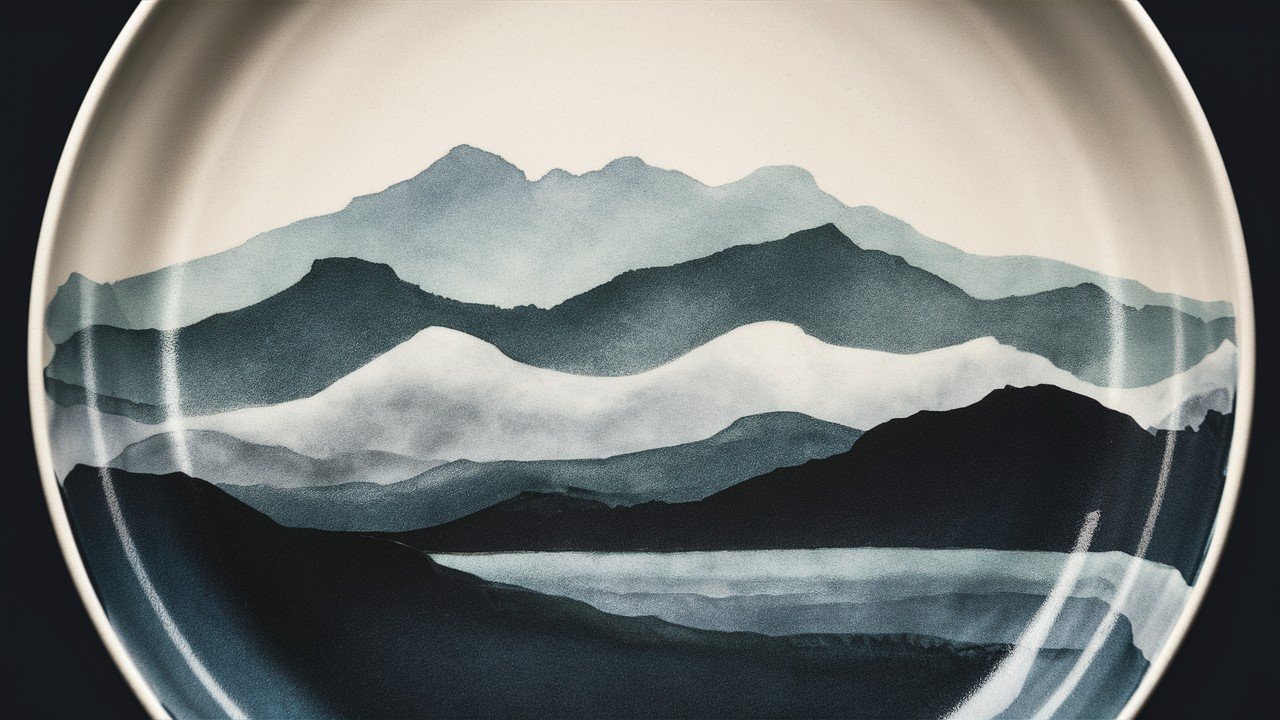
Paint layered mountain shapes in different shades. Start light in the background, darker in front.
Color progression: Lightest mountains (pale blue/gray) in back. Medium tones in the middle. Darkest (deep blue/purple) in front.
Simple yet beautiful results every time. Creates a peaceful, zen-like feeling.
Sky options: Sunrise (pink/orange), sunset (purple/orange), or clear day (light blue gradient).
Additional elements: Add small trees on mountain peaks. Paint birds in distant sky for movement.
Seasonal & Holiday Pottery Ideas
Celebrate the seasons with these themed designs.
14. Tulips and Pastel Eggs
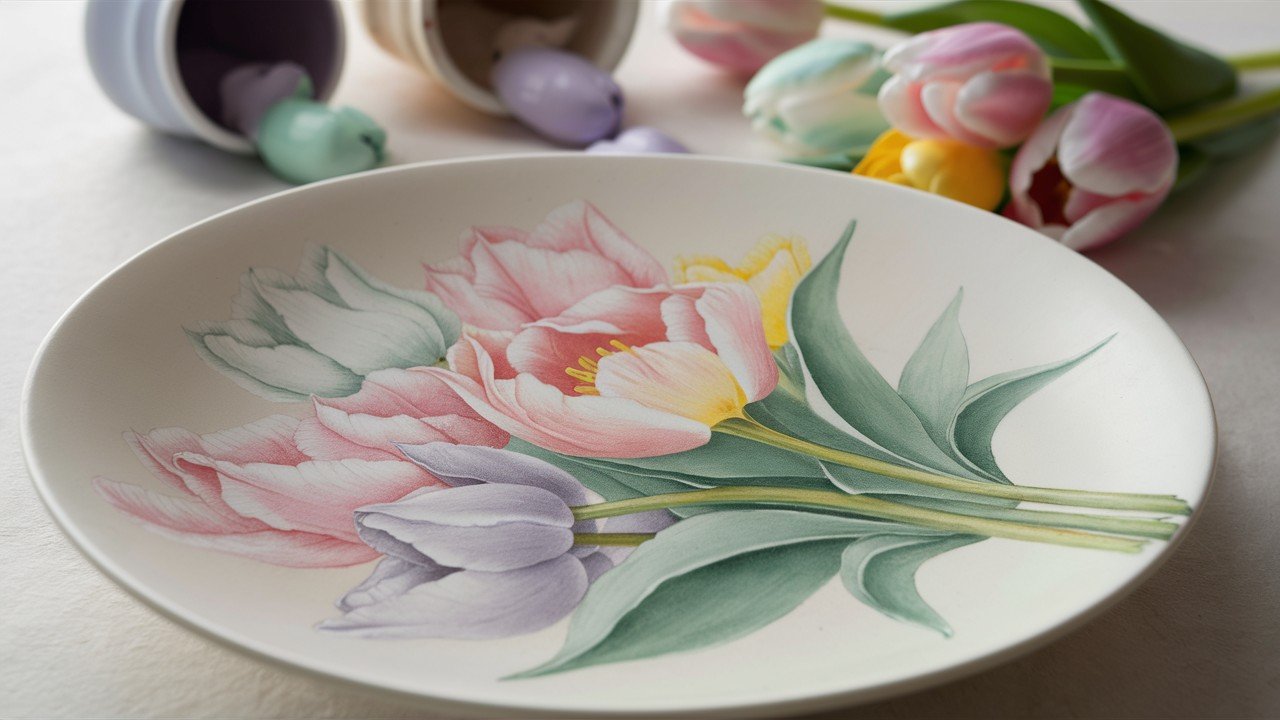
Paint cheerful tulips in soft colors. Add decorated Easter eggs nearby.
Getting started: Sketch tulip shapes lightly with pencil first. Use teardrop shapes for petals, oval stems.
Perfect for spring table settings. Brings fresh energy to any room.
Color palette: Soft pinks, lavender, mint green, butter yellow. These pastels capture spring perfectly.
Egg patterns: Stripes, dots, zigzags, or floral designs. Keep patterns simple but colorful.
15. Watermelons and Suns
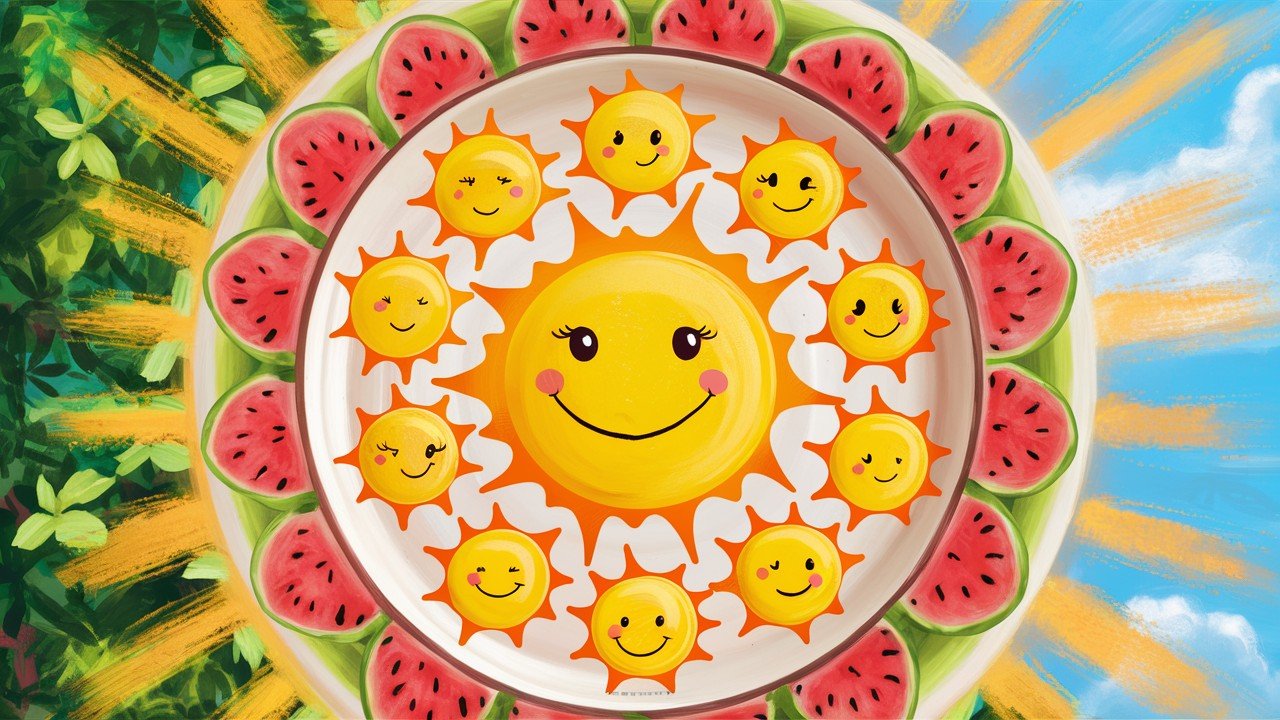
Bright watermelon slices look great on summer dishes. Add yellow suns for extra cheer.
Watermelon technique: Paint pink center, white rind, dark green outer skin. Add black seeds with a small brush.
Sun variations: Smiling faces, radiating rays, or simple circles. Use warm yellows and oranges.
Placement tips: Alternate watermelons and suns around the rim of plates. Creates fun, balanced design.
Summer vibes: This design screams picnic and pool parties. Perfect for outdoor entertaining.
16. Beach Waves and Palm Trees
Transport yourself to vacation mode. Paint rolling waves with swaying palm trees.
Wave motion: Use curved strokes in blue and white. Layer colors while wet for a realistic water effect.
Palm tree details: Brown trunk with texture lines. Green fronds in fan shapes. Add coconuts for fun.
Background options: Sunset sky (orange/pink), clear day (light blue), or starry night (dark blue with white dots).
Tropical feeling: This design brings vacation memories to everyday dining. Instant mood booster.
17. Pumpkins and Fall Leaves
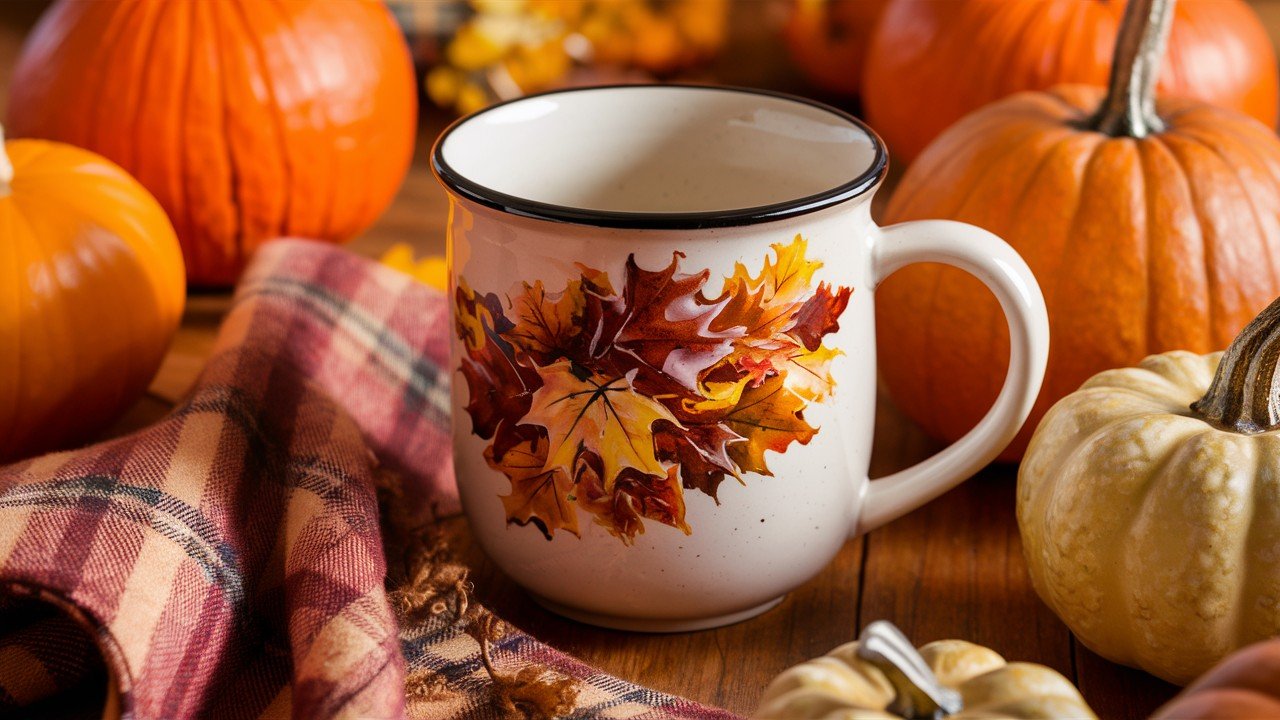
Orange pumpkins with colorful autumn leaves create cozy fall vibes.
Pumpkin shapes: Round, tall, or squat varieties. Add vertical lines for realistic texture.
Leaf colors: Deep reds, golden yellows, burnt oranges, rusty browns. Mix warm autumn tones.
Composition ideas: Scatter leaves around pumpkins. Overlap elements for depth and movement.
Seasonal warmth: Perfect for Thanksgiving table settings. Captures harvest season perfectly.
18. Halloween Jack-o’-lantern Faces
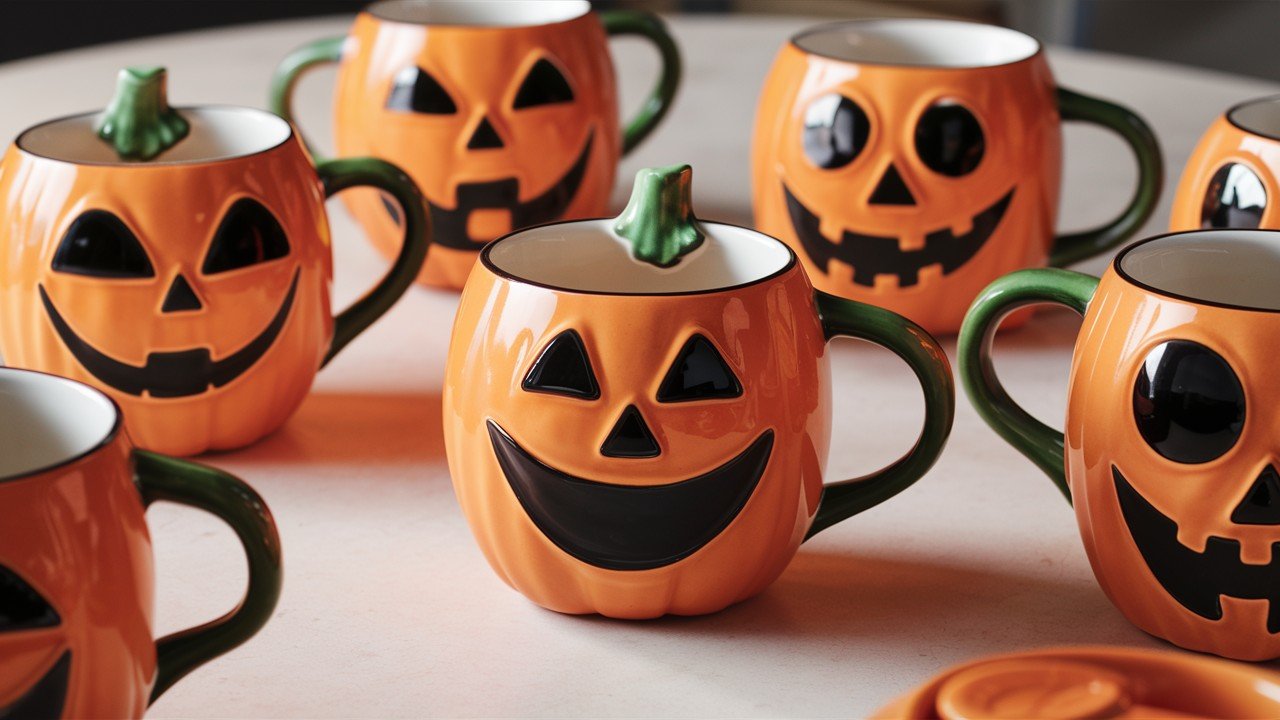
Spooky or silly faces on mugs make Halloween special. Kids especially love these.
Face options: Scary grins, surprised expressions, winking eyes, or goofy smiles. Personality matters.
Color scheme: Classic orange pumpkins with black features. Add green stems for authenticity.
Glow effect: Paint yellow “light” inside face cutouts. Creates magical lantern illusion.
Kid-friendly tip: Let children design their own jack-o’-lantern expressions. Make it personal and fun.
19. Snowflakes and Mittens
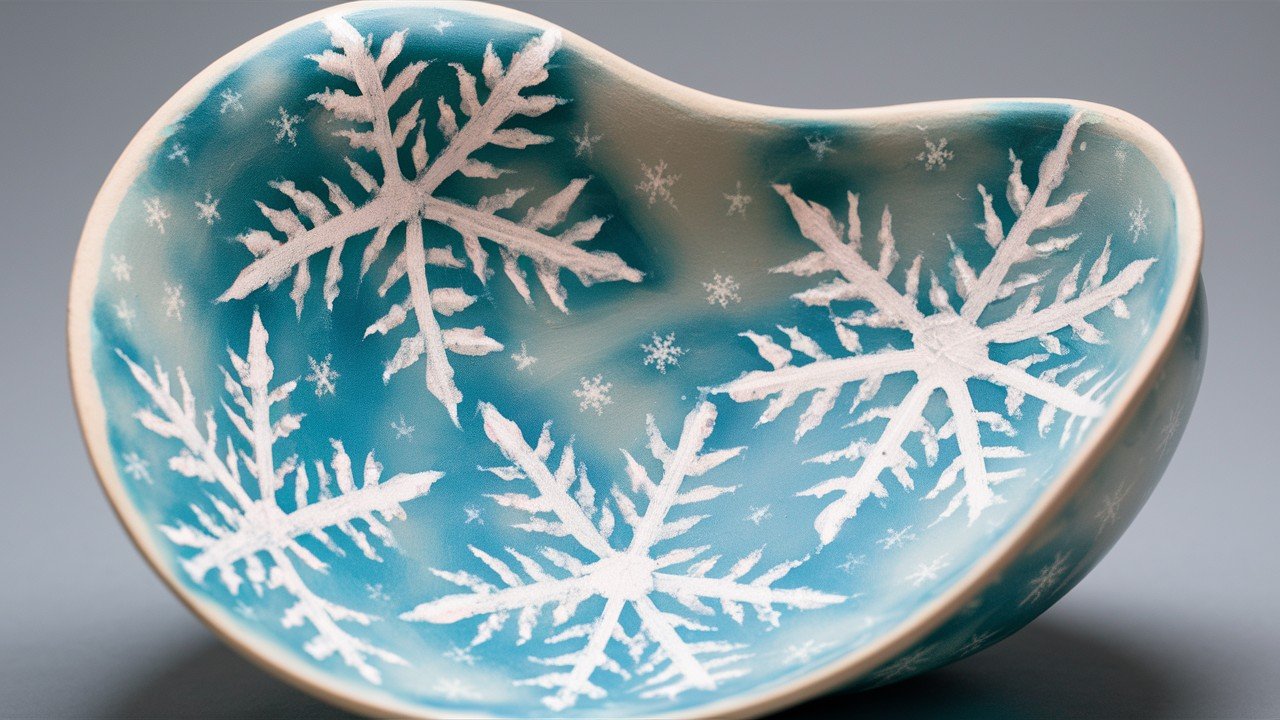
Delicate snowflakes paired with warm mittens capture winter perfectly.
Snowflake patterns: Six-pointed stars with intricate details. Each one should be unique like real snow.
Mitten designs: Cozy shapes in warm colors. Add patterns like Fair Isle knits or simple stripes.
Winter palette: Cool blues, silver, white for snow elements. Warm reds, greens for mittens.
Technique tip: Use white paint on colored pottery for snowflakes. Creates beautiful contrast.
20. Christmas Trees and Candy Canes

Classic holiday symbols never go out of style. Use traditional red and green colors.
Tree varieties: Tall pines, short spruces, or stylized triangles. Add simple ornament dots.
Candy cane stripes: Perfect red and white stripes. Use painter’s tape for crisp lines.
Holiday magic: Add gold or silver accents for sparkle. Creates festive, celebratory feeling.
Arrangement ideas: Alternate trees and candy canes around pottery rim. Balance the design elements.
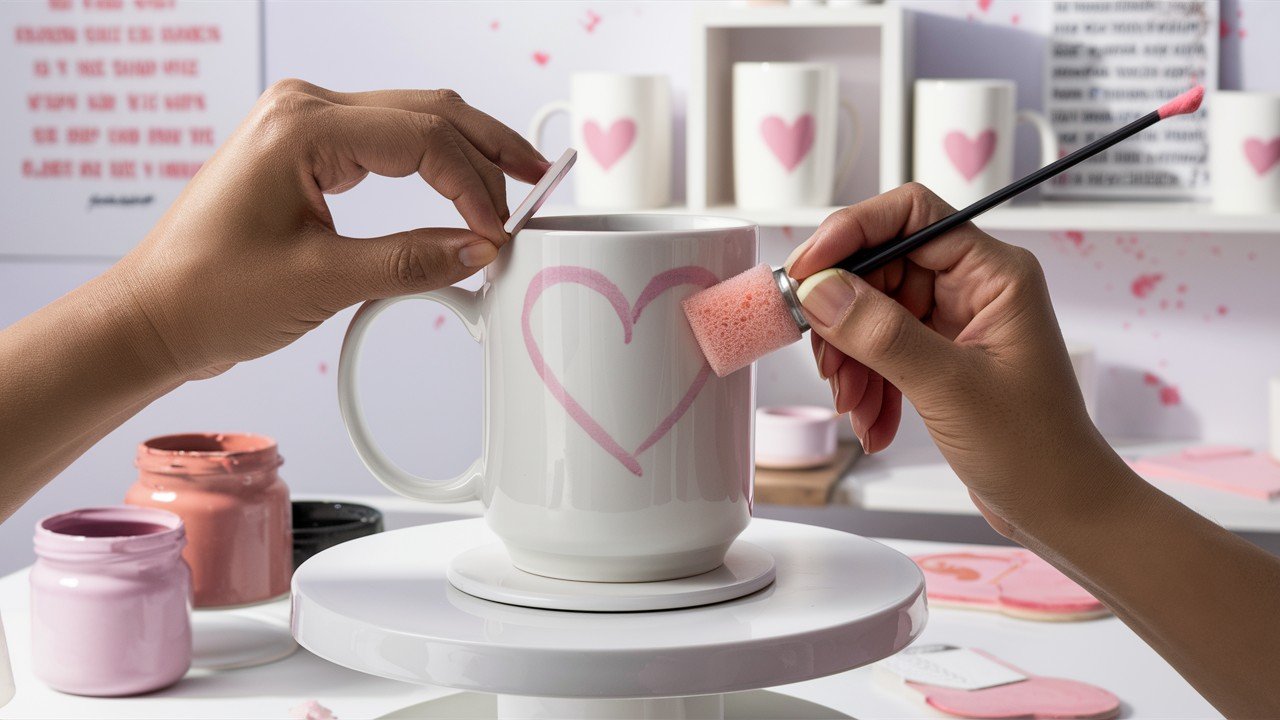
21. Valentine’s Day Hearts & Roses

Romantic designs for the love holiday. Pink and red work beautifully together.
Heart variations: Simple outlines, filled shapes, or decorative patterns inside hearts.
Rose techniques: Simple five-petal flowers or more detailed layered petals. Keep proportions manageable.
Romantic colors: Deep reds, soft pinks, cream whites. Add gold accents for elegance.
Message ideas: Paint “Love,” “XOXO,” or names alongside heart and rose designs.
Kid-Friendly Pottery Painting Ideas
These designs are perfect for little hands and big imaginations.
22. Animal Faces on Mugs or Bowls
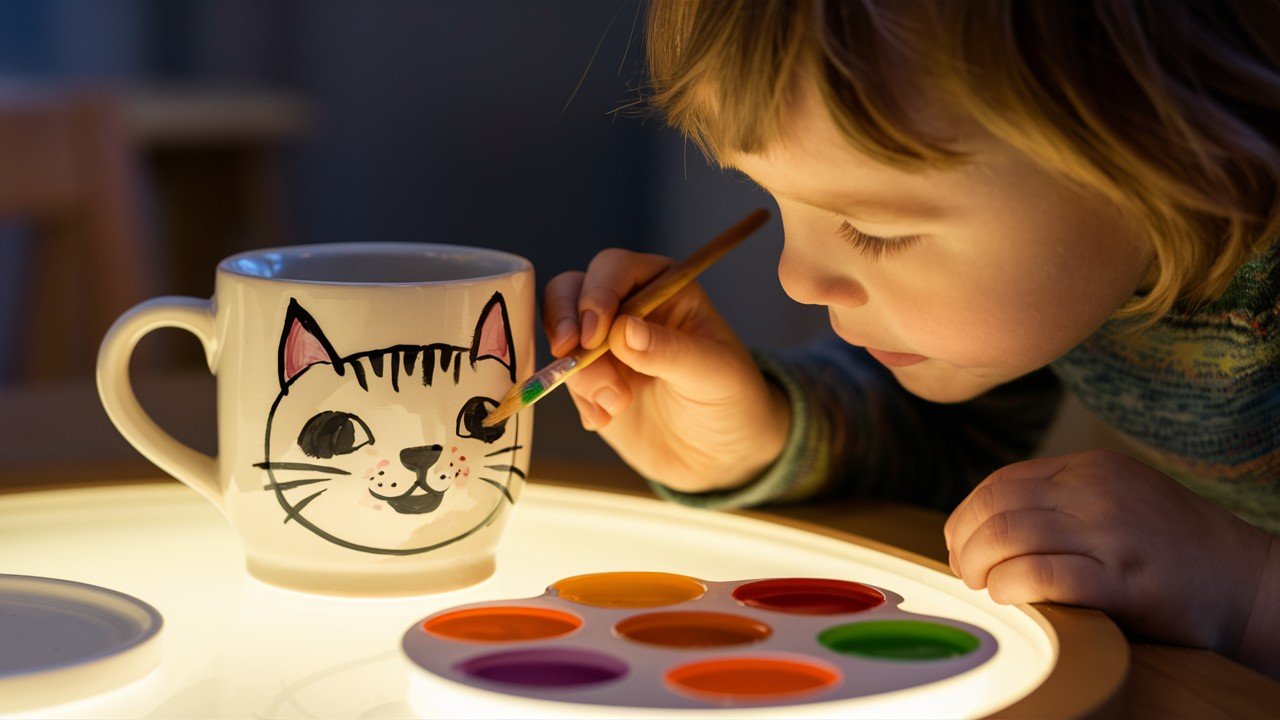
Paint cute cat, dog, or bear faces. Use simple shapes and bold colors.
Getting started: Draw basic circles for heads, triangles for ears, ovals for noses. Keep shapes large and simple.
Kids can drink from their favorite animal friend. Makes mealtime more fun and engaging.
Easy animals: Cats (triangular ears, whiskers), dogs (floppy ears, wet noses), bears (round ears, friendly smiles).
Color choices: Bright, cheerful colors kids love. Orange cats, brown dogs, black and white pandas.
23. Superhero Logos

Batman, Superman, or Spider-Man symbols are always popular. Keep designs simple but recognizable.
Logo basics: Focus on main shapes – Batman’s bat, Superman’s S, Spider-Man’s web pattern.
Bold colors: Use primary colors kids recognize. Yellow and black for Batman, red and blue for Superman.
Size matters: Make logos big enough to see clearly. Fill most of the mug or plate surface.
Personal touch: Let kids choose their favorite superhero. Creates ownership and pride in their artwork.
24. Dinosaur Tracks and Bones
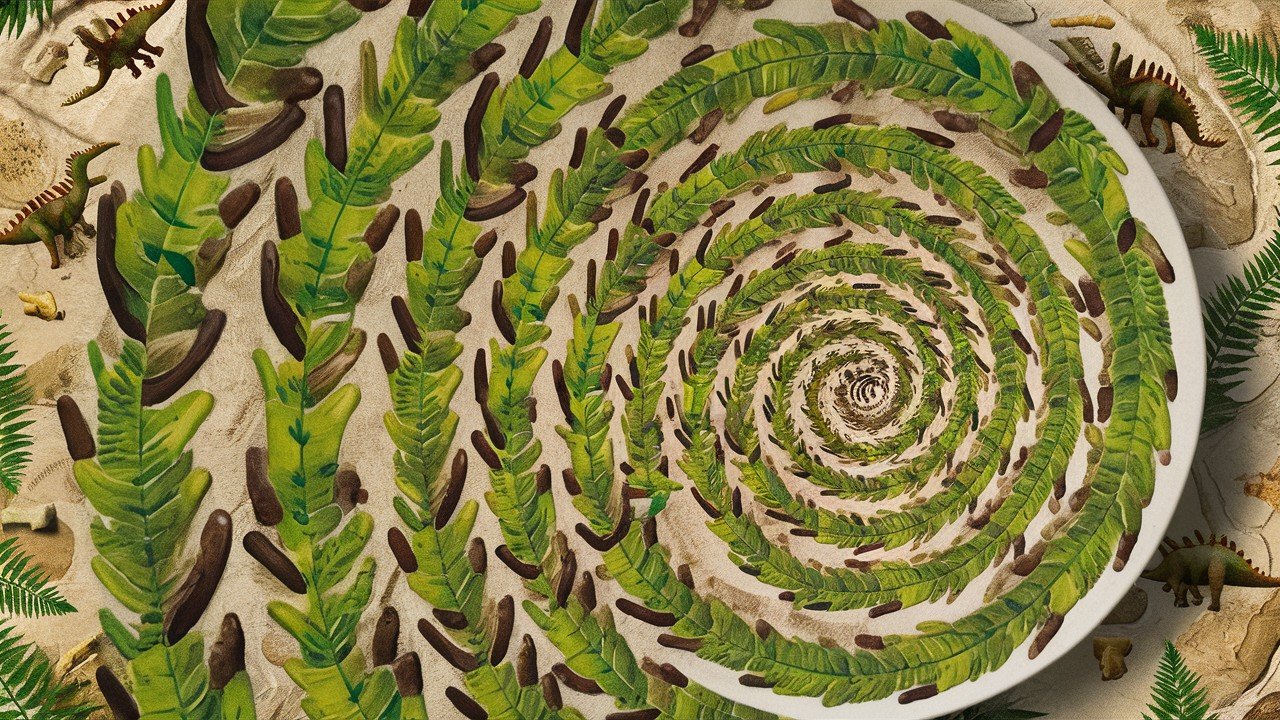
Paint dinosaur footprints marching around a plate. Add fossil bones for extra detail.
Track patterns: Three-toed prints for meat-eaters, round prints for plant-eaters. Vary sizes for different dinosaurs.
Every kid loves dinosaurs! Taps into natural fascination with prehistoric creatures.
Bone shapes: Simple long bones, curved ribs, or skull outlines. Keep details basic but recognizable.
Storytelling element: Arrange tracks to tell a story. Where was the dinosaur going? What was it doing?
25. Rainbow and Unicorn Themes
Magical rainbows with sparkly unicorns create pure joy. Use lots of bright colors.
Rainbow technique: Paint curved stripes in color order – red, orange, yellow, green, blue, purple.
Unicorn features: Horse shape with single horn, flowing mane, maybe wings for extra magic.
Sparkle effects: Add dots of glitter paint or metallic accents. Kids love anything that shines.
Color explosion: Use every bright color available. More is definitely more with this design.
26. Space Planets and Rocket Ships
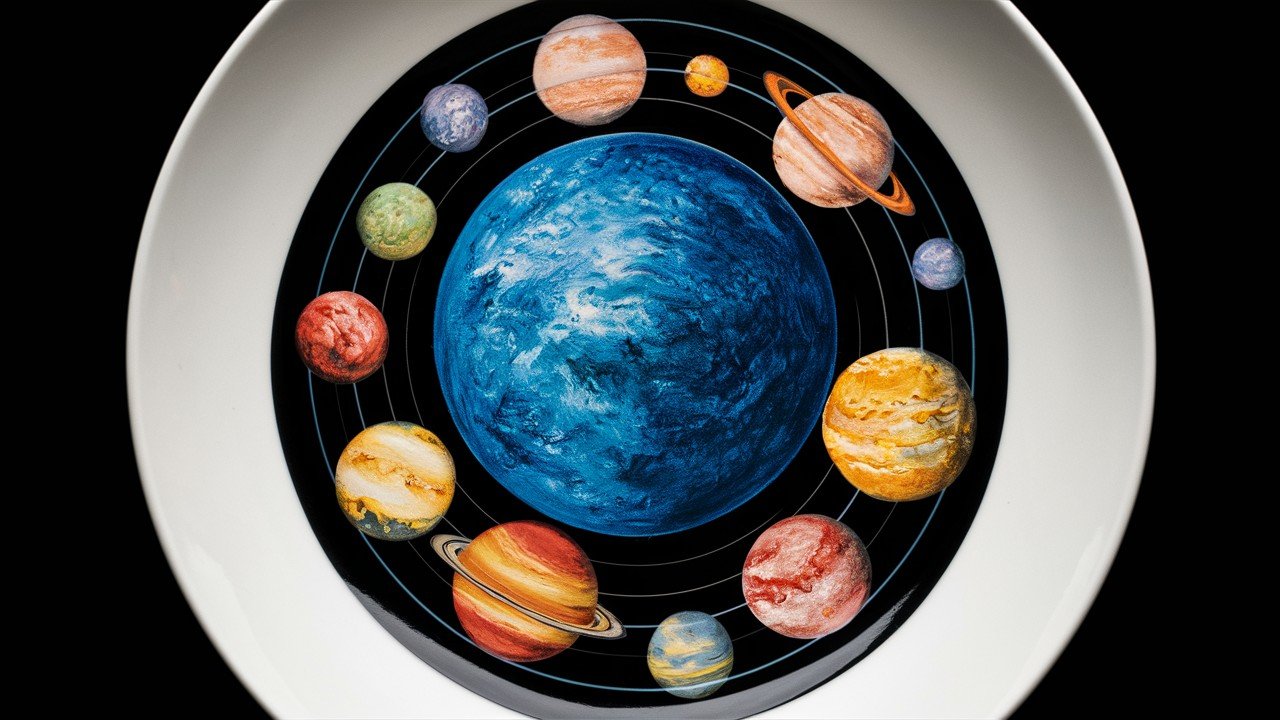
Explore the galaxy on pottery. Paint colorful planets with zooming rocket ships.
Planet variety: Different sizes and colors. Jupiter’s stripes, Saturn’s rings, Mars’ red surface.
Add silver stars for the full space effect. Use white paint or metallic silver pens.
Rocket designs: Classic pointy nose, fins, flame trails. Keep shapes simple but dynamic.
Space exploration: Creates stories about exploring new worlds. Encourages imagination and wonder.
Functional Pottery with Creative Patterns
These designs combine beauty with everyday use.
27. Minimalist Dots on a Coffee Mug
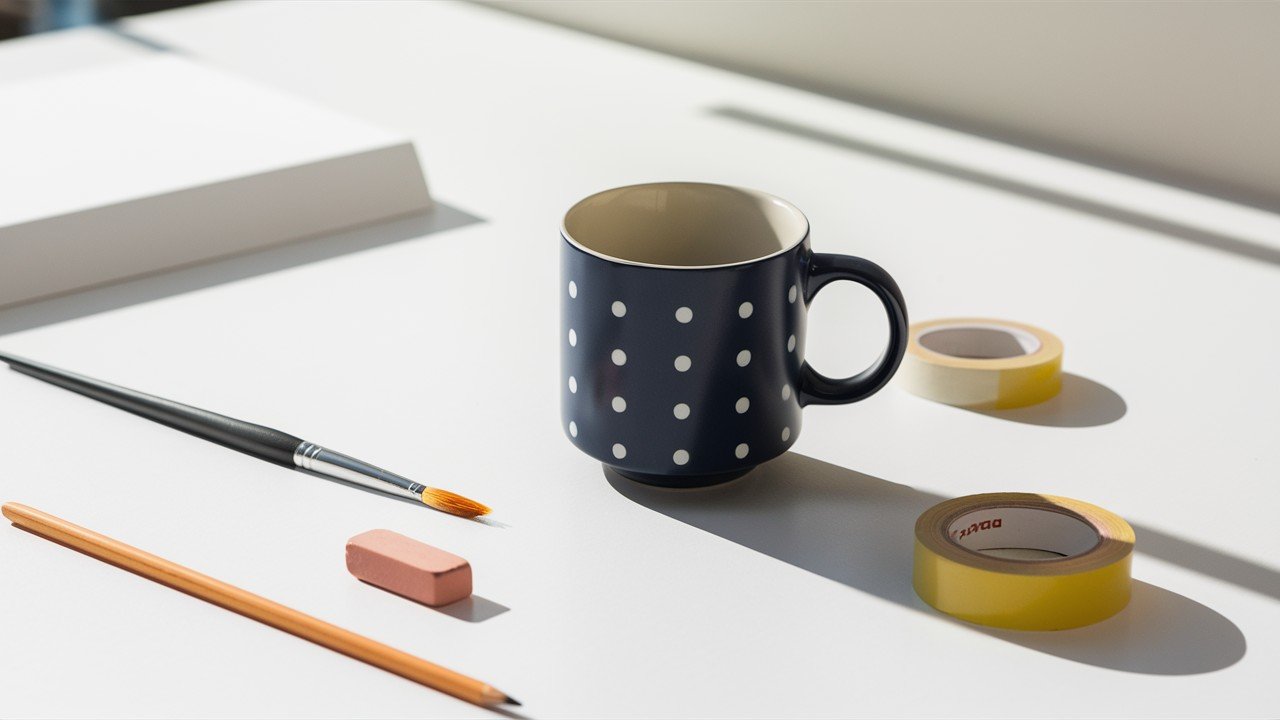
Simple white dots on colored mugs look modern and clean.
Dot placement: Space evenly around the mug or create random clusters. Use a pencil eraser for perfect circles.
Less is more with this clean design. Perfect for modern kitchen style.
Color combinations: White dots on navy blue, black dots on cream, gold dots on forest green.
Professional tip: Use painter’s tape to mask straight lines if you want geometric dot patterns.
28. Checkerboard Salad Plate
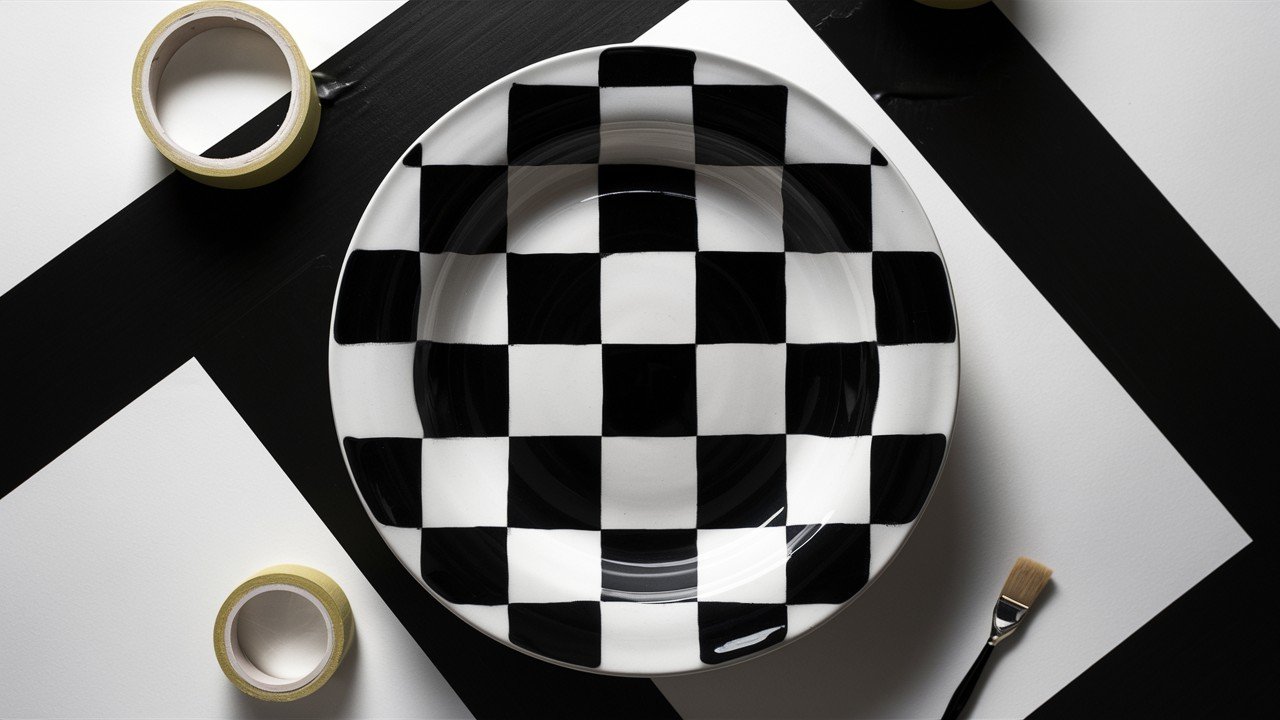
Alternate colored squares create a classic pattern. Use contrasting colors for the best effect.
Square method: Use painter’s tape to create perfect squares. Remove tape while paint is slightly wet.
Game board appeal: Reminds people of chess or checkers. Creates conversation at dinner parties.
Color pairs: Black and white for classic look, red and cream for vintage feel, blue and yellow for cheerful vibe.
Pattern precision: Keep squares the same size. Measure the first square, then use it as a template for others.
29. Abstract Faces on a Trinket Dish
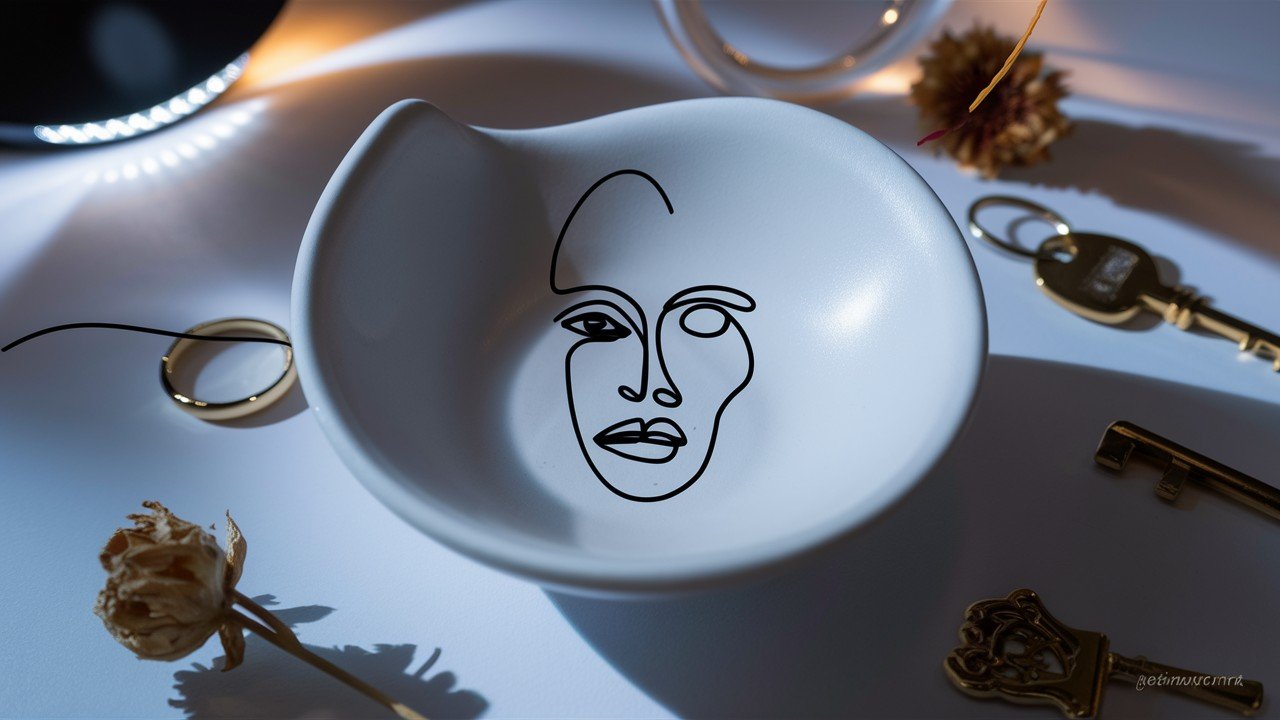
Paint simple line-art faces. These look artistic and modern.
Face basics: Continuous line drawings work best. Don’t lift brush while drawing facial features.
Perfect for holding jewelry or keys. Functional art for your dresser or entryway.
Style inspiration: Picasso-like abstractions, modern minimalist portraits, or whimsical cartoon faces.
Line weight: Vary thickness for interest. Thick lines for main features, thin lines for details.
30. Brushstroke Bowls with Gold Accents
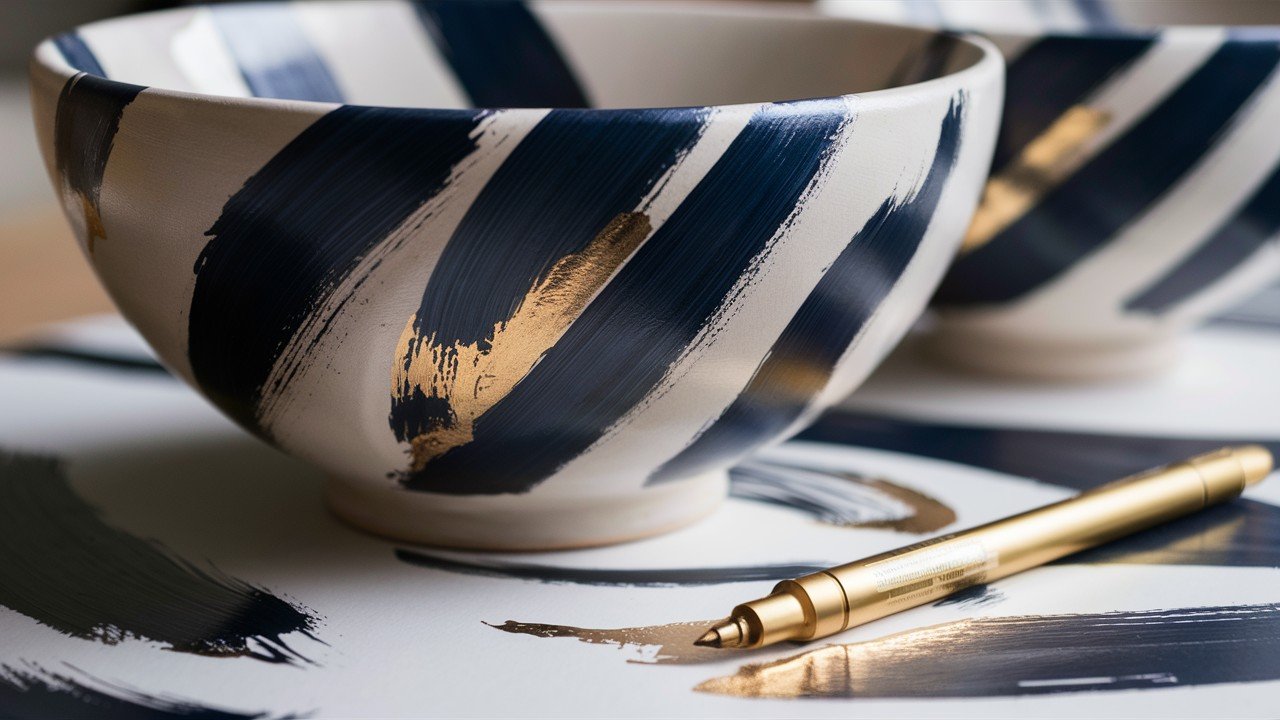
Bold brushstrokes in your favorite color, highlighted with gold paint.
Brushstroke technique: Use a wide, flat brush. Make confident, flowing movements. Don’t overthink the strokes.
Gold adds luxury to any design. Apply after the base color dries completely.
Color base: Choose one main color per bowl. Deep blues, rich greens, or warm terracotta work beautifully.
Gold application: Use metallic paint pen for precise lines, or small brush for painted accents.
31. Quote or Pun Mugs (e.g. “Mug Life”)
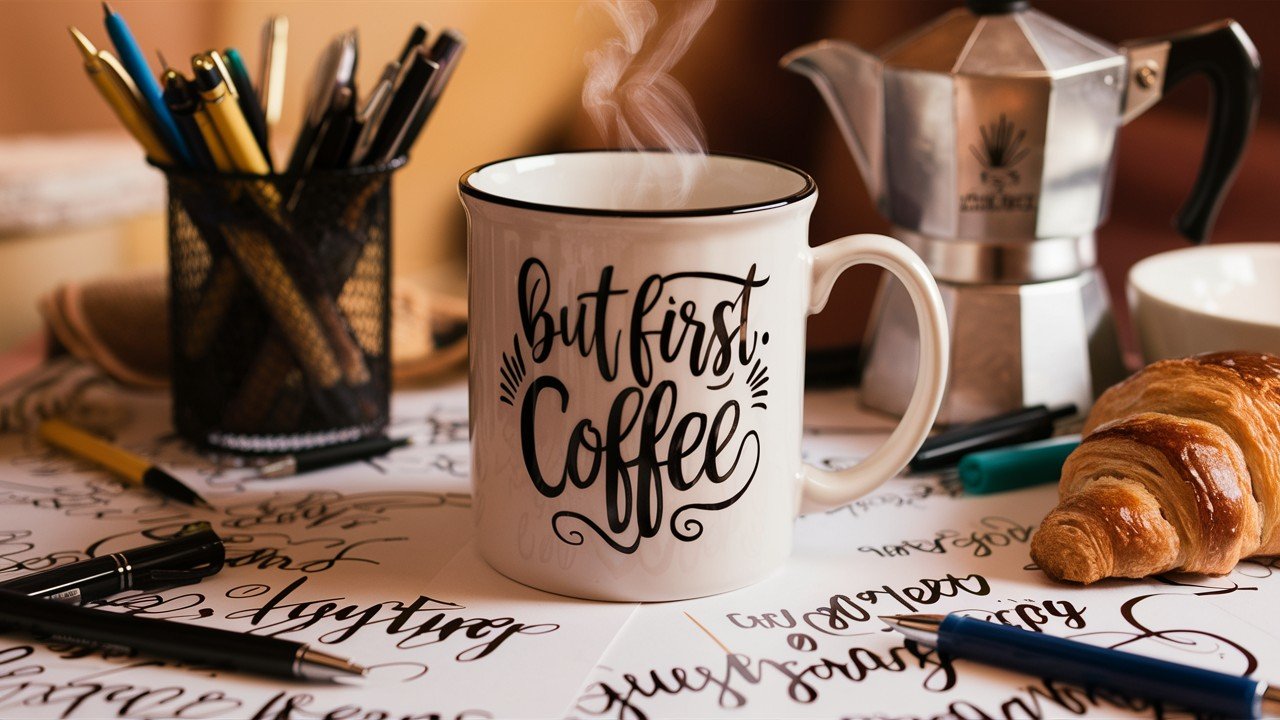
Funny sayings make every sip enjoyable. Choose quotes that make you smile.
Letter spacing: Practice on paper first. Keep letters consistent size and spacing for professional look.
Popular options: “But first, coffee” or “Tea-rific day ahead!” Choose phrases that match your personality.
Font styles: Block letters for bold impact, script for elegance, or hand-lettered for personal touch.
Design balance: Center text or create interesting compositions. Add decorative elements around words.
DIY Pottery Gifts & Keepsakes
Create meaningful presents that people will treasure forever.
32. Name and Date Keepsake Plates
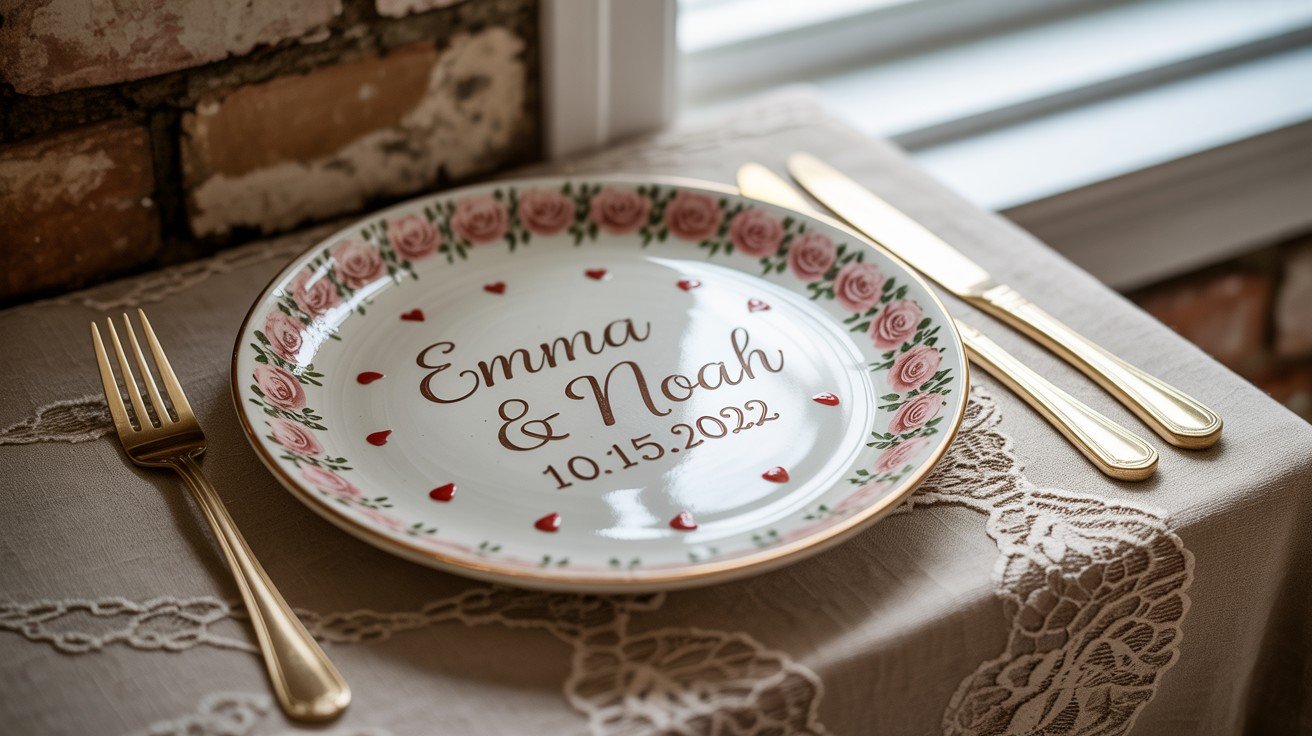
Paint important dates and names. Perfect for anniversaries or special occasions.
Information to include: Wedding dates, birth dates, graduation years, or family milestones. Keep text readable.
These become family heirlooms. Pass down through generations as meaningful treasures.
Font choices: Elegant script for weddings, playful letters for kids’ birthdays, classic block for anniversaries.
Design elements: Add decorative borders, small hearts, or floral accents around the text.
33. “Mom’s Mug” with Handprints
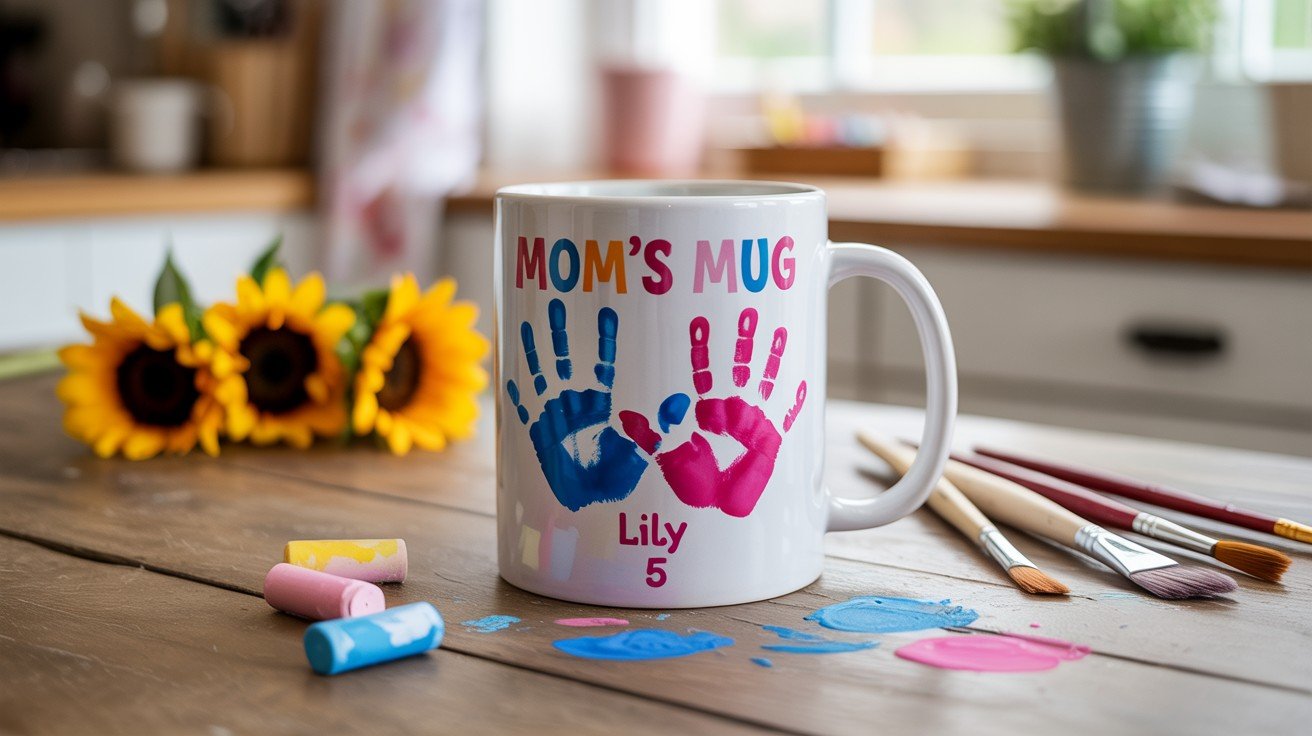
Press little hands in paint, then onto the mug. Add “Mom’s Mug” text.
Handprint technique: Use washable paint for safety. Press hand firmly, lift straight up to avoid smudging.
Mothers cherish these forever. Nothing beats a child’s handprint for sentimental value.
Age progression: Make new ones each year to show growth. Creates beautiful collections over time.
Text placement: Add child’s name and age alongside handprints. Include date for future reference.
34. Matching Couple Mugs
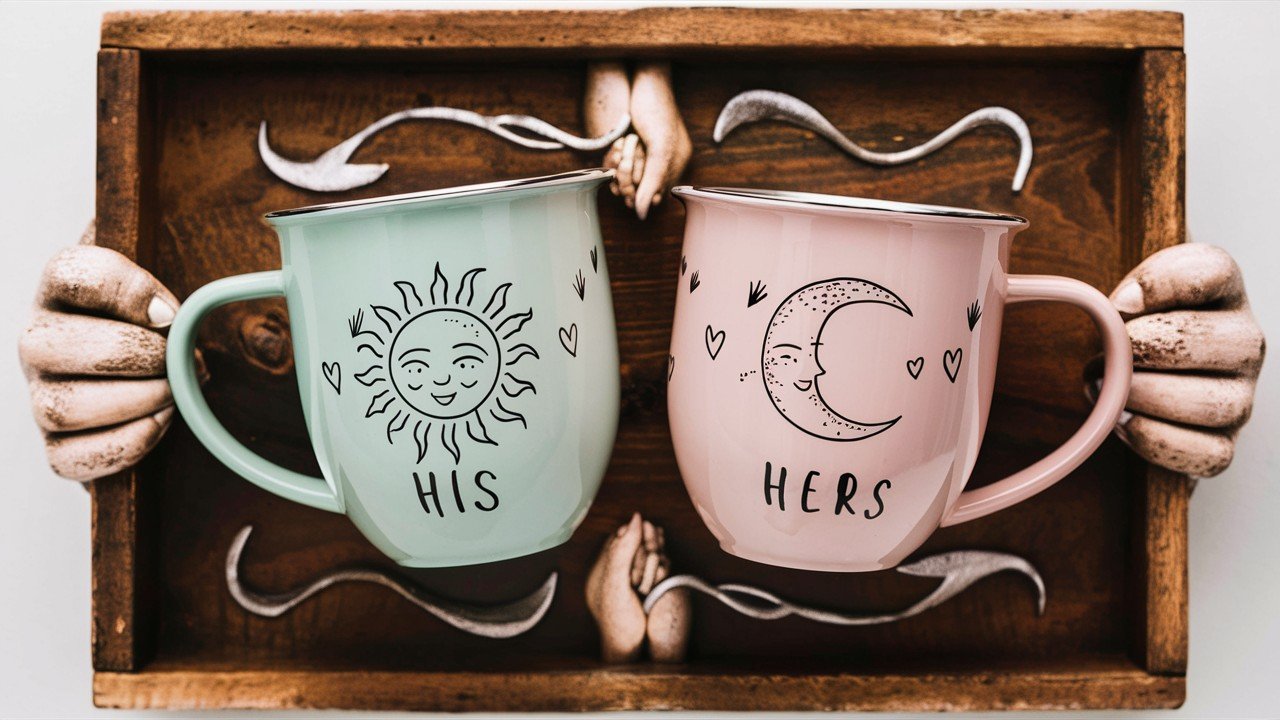
Paint “His” and “Hers” designs that complement each other. Use shared themes or colors.
Design connections: Puzzle pieces that fit together, sun and moon, coffee and cream themes.
Color coordination: Use the same color palette but different patterns. Creates unity while maintaining individuality.
Personal touches: Include inside jokes, favorite quotes, or meaningful symbols from your relationship.
Gift timing: Perfect for weddings, anniversaries, or Valentine’s Day. Shows thoughtfulness and effort.
35. Baby Footprint Bowls
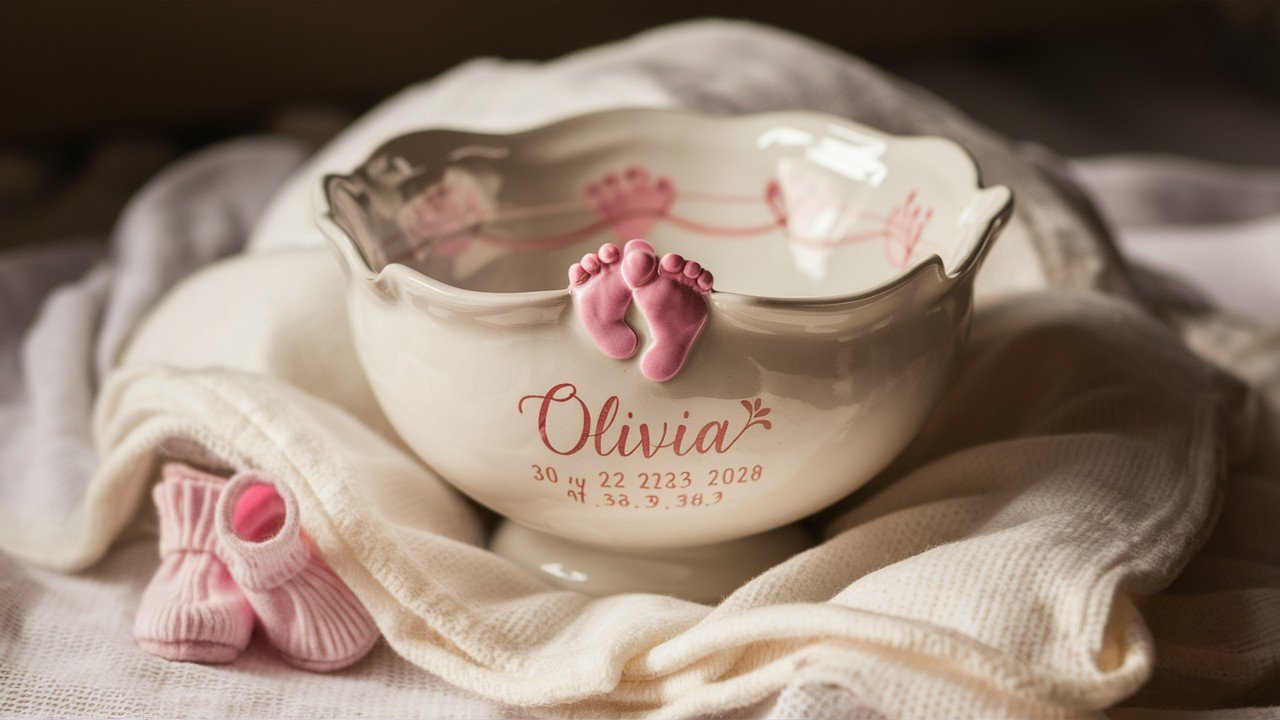
Capture tiny footprints on small bowls. Include the baby’s name and birth date.
Footprint method: Use non-toxic paint. Press the baby’s foot gently, work quickly before they wiggle.
New parents love these keepsakes. Captures precious moments in time that’s gone too quickly.
Size considerations: Use small bowls perfect for baby’s first foods. Makes practical yet sentimental gifts.
Information details: Add birth weight, length, time of birth for complete keepsake record.
36. Wedding Ring Dish with Initials
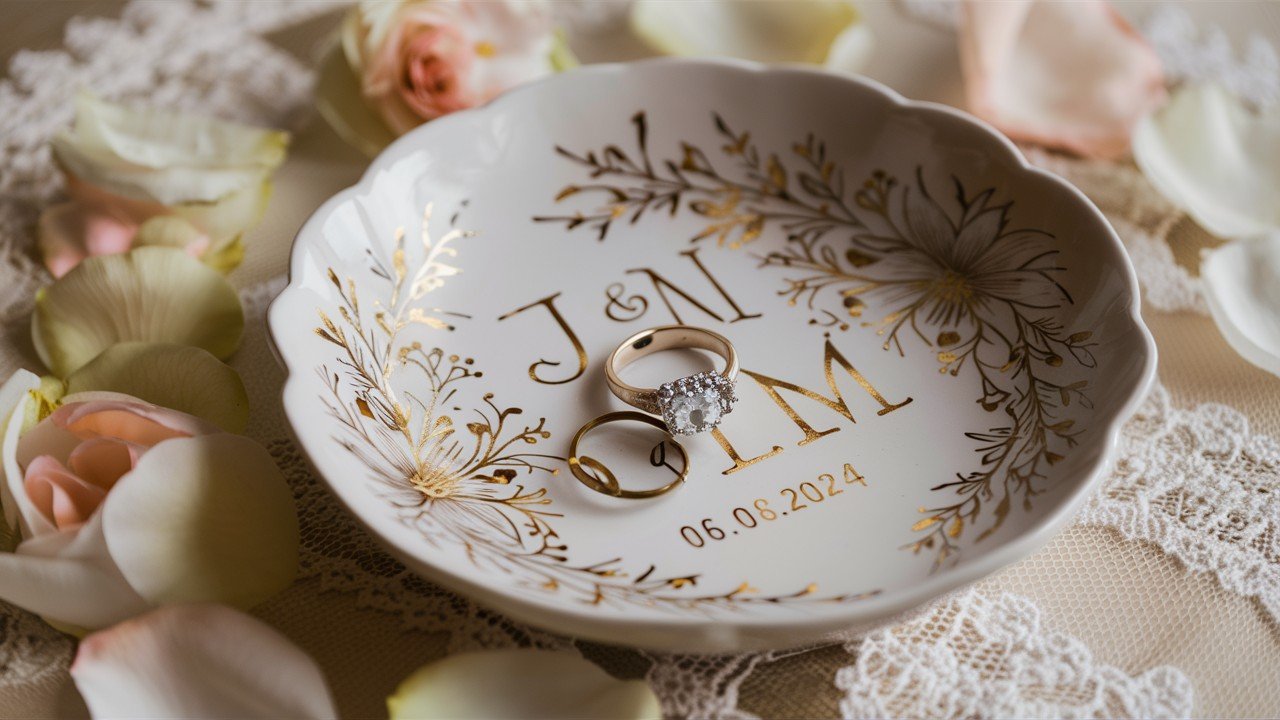
Paint the couple’s initials with their wedding date. Perfect for holding rings safely.
Initial styles: Intertwined letters, separate monograms, or combined family crest designs.
Functional beauty: Small dish size perfect for nightstand or bathroom counter. Prevents lost rings.
Wedding colors: Use the bride’s chosen color palette. Coordinates with wedding themes and home decor.
Special additions: Add small hearts, wedding date, or “Mr. & Mrs.” text around the initials.
Trendy & Artistic Pottery Painting Styles
Stay current with these modern pottery painting techniques.
37. Terrazzo-Inspired Paint Splatter

Flick different colored paints for a terrazzo stone effect. Seal with a clear coat when dry.
Splatter technique: Load brush with paint, flick wrist to create random spots. Use multiple colors for an authentic look.
This trend is everywhere in home decor. Brings expensive stone to affordable pottery.
Color palette: Neutral base (white, cream, gray) with colorful speckles (pink, green, blue, gold).
Protective measures: Cover the work area completely. Wear old clothes. This technique gets messy but worth it.
38. Mandala Dot Painting
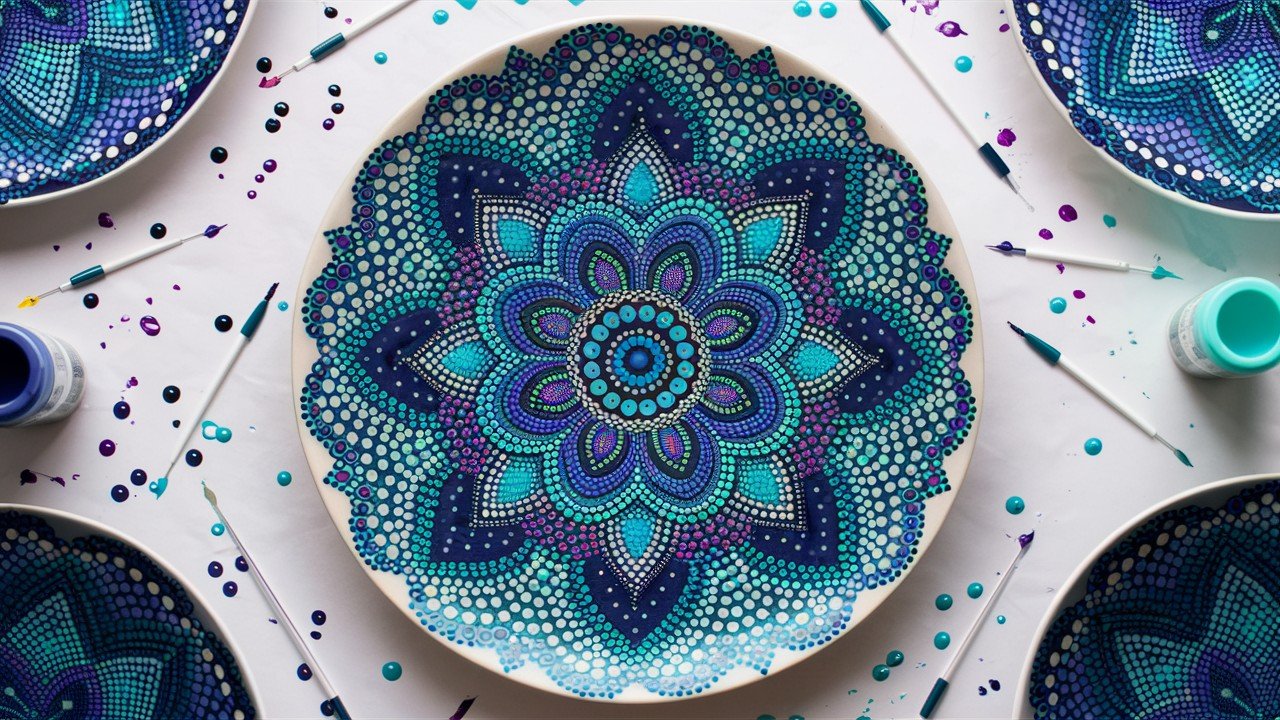
Create intricate patterns using only dots. Start from the center and work outward.
Dot tools: Use cotton swabs, pencil erasers, or special dotting tools. Different sizes create texture.
Very meditative and relaxing to paint. Repetitive motion calms the mind and reduces stress.
Pattern building: Begin with center dot, add ring around it, continue expanding outward in symmetrical patterns.
Color progression: Use one color family with different shades, or create rainbow mandalas with multiple hues.
39. Japanese Wabi-Sabi Brushwork
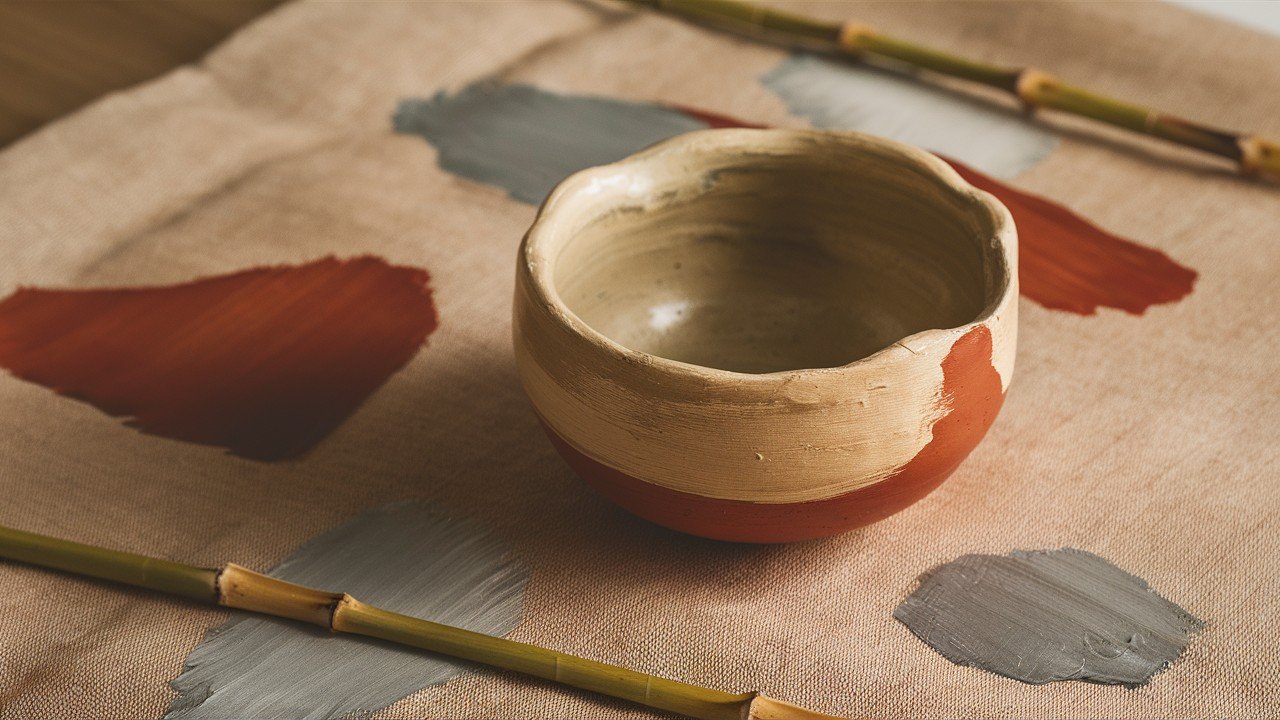
Embrace imperfection with flowing, organic brushstrokes. Use earth tones for authenticity.
Philosophy focus: Wabi-sabi celebrates natural imperfections. Don’t aim for perfect lines or shapes.
Brushstroke freedom: Let brush move naturally. Wide strokes, thin lines, organic curves all work together.
Earth tone palette: Browns, tans, muted greens, soft grays. Colors found in nature work best.
Minimalist approach: Less is more. Leave plenty of white space for a peaceful, zen-like feeling.
40. Metallic Accent Pottery
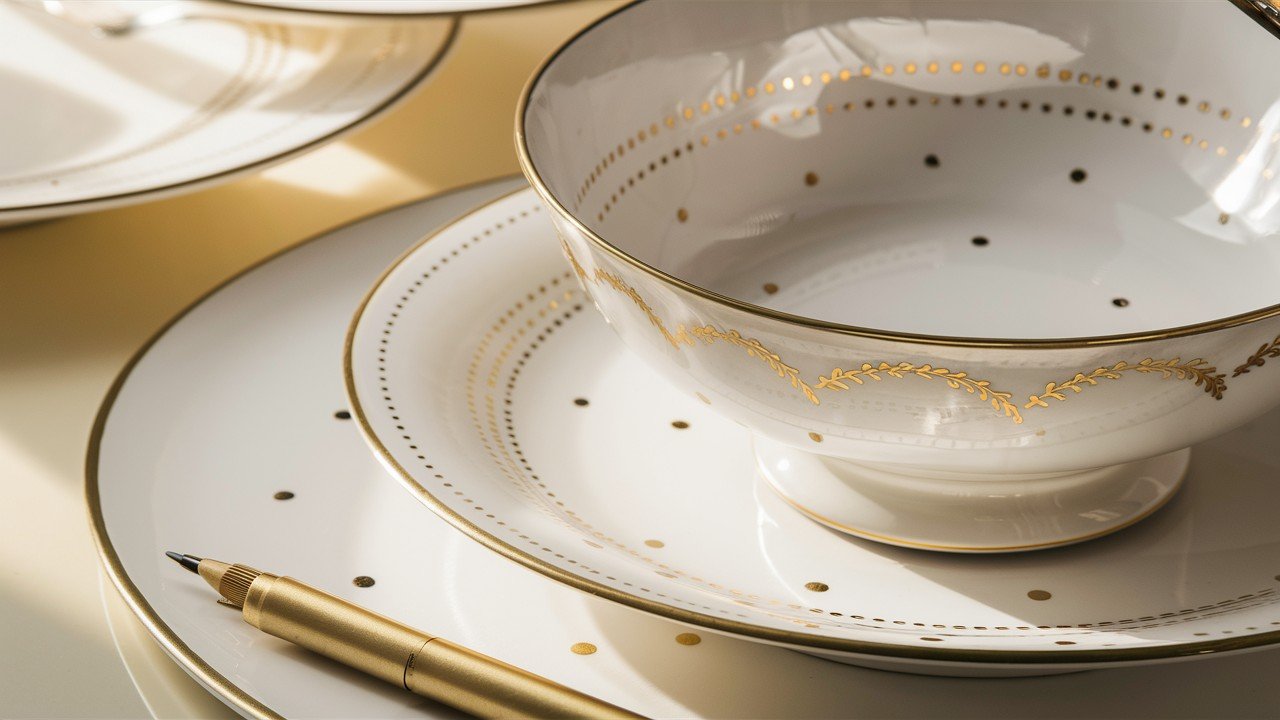
Add gold, silver, or copper accents to any design. Use metallic pens for precise details.
Application timing: Add metallics after base colors dry completely. Prevents muddy mixing.
Metallics make everything feel more luxurious. Instant upgrade to any simple design.
Accent ideas: Rim edges, handle details, small decorative elements, or outline existing patterns.
Metallic types: Gold for warmth, silver for modern feel, copper for rustic charm. Choose based on home decor.
41. Watercolor-Inspired Floral Cups
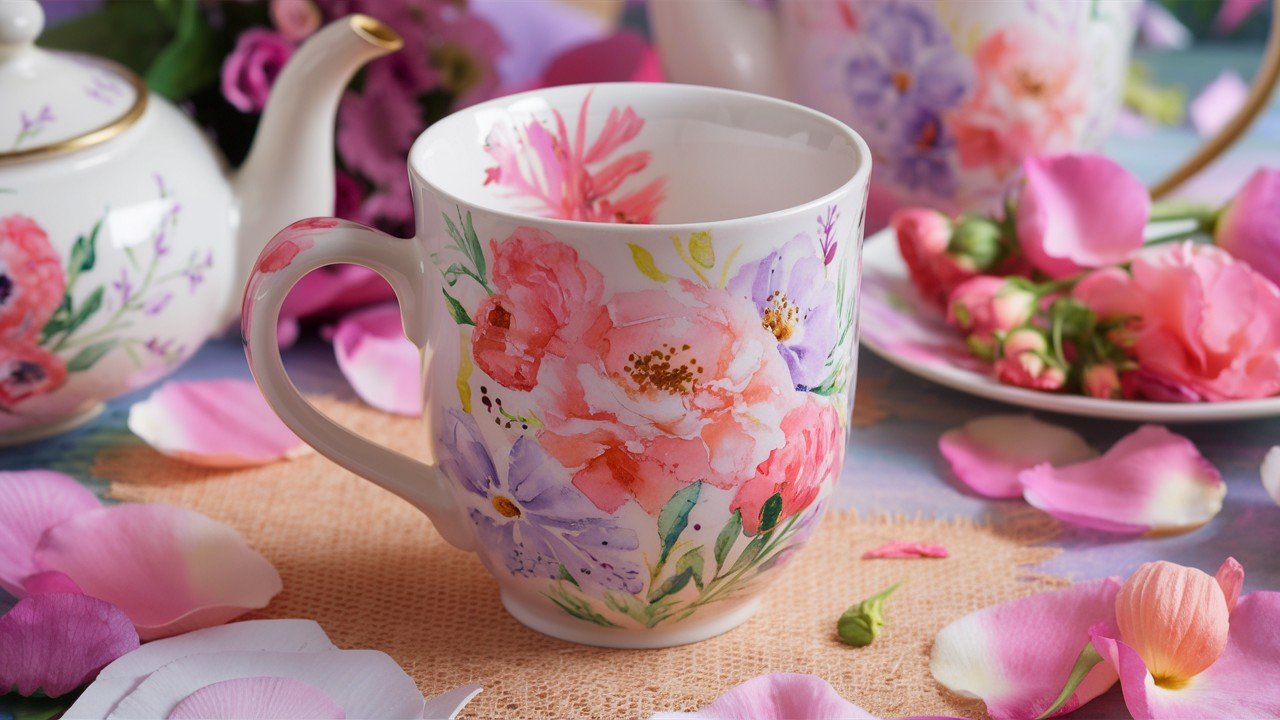
Paint soft, flowing flowers that look like watercolor paintings. Blend colors while wet.
Wet-on-wet technique: Apply clean water first, then drop in paint colors. Watch them blend naturally.
Beautiful for tea cups and mugs. Perfect for garden party vibes or shabby chic decor.
Flower choices: Roses, peonies, wildflowers, or abstract blooms. Keep shapes loose and organic.
Color blending: Use soft pastels that flow together. Pink into purple, yellow into orange, blue into green.
Conclusion
You now have proven pottery painting ideas at your fingertips. Each one tested and designed for real success. Start with beginner techniques if you’re new. They build confidence fast. More experienced? Jump straight to the trendy artistic styles.
Here’s your action plan:
- Pick one design that excites you
- Gather your materials today
- Start with simple shapes like mugs or plates
- Don’t aim for perfection on your first try
Remember this: Every expert was once a beginner. Your first painted piece won’t be your best, but it will be your beginning.
The pottery studio is waiting. Your plain ceramics are ready for transformation. Which idea will you try first?
Stop planning. Start painting. Your creative journey begins now.
Frequently Asked Questions
What paint works best for pottery painting beginners?
Use ceramic acrylic paints designed specifically for pottery. They stick better than regular acrylics and won’t chip off easily.
How long should I wait between paint coats?
Let each layer dry for 15-20 minutes before adding the next coat. Rushing this step causes smudging and uneven colors.
Can I use pottery painting ideas on already glazed ceramics?
Yes, but clean the surface thoroughly with rubbing alcohol first. The paint needs a clean surface to bond properly.
What’s the biggest mistake beginners make with pottery painting?
Using too much paint at once creates thick, messy layers. Apply thin coats and build up colors gradually for professional results.
Do painted pottery pieces need special care when washing?
Hand wash gently with mild soap and avoid scrubbing painted areas. Dishwashers can fade or damage your beautiful artwork over time.